Skills - Configuration changes
Skills are the Celonis automation tool used to implement some of the actions and functionalities of the AR Credit app. The table below shows the list of Skills that are available upon installation of the app.
Skill Name | Used For |
|---|---|
Create Task - Manual Sensor | Creating a task |
Calculate Credit Score | Calls MLWB script to calculate credit scorecard. |
Create Approval Task | Create a new “Credit Approval detail” record, and assign a task to the approver(s). |
Credit Task Approve | For updates to the credit approval process that includes updating the approval status, Tast status update and checking the limits for the approver. |
Generate Credit Review | Calling MLWB to generate a “credit review” on the account. |
Request Dunning Level Change | Creates task for selected user to change the dunning level, Send email notification to the credit analyst, |
Approval Matrix - New | For writing the approval data to the table |
Create Scorecard Parameter Value | For writing data to the table “Scorecard Parameter value” |
Create Scorecard Parameter | For writing data to the table “Scorecard Parameter” |
These skills will need some updates to ensure that they have appropriate permissions and parameters to function properly in the Celonis environment. The section future explains the edits that are required in a particular step in each skill.:
Skill - Create Task(Manual)
The details of modules that need to be updated in the skill are mentioned below.
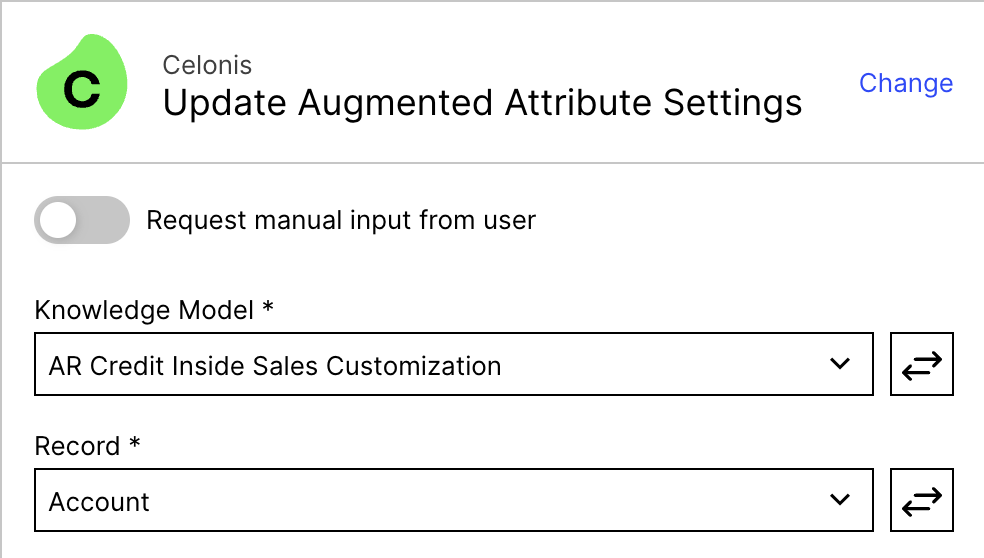
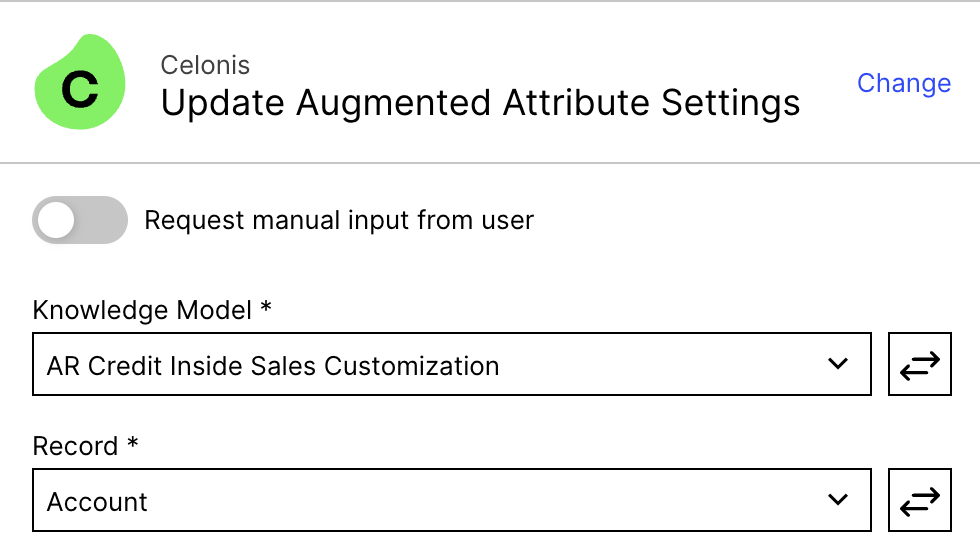
Step 2: Update Augmented Attribute:
Knowledge Model: Select AR Credit Inside Sales Customization as the knowledge model.
Record: Select the Account record from the knowledge model.
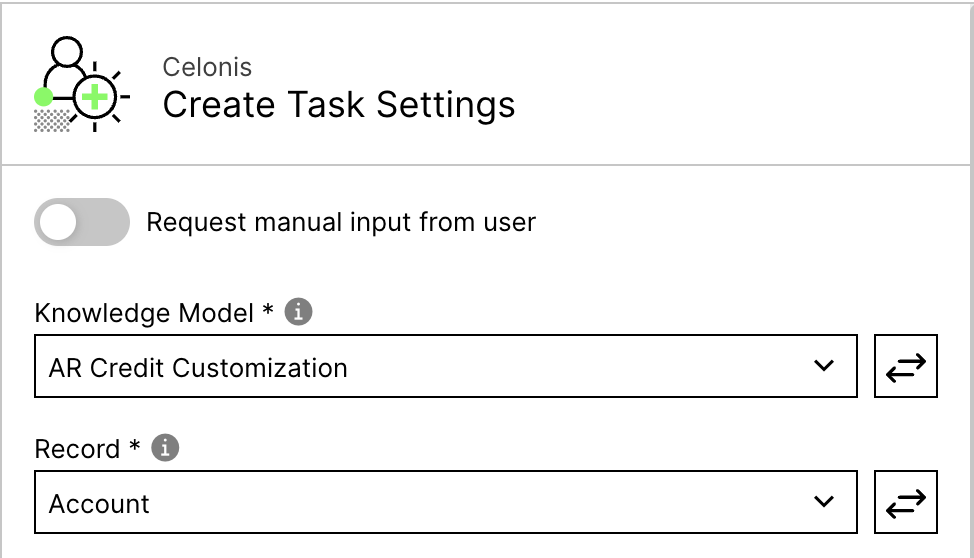
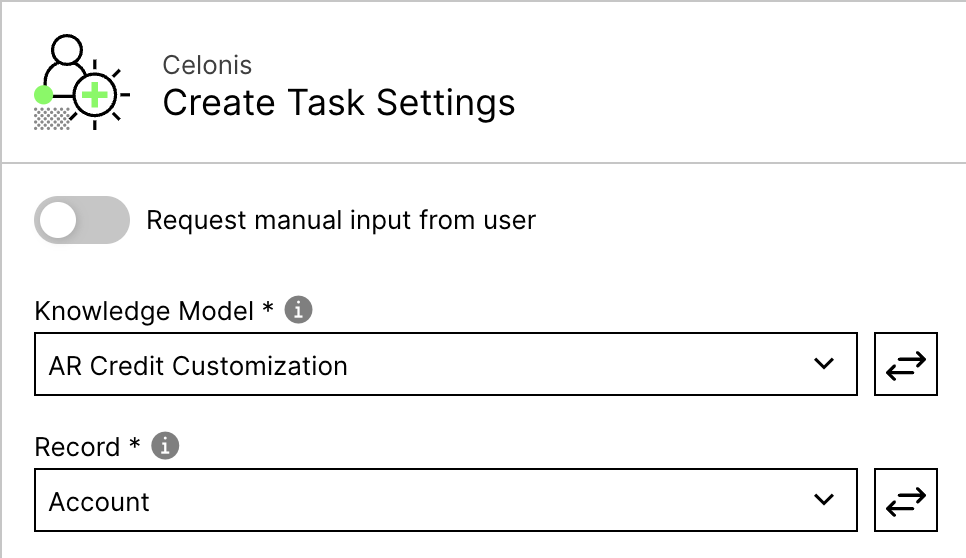
Step 3: Create Task:
Knowledge Model: Select AR Credit Customization as the knowledge model.
Record: Select the Account record from the knowledge model.
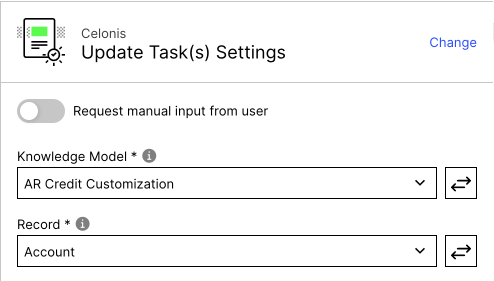
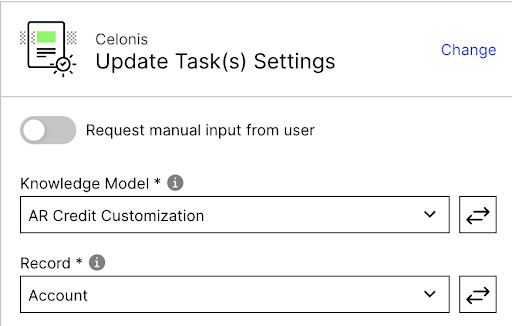
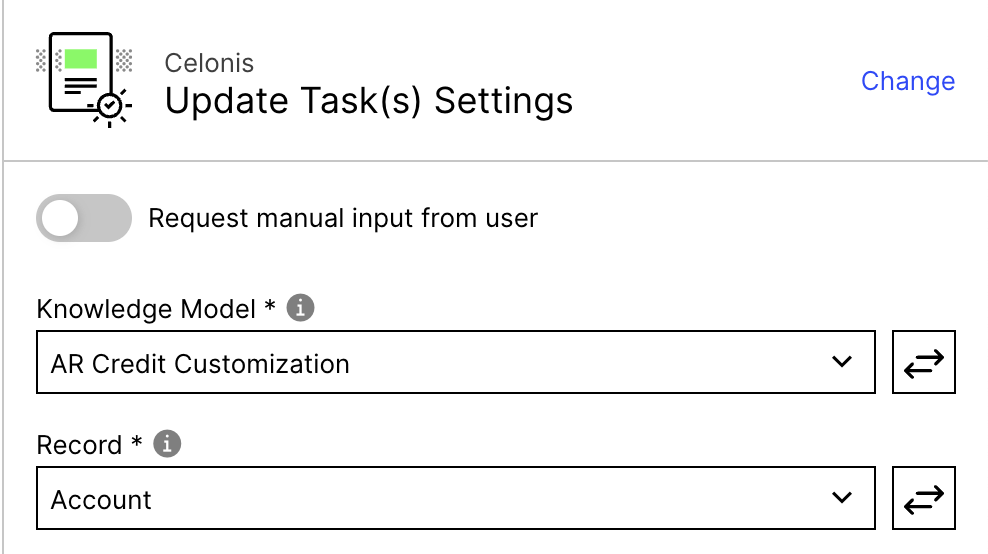
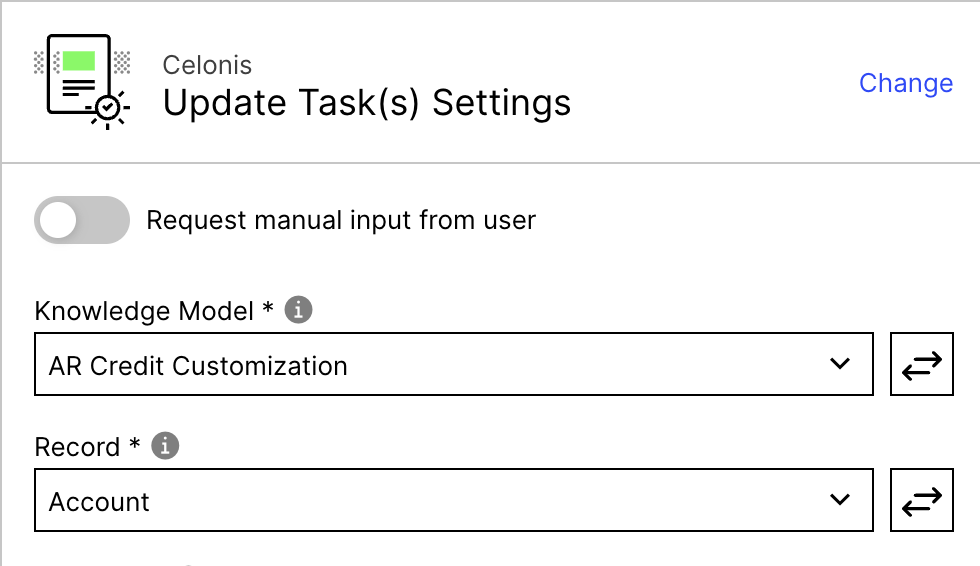
Step 11: Update Task(s):
Knowledge Model: Select AR Credit Customization as the knowledge model.
Record: Select the Account record from the knowledge model.
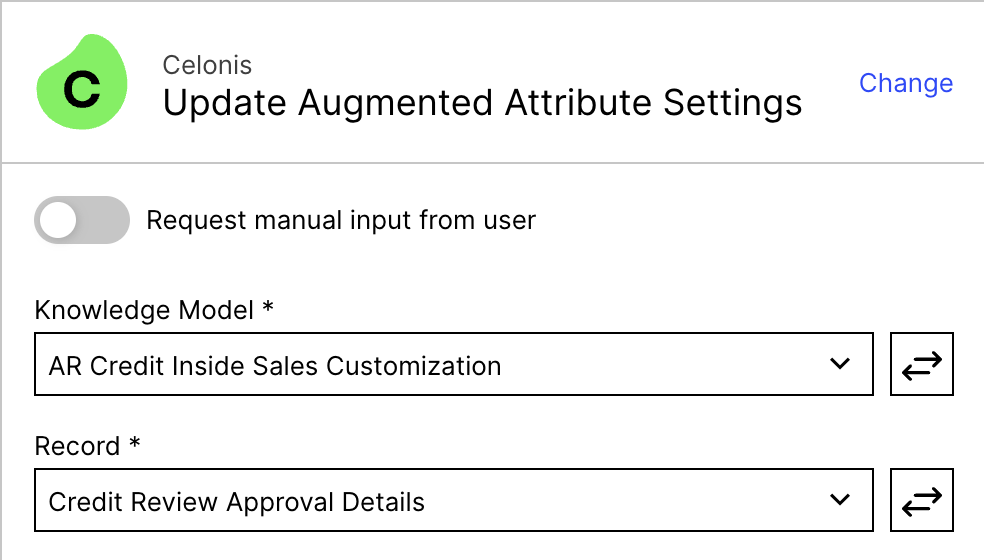
Steps 12, 13, & 14: Update Augmented Attribute
Knowledge Model: Select AR Credit Inside Sales Customization as the knowledge model.
Record: Select the Credit Review Approval Details record from the knowledge model.
Step 6: Update Augmented Attribute
Knowledge Model: Select AR Credit Inside Sales Customization as the knowledge model.
Record: Select the Credit Review record from the knowledge model.

Steps 7, 8, & 9: Update Augmented Attribute
Knowledge Model: Select AR Credit Inside Sales Customization as the knowledge model.
Record: Select the Credit Review Approval Details record from the knowledge model.
Step 10: Update Augmented Attribute
Knowledge Model: Select AR Credit Inside Sales Customization as the knowledge model.
Record: Select the Account record from the knowledge model.
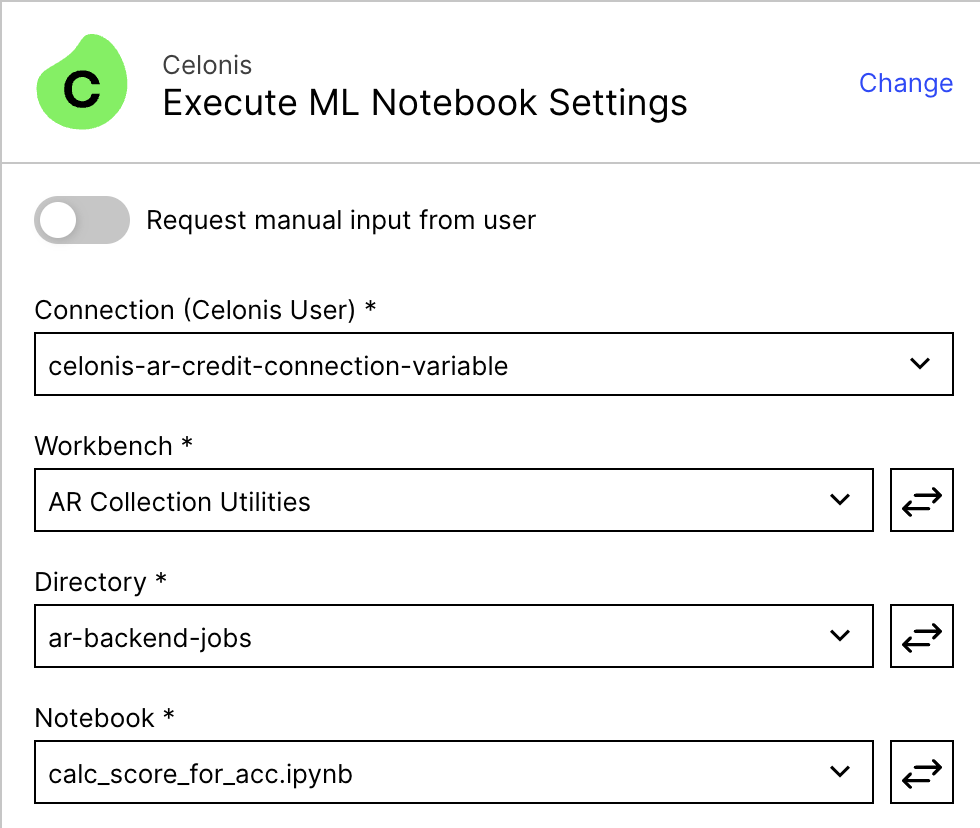
Skill - Calculate Credit Score
Step 2: Execute ML Notebook
Connection: Select the Application Key connection to interact with Celonis. If you do not have an existing connection then you can create one by clicking the “Add” button.
Workbench: Select ML application that you have setup for AR App.
Directory: Select directory ar-backend-jobs from the list.
Notebook: Select calc_score_for_acc.ipynb notebook from the list.
Skill - Create Approval Task
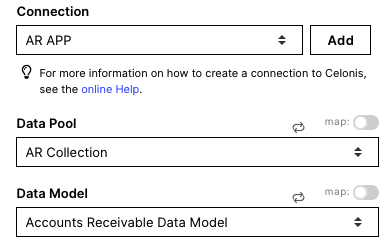
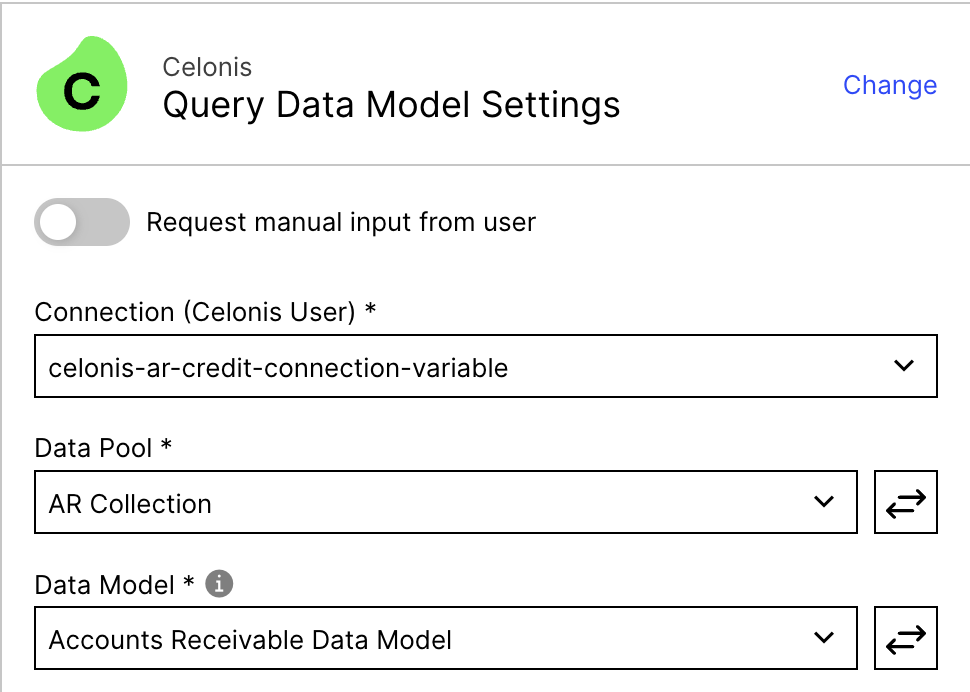
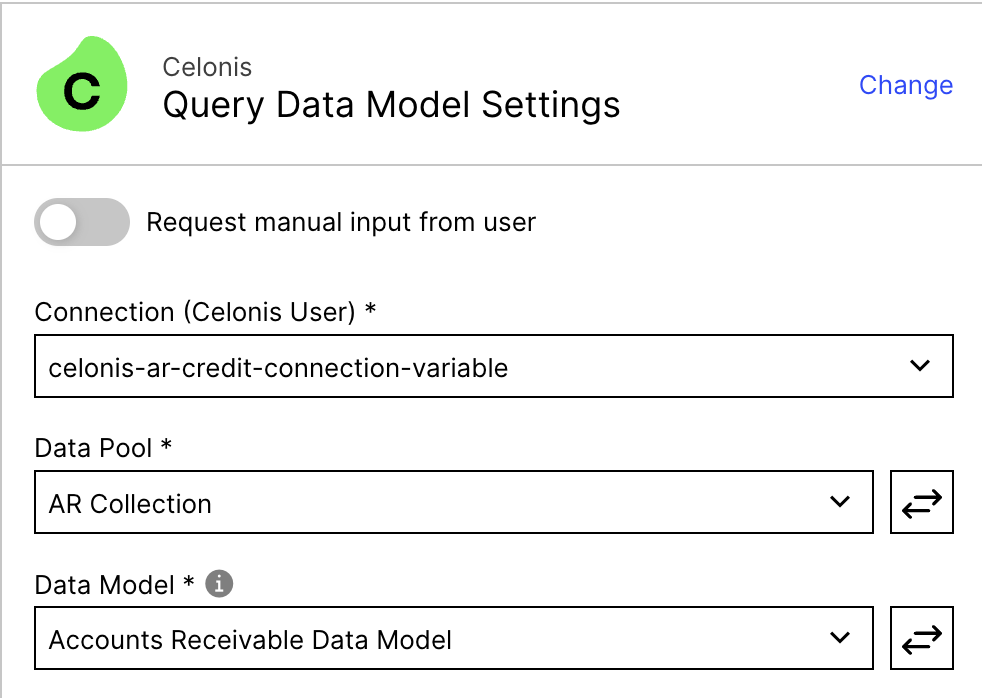
Step 6: Query Data Model
Connection: Select the Application Key connection to interact with Celonis. If you do not have an existing connection then you can create one by clicking the “Add” button.
Data Pool: Select the Data Pool that you created in Step 1.
Data Model: Select Accounts Receivable Data Model as the data model.
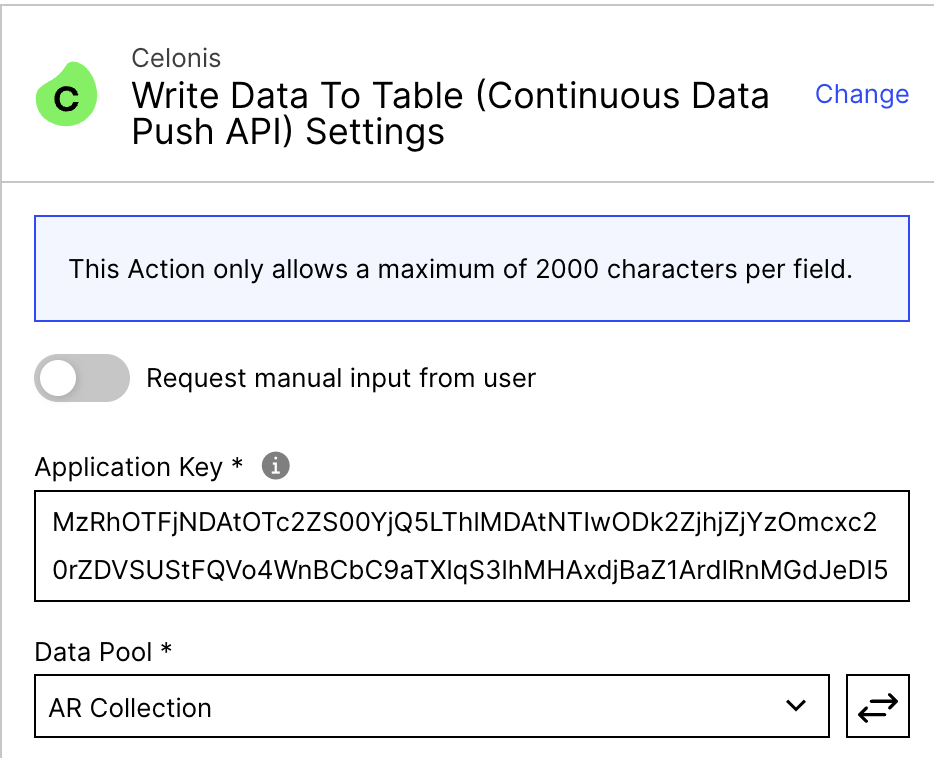
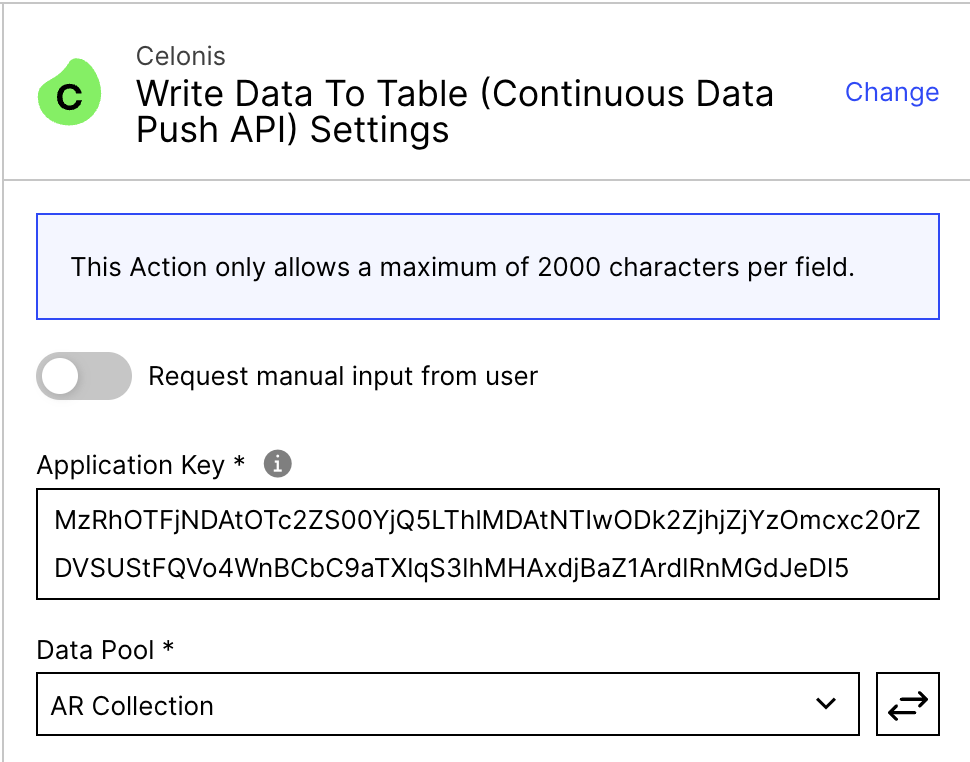
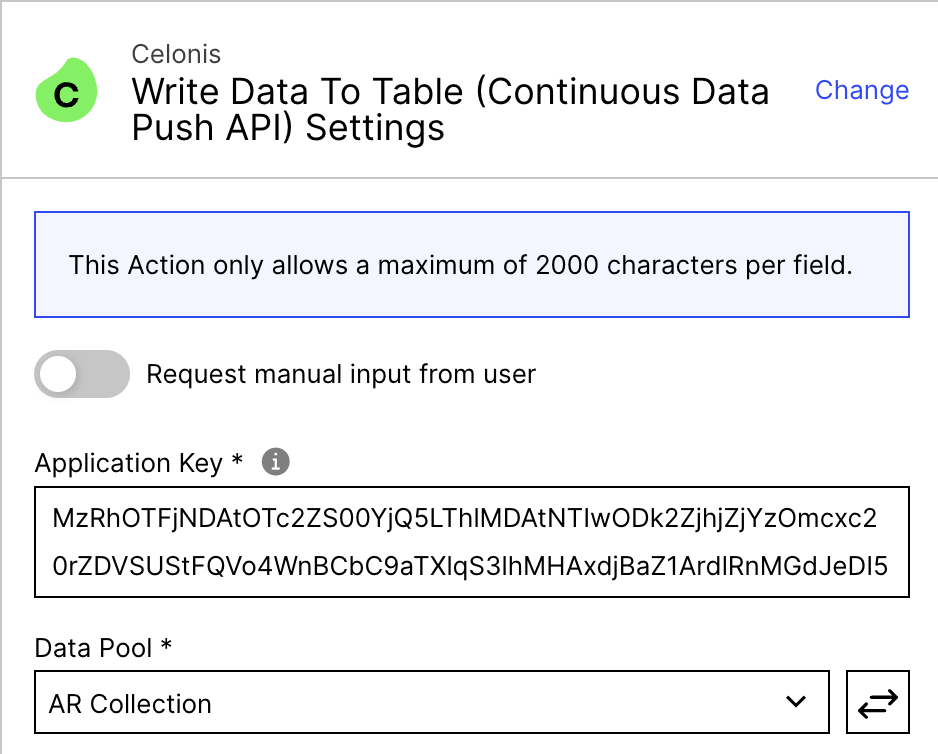
Step 11: Write Data To Table (Continuous Data Push API)
Application Key: Enter the application key that has permission to insert data into the Data Pool.
Data Pool: Select the Data Pool you created in Step 1.
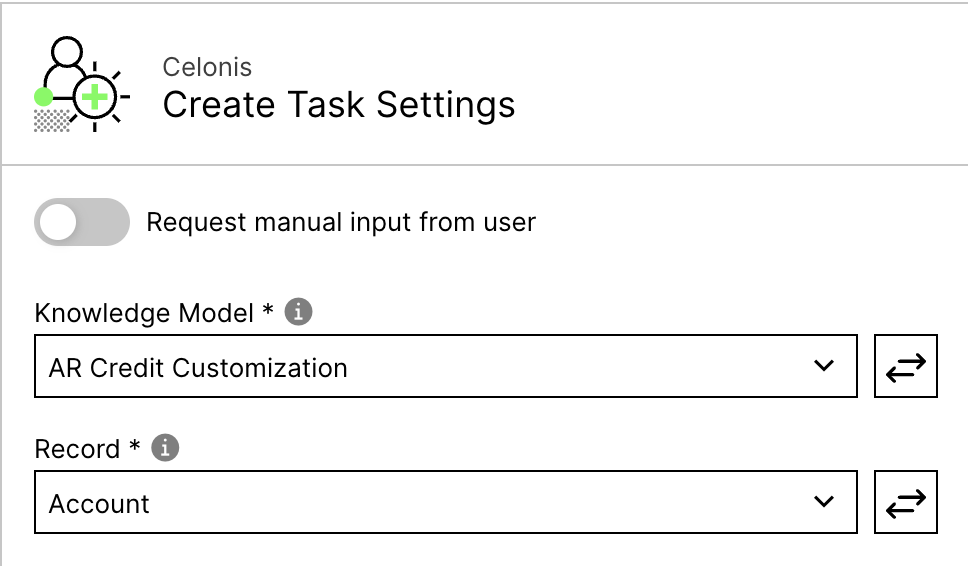
Step 2: Create Task
Knowledge Model: Select AR Credit Customization as the knowledge model.
Record: Select the Account record from the knowledge model.
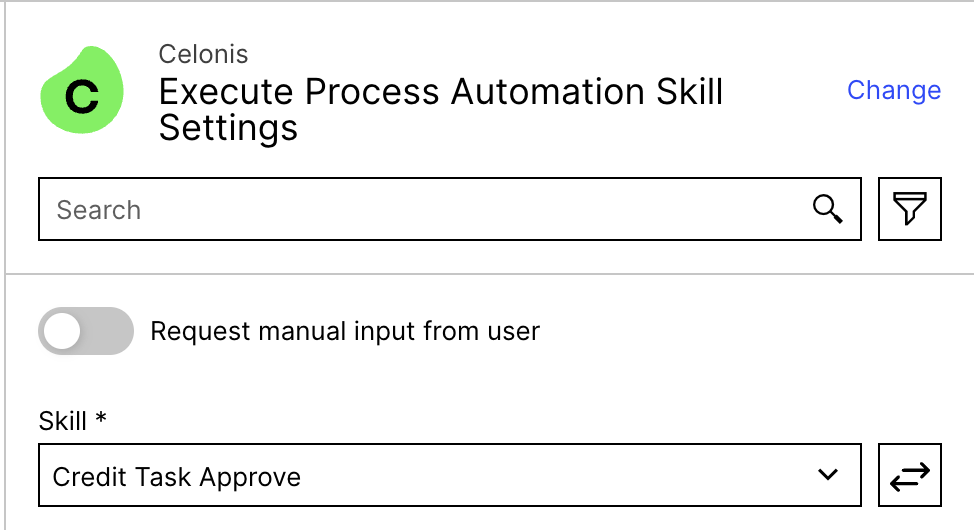
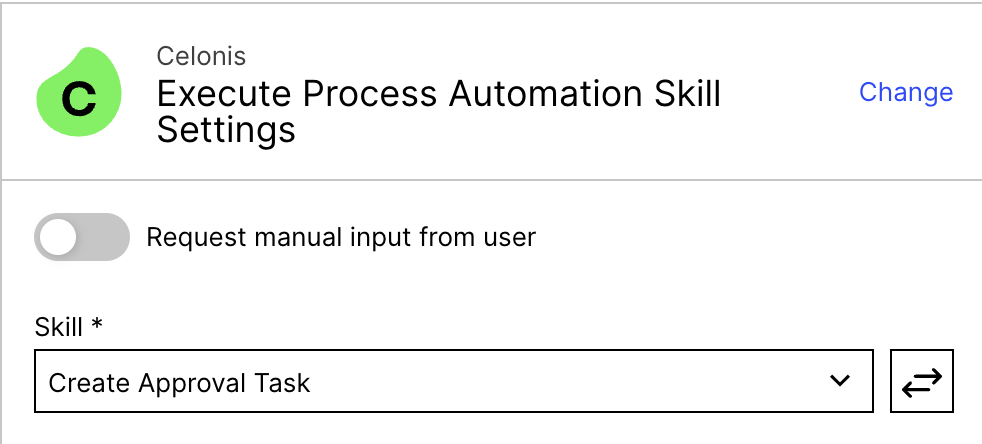
Step 5: Execute Process Automation Skill
Skill: Select Credit task Approve from the list
Step 16: Update Task(s)
Knowledge Model: Select AR Credit Customization as the knowledge model.
Record: Select the Account record from the knowledge model.
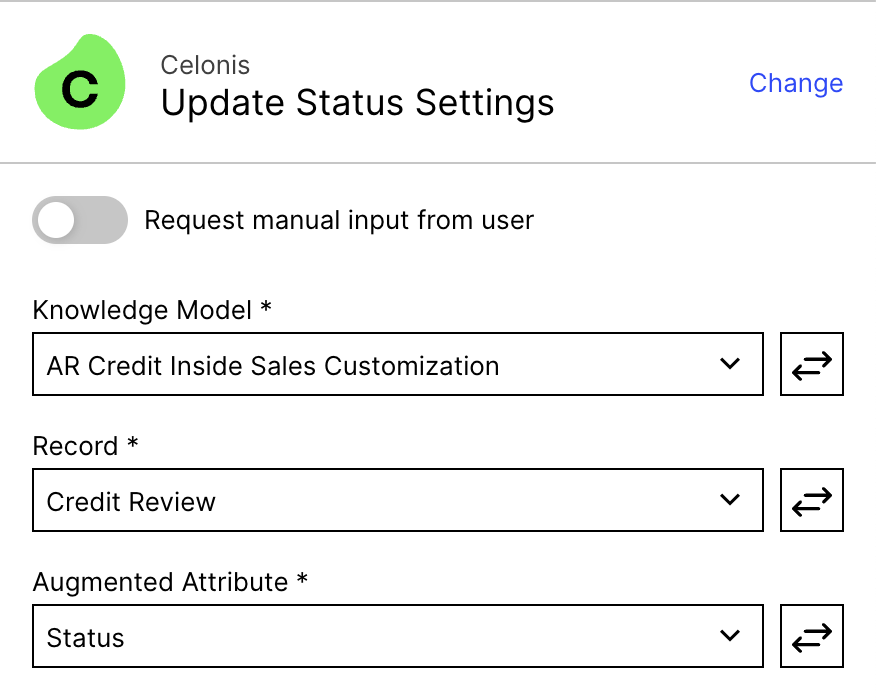
Step 10: Update Status
Knowledge Model: Select AR Credit Customization as the knowledge model.
Record: Select the Credit Review record from the knowledge model.
Augmented Attribute: Select Status from the list.
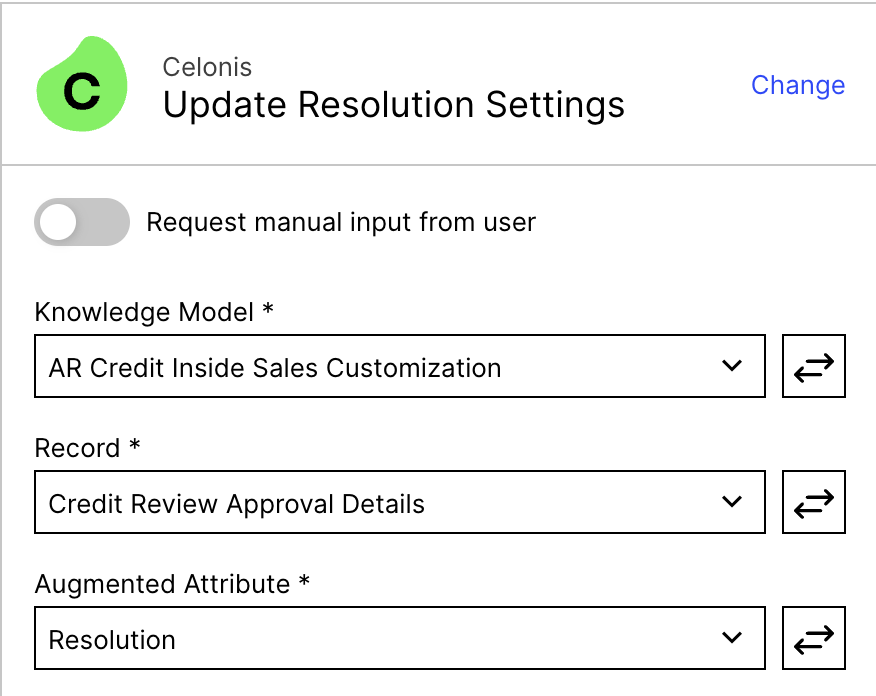
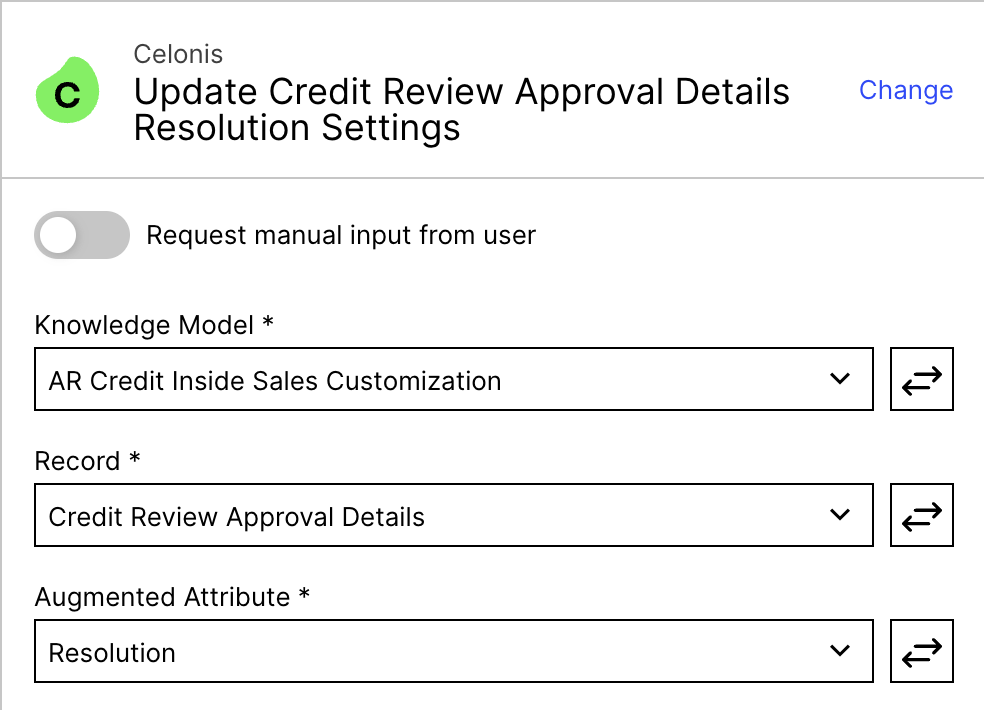
Step 13: Update Resolution
Knowledge Model: Select AR Credit Inside Sales Customization as the knowledge model.
Record: Select the Credit Review Approval Details record from the knowledge model.
Augmented Attribute: Select Resolution from the list.
Step 14: Update Note
Knowledge Model: Select AR Credit Inside Sales Customization as the knowledge model.
Record: Select the Credit Review Approval Details record from the knowledge model.
Augmented Attribute: Select Note from the list.

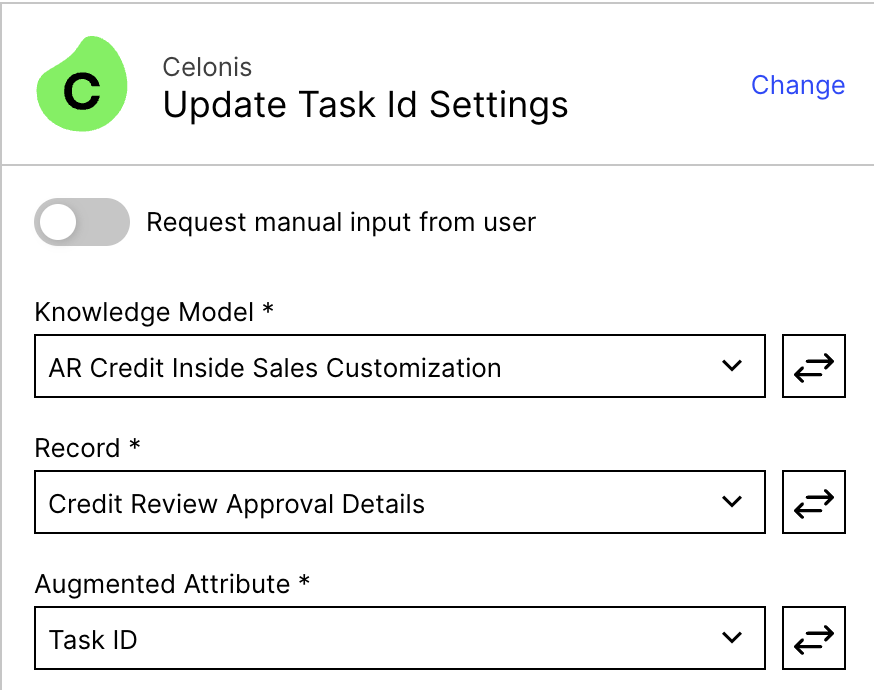
Step 15: Update Task Id
Knowledge Model: Select AR Credit Inside Sales Customization as the knowledge model.
Record: Select the Credit Review Approval Details record from the knowledge model.
Augmented Attribute: Select Task ID from the list.
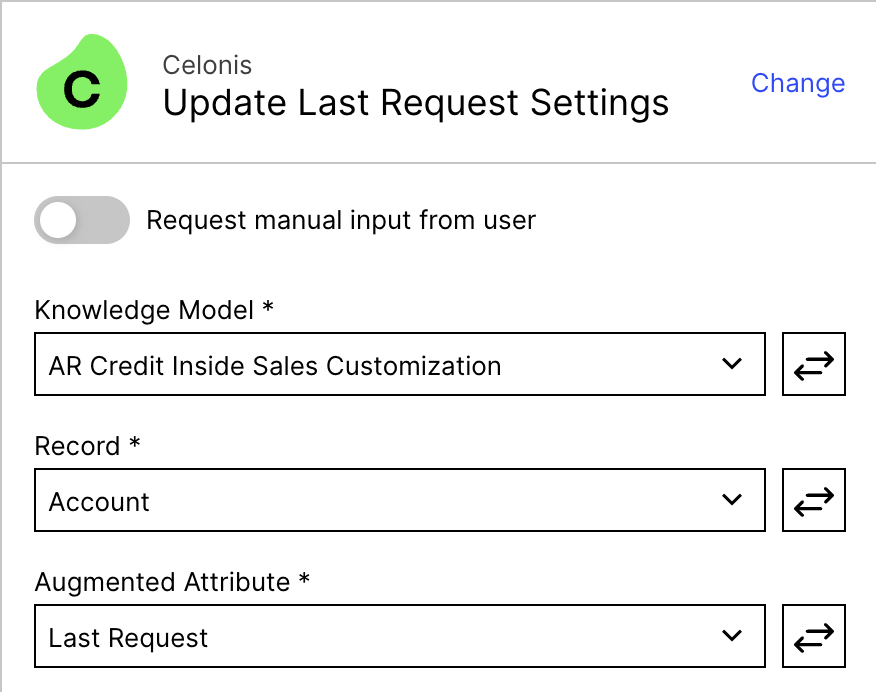
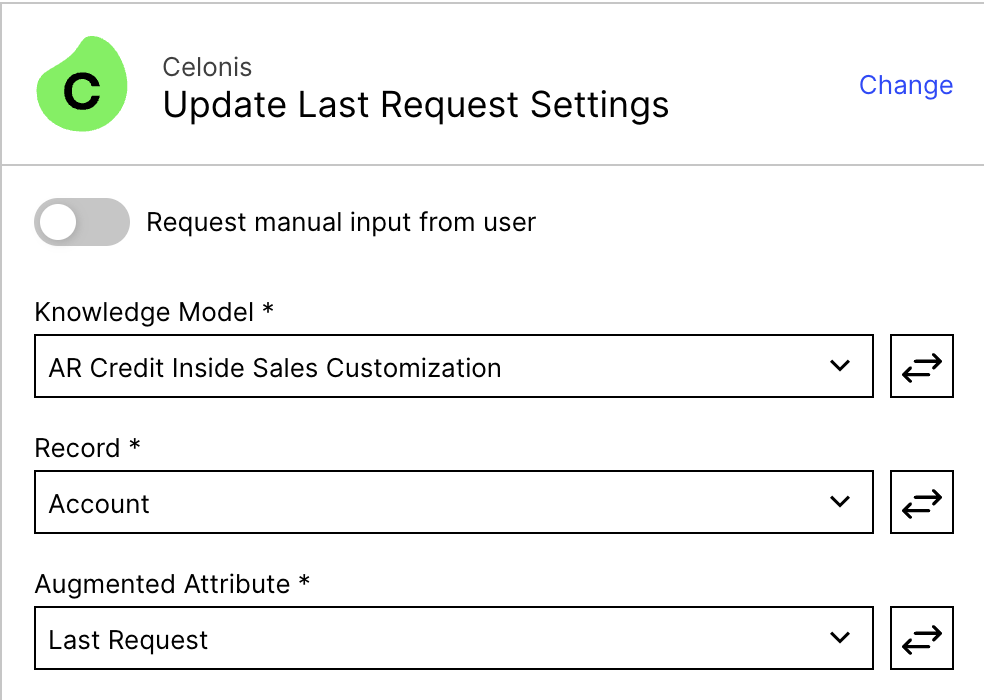
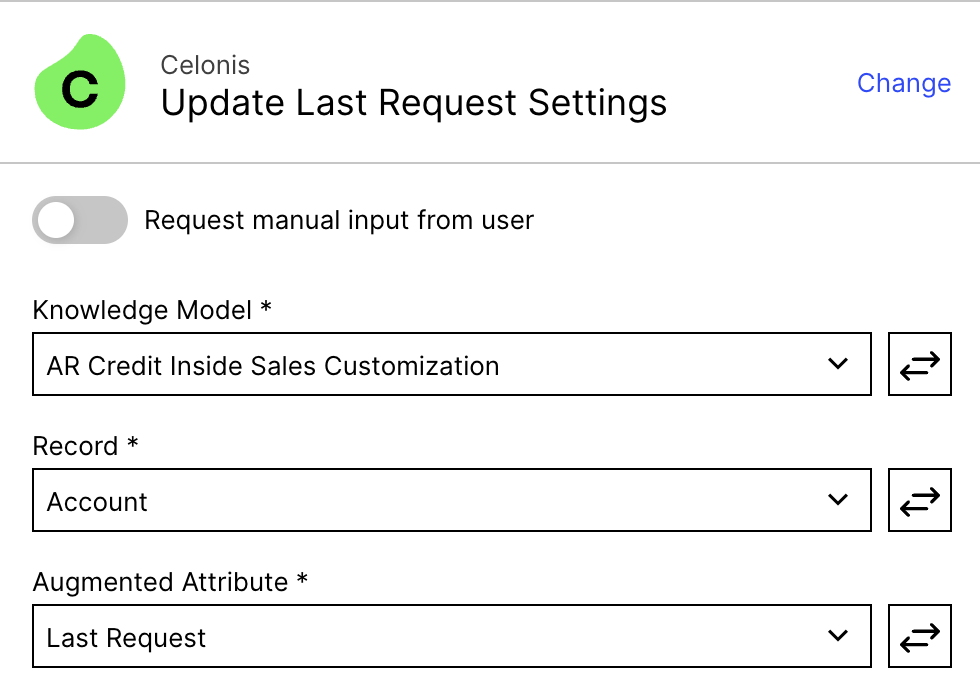
Step 8: Update Last Request
Knowledge Model: Select AR Credit Inside Sales Customization as the knowledge model.
Record: Select the Account record from the knowledge model.
Augmented Attribute: Select Last Request from the list.
Skill - Credit Task Approve
Step 2: Query Data Model
Connection: Select the Application Key connection to interact with Celonis. If you do not have an existing connection then you can create one by clicking the “Add” button.
Data Pool: Select the Data Pool that you created in Step 1.
Data Model: Select Accounts Receivable Data Model as the data model.
Step 5: Update Task(s)
Knowledge Model: Select AR Credit Customization as the knowledge model.
Record: Select the Account record from the knowledge model.
Step 14: Update Note
Knowledge Model: Select AR Credit Inside Sales Customization as the knowledge model.
Record: Select the Credit Review Approval Details record from the knowledge model.
Augmented Attribute: Select Note from the list.

Step 15: Update Task ID
Knowledge Model: Select AR Credit Inside Sales Customization as the knowledge model.
Record: Select the Credit Review Approval Details record from the knowledge model.
Augmented Attribute: Select Task ID from the list.

Step 16: Update Credit Review Approval Details Resolution
Knowledge Model: Select AR Credit Inside Sales Customization as the knowledge model.
Record: Select the Credit Review Approval Details record from the knowledge model.
Augmented Attribute: Select Resolution from the list.
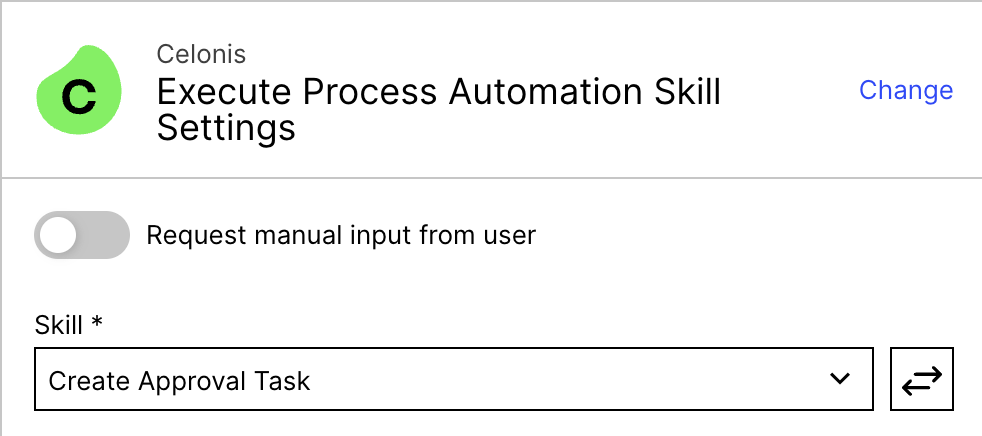
Step 6: Execute Process Automation Skill
Skill: Select Create Approval Task skill from the list.
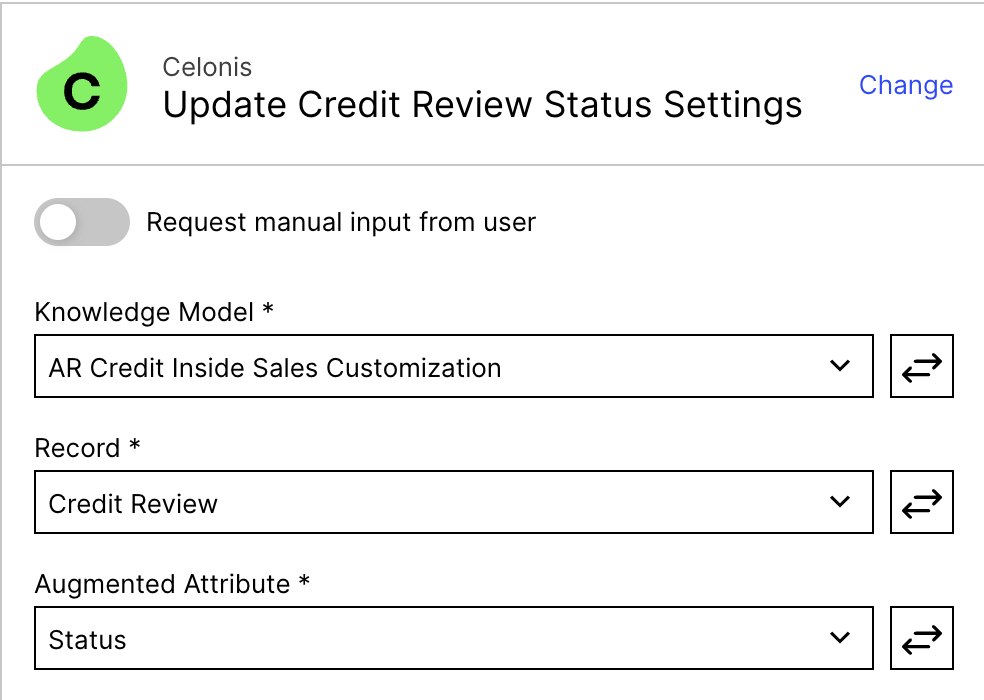
Step 13: Update Credit Review Status
Knowledge Model: Select AR Credit Inside Sales Customization as the knowledge model.
Record: Select the Credit Review record from the knowledge model.
Augmented Attribute: Select Status from the list.
Step 8: Update Last Request
Knowledge Model: Select AR Credit Inside Sales Customization as the knowledge model.
Record: Select the Account record from the knowledge model.
Augmented Attribute: Select Last Request from the list.
Skill - Generate Credit Review
Step 2: Query Data Model
Connection: Select the Application Key connection to interact with Celonis. If you do not have an existing connection then you can create one by clicking the “Add” button.
Data Pool: Select the Data Pool that you created in Step 1
Data Model: Select Accounts Receivable Data Model as the data model.

Step 5: Update Augmented Attribute
Knowledge Model: Select AR Credit Inside Sales Customization as the knowledge model.
Record: Select the Account record from the knowledge model.
Augmented Attribute: Select Last Request from the list.
Step 9: Query Data Model
Connection: Select the Application Key connection to interact with Celonis. If you do not have an existing connection then you can create one by clicking the “Add” button.
Data Pool: Select the Data Pool that you created in Step 1.
Data Model: Select Accounts Receivable Data Model as the data model.
Step 8: Write Data To Table (Continuous Data Push API)
Application Key: Enter the application key that has permission to insert data into the Data Pool.
Data Pool: Select the Data Pool you created in Step 1.
Step 6: Execute Process Automation Skill
Skill: Select Create Approval Task skill from the list.
Skill - Request Dunning Level Change
Step 2: Query data Model
Connection: Select the Application Key connection to interact with Celonis. If you do not have an existing connection then you can create one by clicking the “Add” button.
Data Pool: Select the Data Pool that you created in Step 1.
Data Model: Select Accounts Receivable Data Model as the data model.
Step 14: Update Augmented Attribute
Knowledge Model: Select AR Credit Inside Sales Customization as the knowledge model.
Record: Select the Account record from the knowledge model.
Augmented Attribute: Select Last Request from the list.
Step 3: Create Task
Knowledge Model: Select AR Credit Customization as the knowledge model.
Record: Select the Account record from the knowledge model.
Step 18: Update Task(s)
Knowledge Model: Select AR Credit Customization as the knowledge model.
Record: Select the Account record from the knowledge model.
Step 12: Query Data Model
Connection: Select the Application Key connection to interact with Celonis. If you do not have an existing connection then you can create one by clicking the “Add” button.
Data Pool: Select the Data Pool that you created in Step 1.
Data Model: Select Accounts Receivable Data Model as the data model.
Step 15: Update Last Request
Knowledge Model: Select AR Credit Inside Sales Customization as the knowledge model.
Record: Select the Account record from the knowledge model.
Augmented Attribute: Select Last Request from the list.
Step 17: Update Task(s)
Knowledge Model: Select AR Credit Customization as the knowledge model.
Record: Select the Account record from the knowledge model.
Step 13: Query Data Model
Connection: Select the Application Key connection to interact with Celonis. If you do not have an existing connection then you can create one by clicking the “Add” button.
Data Pool: Select the Data Pool that you created in Step 1.
Data Model: Select Accounts Receivable Data Model as the data model.
Step 16: Update Last Request
Knowledge Model: Select AR Credit Inside Sales Customization as the knowledge model.
Record: Select the Account record from the knowledge model.
Augmented Attribute: Select Last Request from the list.
Skill - Approval Matrix - New
Step 3: Write Data To Table (Continuous Data Push API)
Application Key: Enter the application key that has permission to insert data into the Data Pool.
Data Pool: Select the Data Pool you created in Step 1.
Skill - Create Score Card Parameter Value
Step 2: Write Data To Table (Continuous Data Push API)
Application Key: Enter the application key that has permission to insert data into the Data Pool.
Data Pool: Select the Data Pool you created in Step 1.
Skill - Create Score Card Parameter
Step 2: Write Data To Table (Continuous Data Push API)
Application Key: Enter the application key that has permission to insert data into the Data Pool.
Data Pool: Select the Data Pool you created in Step 1.