Basic functions
Get started
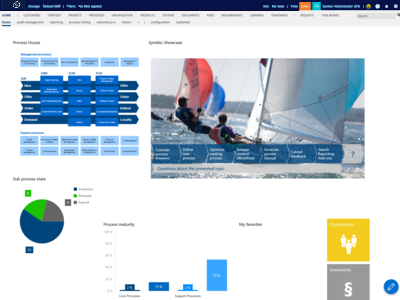
After you log in, Process Designer HOME displays:
 |
You can access your process landscape using the corresponding buttons on the HOME page. The administrator determines the structure and content of the start page and the design and content of the homepage.
The user can access the process house/architecture, the organization, and various objects such as systems, documents, or risks. Quick links like “My last changed processes” open recently modified processes or objects.
The feature Method: The additional column ‘Reason for revision’ for News Lists allows Administrators to create a list on the HOME page, showing the most recently released processes or documents. The function adds a new piece of information to these lists next to the ‘Type of change’ column. It also shows the 'Reason for revision' attribute, which explains why the new version of the item was created. This feature is only available after the Admin activates it.'
Tip
Click the Celonis logo in the top-right of the user interface to open the Celonis Platform in a new tab. If you see a customer logo there instead and clicking doesn't open the Celonis Platform, your admin may need to Configure the logo link.
In the header, users can set a filter to see specific processes or objects that are only valid for certain organizations, locations, or tags.
 |
Users will then only see content related to the selected elements.
The user information also contains information about the user´s authorization and contact data.
Use the Search feature to access the required processes and objects directly. Enter the search term into the text box to open an advanced search window.
Data language
The data language is shown directly in the Header Bar next to the User name.

Layout
 |
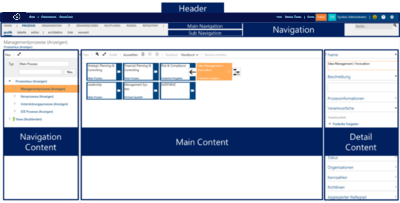
Header
The Header contains some basic information and functions for users. The left pane shows the database name into which the user is logged in.
Click Info to open the taskboard's info page. Generated process documents and feedback are stored here. If new information is available for the user, the number of items is displayed next to “Info.”
Use My Tasks to navigate the open tasks within the taskboard, such as process approvals. If multiple tasks are pending, the number of outstanding items is displayed.
You can change the view from Viewer to Editor and vice versa, provided you have the relevant permissions.
The initials and the username are displayed to the right of the view. Click the username to open a window where you can select the language and disconnect from the database. This window displays additional information, such as assigned user roles.
Navigation
The top row of the Navigation section (Main Navigation) is fixed. It doesn’t change regardless of the selected Sub Navigation or features.
The Main Navigation area consists of:
HOME - Launches the home page
CUSTOMERS – Displays the Customer Experience Management
STRATEGY – Displays to the strategy view
PROJECT – Displays to the project view
PROCESSES - Displays the process view
ORGANIZATION - Displays the organizational structure/chart
PRODUCT – Displays the product view
SYSTEMS - Displays the IT architecture
DOCUMENTS - Displays the guidelines
RISKS - Displays the risks
REQUIREMENTS - Displays demands/idea management
LEARNING – Displays the learnings and training
STANDARDS – Displays the norms and standards
REPORTS – Displays the role entry and specific reports
REQUESTS - Displays received and created requests
TASKBOARD - Displays pending tasks and information
The line at the bottom of the navigation bar (Sub Navigation) is context-dependent and offers different options and views depending on which main navigation item was selected.
Contents
The content of the process world is divided into three areas. Please see the introduction of the Viewer.
The Navigation Content shows the process architecture. Click the gray arrows to open the lower levels of the tree.
The Main Content section displays the contents of the defined main processes and sub-processes in graphics or tables, depending on the selected view or sub-navigation.
The Detail Content section includes details on the main process or sub-process level, such as descriptions, responsible parties, or objects previously created through the Main Navigation area or in the Sub-Navigation of relevant management views.
You should now have an insight into the key basic features of Process Designer. Read through associated topics for a comprehensive overview of typical application scenarios for the various user roles.