Google Sheets (Action Flow)
Important
Any references to third-party products or services do not constitute Celonis Product Documentation nor do they create any contractual obligations. This material is for informational purposes only and is subject to change without notice.
Celonis does not warrant the availability, accuracy, reliability, completeness, or usefulness of any information regarding the subject of third-party services or systems.
With Google Sheets modules in Celonis platform, you can manage rows, cells, sheets, spreadsheets, values, and conditional formats in your Google Sheets account.
To use Google Sheets modules, you must have a Google account. You can create one at accounts.google.com. To use instant trigger modules, you must have the Google Sheets extension.
Refer to the Google Sheets API documentation for a list of available endpoints.
Note
Celonis platform's use and transfer of information received from Google APIs to any other app will adhere to Google API Services User Data Policy.
Connect Google Sheets to Celonis platform
To establish the connection in Celonis platform:
Log in to your Celonis platform account, add a Google Sheets module to your Action Flow, and click Create a connection.
Note: If you add a module with an
instanttag, click Create a webhook, then Create a connection.Optional: In the Connection name field, enter a name for the connection.
Optional: Switch on the Show advanced settings toggle and enter your Google Cloud Platform project client credentials. For more information, see the Create and configure a Google Cloud Platform project for Google Sheets section below.
Click Sign in with Google.
If prompted, authenticate your account and confirm access.
You have successfully established the connection. You can now edit your Action Flow and add more Google Sheets modules.
To connect to Celonis platform using your own client credentials, you can create and configure a project in the Google Cloud Platform.
Create a Google Cloud Platform project for Google Sheets
To create a Google Cloud Platform project:
Log in to the Google Cloud Platform using your Google credentials.
On the welcome page, click Create or select a project > New project. If you already have a project, proceed to the step 5.
Enter a Project name and select the Location for your project.
Click Create.
In the top menu, check if your new project is selected in the Select a project dropdown. If not, select the project you just created.
Note
To create a new project or work in the existing one, you need to have the serviceusage.services.enable permission. If you don’t have this permission, ask the Google Cloud Platform Project Owner or Project IAM Admin to grant it to you.
Enable APIs for Google Sheets
To enable the required APIs:
Open the left navigation menu and go to APIs & Services > Library.
Search for the following APIs: Google Sheets API and Google Drive API.
Click the relevant API, then click Enable. If you see the Manage button instead of the Enable button, you can proceed to the next step: the API is already enabled.
Configure your OAuth consent screen for Google Sheets
To configure your OAuth consent screen:
In the left sidebar, click Google Auth Platform.
Note
If you don't see Google Auth Platform in the left sidebar, click View all products at the top of it, then pin Google Auth Platform to the sidebar.

Click Get Started.
In the Overview section, under App information, enter Make as the app name and provide your Gmail address. Click Next.
Under Audience, select External. Click Next.
For more information regarding user types, refer to Google's Exceptions to verification requirements documentation.
Under Contact Information, enter your Gmail address. Click Next.
Under Finish, agree to the Google User Data Policy.
Click Continue > Create.
Click Create OAuth Client.
In the Branding section, under Authorized domains, add
make.comandintegromat.com. Click Save.Optional: In the Audience section, add your Gmail address on the Test users page, then click Save and continue if you want the project to remain in the Testing publishing status. Read the note below to learn more about the publishing status.
In the Data Access section, click Add or remove scopes, add the following scopes:
https://www.googleapis.com/auth/spreadsheetshttps://www.googleapis.com/auth/drive
You can add scopes using:
A table with filters:

A window to manually enter scopes:

Click Update.
Click Save.
Note
Publishing Status
Testing: If you keep your project in the Testing status, you will be required to reauthorize your connection in Make every week. To avoid weekly reauthorization, update the project status to In production.
In production: If you update your project to the In production status, you will not be required to reauthorize the connection weekly. To update your project's status, go to the OAuth consent screen, the Audience section, and click Publish app. If you see the notice Needs verification, you can choose whether to go through the Google verification process for the app or to connect to your unverified app. Currently connecting to unverified apps works in Celonis platform, but we cannot guarantee the Google will allow connections to unverified apps for an indefinite period.
For more information regarding the publishing status, refer to the Publishing status section of Google's Setting up your OAuth consent screen help.
Create your Google Sheets client credentials
To create your client credentials:
In Google Auth Platform, click Clients.
Click + Create Client.
In the Application type dropdown, select Web application.
Update the Name of your OAuth client. This will help you identify it in the platform.
In the Authorized redirect URIs section, click + Add URI and enter the following redirect URI:
https://auth.redirect.celonis.cloud/oauth/cb/google/Click Create.
Click the OAuth 2.0 Client you created, copy your Client ID and Client secret values, and store them in a safe place.
You will use these values in the Client ID and Client Secret fields in Celonis platform.
Set Up Google Sheets Webhooks
Caution
The Celonis platform Google Sheets Add-on is currently not available, and the following procedure should be followed to use the Perform a Function and Watch Changes instant modules.
To use the Google Sheets Perform a Function or Watch Changes instant modules, you must first paste a script and your module's webhook address into your spreadsheet.
To set up the webhook:
Log in to your Celonis platform account, add either the Perform a Function or Watch Changes module to your Action Flow, and click Create a webhook or Add.
Optional: Enter a name for the webhook in the Webhook name field.
Click Save.
Next you will paste a script into your spreadsheet. Click here to access the script and copy the entire content.
Open the spreadsheet and go to Extensions > Apps Script. You will see a new project containing default content.
Delete the default content and paste the script you copied in Step 4. This script must be updated with the webhook address from your Google Sheets module.
To obtain the webhook address, go back to your Action Flow, click on the module, and click Copy address to clipboard.
Now return to the Apps Script project in your spreadsheet. At the beginning of the script, you will see the lines
WATCH_CHANGE_WEBHOOK_URL = 'https://hook.eu1.make.com/xxx';andPERFORM_FUNCTION_WEBHOOK_URL = 'https://hook.eu1.make.com/xxx';.Depending on the module you are using, replace
https://hook.eu1.make.com/xxxwith the webhook address you copied in Step 7.Caution
It is important to paste the full webhook address into the script to avoid any errors.
Click the Save icon.
In the left sidebar, click the Triggers icon.
Click Add Trigger.
In the Select event type field, select On edit, and click Save.
If prompted, authenticate your account and confirm access.
The Perform a Function or Watch Changes module will now send data through the webhook when the selected event occurs.
Build Google Sheets Action Flows
After connecting the app, you can perform the following actions:
Sheets
Celonis platform allows you to use the custom function MAKE_FUNCTION in Google Sheets similarly to built-in functions like AVERAGE, SUM, etc. It allows you to perform the function in Celonis platform and return the result back to the sheet. The function MAKE_FUNCTION accepts as many parameters as you need.
You must have a Sheets Add-On.
See the example of the module usage in the Tips & Tricks section.
Returns processed data as a result of the MAKE_FUNCTION or INTEGROMAT function. You must have a Sheets Add-On. This module is to be used together with the Perform a Function module.
Response type | Select whether you insert text or a number into the sheet. |
Value | Map the value from the previous module you want to insert into the sheet. |
Add a new sheet.
Connection | |
Search Method | Select an option to choose the spreadsheet in which you want to create a sheet.
|
Spreadsheet ID | Select, search for, or enter the ID of the spreadsheet that contains the sheet you want to add a sheet to. You can extract the Spreadsheet ID from the spreadsheet URL. For example, the URL is the following: |
Properties | Title Enter the name of the new sheet. Index Enter the sheet position. The default is |
Creates a new spreadsheet.
Connection | |||||||||||||||||
Title | Enter the name of a new spreadsheet. | ||||||||||||||||
Locale | The locale of the spreadsheet in one of the following formats: | ||||||||||||||||
Recalculation interval | The amount of time to wait before volatile functions are recalculated: On change Volatile functions are updated upon every change. On change and every minute Volatile functions are updated upon every change and every minute. On change and hourly Volatile functions are updated upon every change and hourly. | ||||||||||||||||
Time zone | Select the time zone of the spreadsheet. | ||||||||||||||||
Number format | Select the default format of all cells in the spreadsheet.
| ||||||||||||||||
Sheets | Add sheets to the new spreadsheet. |
Creates a new spreadsheet from a template sheet.
Connection |
|
Search Method | Select or map the Template Spreadsheet ID from which you want to create the spreadsheet.
|
Drive | Select or map the drive where you want to create the spreadsheet. |
Template Spreadsheet ID | Select the template from which you want to create the spreadsheet. If the spreadsheet contains tags like Your file must contain at least one tag for this module to work. |
Title | Enter a name for the spreadsheet. |
New Drive Location | Select or map the drive to store the new spreadsheet. |
New Document's Location | Select or map the folder, where the new spreadsheet should be placed. |
Copies a sheet to another spreadsheet.
Connection |
|
Search Method | Select or map the option to choose the spreadsheet that you want to copy.
|
Drive | Select or map the drive location where the spreadsheet that you want to copy is located. |
Spreadsheet ID | Select or map the Spreadsheet ID you want to copy. You can extract the Spreadsheet ID from the spreadsheet URL. For example, the URL is the following: |
Destination Drive Location | Select or map the drive location where you want to store the copied spreadsheet. |
Destination Spreadsheet ID | Select or map the copied Spreadsheet ID. |
Creates a new conditional format rule at the given index. All subsequent rules' indexes are incremented.
Connection |
|
Search Method | Enter the Spreadsheet ID to which you want to create the conditional format rule.
|
Spreadsheet ID | Enter the Spreadsheet ID to which you want to create the conditional format rule. You can extract the Spreadsheet ID from the spreadsheet URL. For example, the URL is the following: |
Sheet ID | Enter the Sheet ID to which you want to create the conditional format rule. |
Range | Enter the range of rows and columns to which you want to apply the conditional rule format. For example, A1:D25. |
Index | The zero-based index where the rule should be inserted. |
Format Rule | Select or map the rule for the conditional format rule. |
Condition | Select or map the condition and enter the value for the format rule. For more information, see the boolean and gradient conditions. |
Cell Format | Select or map the cell background color. |
Text Format | Set the text format such as foreground color, bold, italic or strikethrough. |
Renames a specific sheet.
Connection |
|
Search Method | Select an option to choose the spreadsheet in which you want to create a sheet.
|
Drive | Select or map the drive location where the spreadsheet in which you want to rename a sheet is located. |
Spreadsheet ID | Select or map the Spreadsheet ID where a sheet you want to rename is located. You can extract the Spreadsheet ID from the spreadsheet URL. For example, the URL is the following: |
Sheet ID | Enter the Sheet ID you want to rename. |
New Sheet Name | Enter a new name of a sheet. |
Returns a sheet's content defined by range values.
Connection |
|
Search Method | Select an option to choose the spreadsheet whose range value you want to get.
|
Spreadsheet ID | Select or map the Spreadsheet ID for the spreadsheet where you want to retrieve range values. You can extract the Spreadsheet ID from the spreadsheet URL. For example, the URL is the following: |
Sheet Name | Select the sheet you want to get the range content from. |
Range | Enter the range you want to get, e.g. |
Table contains headers | Row with headers Enter the range of the table headers, e.g. |
Value render option | Formatted value The values in the reply will be calculated and formatted according to the cell's formatting. Formatting is based on the spreadsheet's locale, not the requesting user's locale. For example, if Unformatted value The values will be calculated, but not formatted in the reply. For example, if Formula The values will not be calculated. The reply will include the formulas. For example, if |
Date and render option | Serial number Instructs date, time, datetime, and duration fields to be output as doubles in "serial number" format, as popularized by Lotus 1-2-3. The whole number portion of the value (to the left of the decimal) counts the days since December 30th 1899. The fractional portion (to the right of the decimal) counts the time as a fraction of the day. For example, January 1st 1900 at noon would be 2.5. 2 because it's 2 days after December 30th 1899, and .5 because noon is half a day. February 1st 1900 at 3 pm would be 33.625. This correctly treats the year 1900 as not a leap year. Formatted string Instructs date, time, datetime, and duration fields to be outputted as strings in their given number format (which is dependent on the spreadsheet's locale). |
Gets a list of all sheets in a spreadsheet.
Connection |
|
Search Method | Select an option to choose the spreadsheet whose range value you want to get.
|
Spreadsheet ID | Select or map the Google Spreadsheet ID you want to retrieve sheets from. You can extract the Spreadsheet ID from the spreadsheet URL. For example, the URL is the following: |
Deletes a specific sheet.
Connection |
|
Search Method | Select an option to choose the spreadsheet whose sheet you want to delete.
|
Spreadsheet ID | Select or map the Spreadsheet ID from which you want to delete the row. |
Sheet ID | Select or map the Sheet ID you want to delete. |
Clears a specified range of values from a spreadsheet.
Connection |
|
Search Method | Select an option to choose the spreadsheet and sheet name whose value you want to clear.
|
Spreadsheet ID | Enter the Spreadsheet ID from which you want to clear the values. You can extract the Spreadsheet ID from the spreadsheet URL. For example, the URL is the following: |
Sheet Name | Enter a sheet name from which you want to clear the values. |
Range | Enter the range you want to clear. For example, A1:D25. |
Deletes a conditional format rule at the given index. All subsequent rules' indexes are decremented.
Connection |
|
Search Method | Select an option to choose the spreadsheet and sheet name whose value you want to clear.
|
Spreadsheet ID | Enter the Spreadsheet ID whose conditional format rule you want to delete. You can extract the Spreadsheet ID from the spreadsheet URL. For example, the URL is the following: |
Sheet ID | Enter the Sheet ID whose conditional format rule you want to delete. |
Index | The zero-based index of the rule to be deleted |
Rows
Triggers when a new row is added. If a sheet contains a blank row, Make doesn't process all subsequent rows.
Connection | |
Search Method | Select a method to choose the spreadsheet whose rows you want to watch.
|
Drive | Select Google Drive, where you have the spreadsheet whose rows you want to watch. |
Spreadsheet ID | Select the Spreadsheet ID whose rows you want to watch. You can extract the Spreadsheet ID from the spreadsheet URL. For example, the URL is the following: |
Sheet Name | Enter a sheet name in which you want search rows. |
Table contains headers | Select whether the spreadsheet contains the header row. If the Yes option is selected, the module doesn't retrieve the header row as output data, and variables in the output are then called by the headers. If the No option is selected, the module retrieves the first table row, and the output variables are called simply A, B, C, D, etc. |
Row with headers | Enter the range of the header row, e.g., |
Value render option | Formatted value The values in the reply will be calculated and formatted according to the cell's formatting. Formatting is based on the spreadsheet's locale, not the requesting user's locale. For example, if Unformatted value The values will be calculated but not formatted in the reply. For example, if Formula The values will not be calculated. The reply will include the formulas. For example, if |
Date and time render option | Serial number Instructs date, time, datetime, and duration fields to be outputted as doubles in "serial number" format, as popularized by Lotus 1-2-3. The whole number portion of the value (to the left of the decimal) counts the days since December 30th, 1899. The fractional portion (to the right of the decimal) counts the time as a fraction of the day. For example, January 1st, 1900 at noon would be 2.5. 2 because it's 2 days after December 30th, 1899, and .5 because noon is half a day. February 1st, 1900 at 3 pm would be 33.625. This correctly treats the year 1900 as not a leap year. Formatted string Instructs date, time, datetime, and duration fields to be outputted as strings in their given number format (which depends on the spreadsheet's locale). |
Limit | Set the maximum number of results that Make will work with during one execution cycle. |
Appends a new row to the bottom of the table.
Connection |
|
Search Method | Select an option to choose the spreadsheet in which you want to add a row.
|
Drive | Select Google Drive to choose the spreadsheet in which you want to add a row. |
Spreadsheet ID | Enter the Spreadsheet ID in which you want to add a row. You can extract the Spreadsheet ID from the spreadsheet URL. For example, the URL is the following: |
Sheet Name | Enter a sheet name in which you want to add a row. |
Column range | Select the column range that you want to work with. |
Unformatted | Select or map whether the rows should be formatted or not based upon the spreadsheet's existing formatting. |
Value | Enter or mapthe desired cells of the row you want to add. |
Value input option | User entered The values will be parsed as if the user typed them into the UI. Numbers will remain numbers, but strings may be converted to numbers, dates, etc., following the same rules that are applied when entering text into a cell via the Google Sheets UI. Raw The values the user has entered will not be parsed and will be stored as-is. |
Insert data option | Insert rows Rows are inserted for the new data. Overwrite The new data overwrites the existing data in the areas where it is written. (Note: adding data to the end of the sheet will still insert new rows or columns so the data can be written.) |
Updates a row.
Connection |
|
Search Method | Select an option to choose the spreadsheet in which you want to update a row.
|
Drive | Select Google Drive to choose the spreadsheet whose rows you want to update. |
Spreadsheet ID | Enter the Spreadsheet ID whose rows you want to update. You can extract the Spreadsheet ID from the spreadsheet URL. For example, the URL is the following: |
Sheet Name | Select the sheet you want to update a row in. |
Row number | Enter the number of the row you want to update. |
Values | Enter or map the values in the desired cells of the row you want to change (update). |
Value input option | User entered The values will be parsed as if the user typed them into the UI. Numbers will remain numbers, but strings may be converted to numbers, dates, etc., following the same rules that are applied when entering text into a cell via the Google Sheets UI. Raw The values the user has entered will not be parsed and will be stored as-is. |
Appends multiple rows to the bottom of the table.
Connection |
|
Spreadsheet ID | Select, search for, or enter the ID of the spreadsheet that contains the sheet where you want to add rows to. You can extract the Spreadsheet ID from the spreadsheet URL. For example, the URL is the following: |
Sheet Name | Enter the name of the sheet where you want to add rows. |
Column range | Select the column range that you want to work with. |
Unformatted | Select or map whether the rows should be formatted or not based upon the spreadsheet's existing formatting. |
Value | Enter or mapthe desired cells of the row you want to add. |
Value input option | User entered The values will be parsed as if the user typed them into the UI. Numbers will remain numbers, but strings may be converted to numbers, dates, etc., following the same rules that are applied when entering text into a cell via the Google Sheets UI. Raw The values the user has entered will not be parsed and will be stored as-is. |
Insert data option | Insert rows Rows are inserted for the new data. Overwrite The new data overwrites the existing data in the areas where it is written. (Note: adding data to the end of the sheet will still insert new rows or columns so the data can be written.) Note: adding data to the end of the sheet will still insert new rows or columns. |
Updates multiple rows.
Connection |
|
Spreadsheet ID | Select, search for, or enter the ID of the spreadsheet that contains the sheet where you want to update rows. You can extract the Spreadsheet ID from the spreadsheet URL. For example, the URL is the following: |
Sheet Name | Enter the name of the sheet where you want to update rows. |
Column range | Select the column range that you want to work with. |
Unformatted | Select or map whether the rows should be formatted or not based upon the spreadsheet's existing formatting. |
Values | Enter or map the values in the desired cells of rows you want to change (update). |
Value input option | User entered The values will be parsed as if the user typed them into the UI. Numbers will remain numbers, but strings may be converted to numbers, dates, etc., following the same rules that are applied when entering text into a cell via the Google Sheets UI. Raw The values the user has entered will not be parsed and will be stored as-is. |
Returns results matching the given criteria.
Connection |
|
Search Method | Select an option to choose the spreadsheet in which you want to search rows.
|
Spreadsheet ID | Enter the Spreadsheet ID in which you want search rows. You can extract the Spreadsheet ID from the spreadsheet URL. For example, the URL is the following: |
Sheet Name | Enter a sheet name in which you want to search rows. |
Table contains headers | option is selected, the module also retrieves the first table row, and variables in the output are then called simply A, B, C, D, etc.No option is select |
Filter | Set the filter for the row to be searched by. Set filter values. You can also use logical operators, AND/OR in order to specify your selection. |
Sort order | Map or select the direction that rows should be sorted by. |
Order by | Select or map the option to arrange the search results. |
Field Type | Select or map the field type to search the rows that match the specified type:
|
Value reoption | Formatted value The values in the reply will be calculated and formatted according to the cell's formatting. Formatting is based on the spreadsheet's locale, not the requesting user's locale. For example, if Unformatted value The values will be calculated, but not formatted in the reply. For example, if Formula The values will not be calculated. The reply will include the formulas. For example, if |
Date and time render option | Serial number Instructs date, time, datetime, and duration fields to be output as doubles in "serial number" format, as popularized by Lotus 1-2-3. The whole number portion of the value (to the left of the decimal) counts the days since December 30th 1899. The fractional portion (to the right of the decimal) counts the time as a fraction of the day. For example, January 1st 1900 at noon would be 2.5. 2 because it's 2 days after December 30th 1899, and .5 because noon is half a day. February 1st 1900 at 3 pm would be 33.625. This correctly treats the year 1900 as not a leap year. Formatted string Instructs date, time, datetime, and duration fields to be outputted as strings in their given number format (which is dependent on the spreadsheet's locale). |
Maximum number of returned rows | The maximum number of rows Celonis platform should return during one scenario execution cycle. |
Returns results matching the given criteria. This module doesn't return a row number.
Connection |
|
Search Method | Select an option to choose the spreadsheet in which you want to search rows.
|
Spreadsheet ID | Select or map the Spreadsheet ID of the spreadsheet where you want to search rows. You can extract the Spreadsheet ID from the spreadsheet URL. For example, the URL is the following: |
Sheet ID | Enter the Sheet ID whose row you want to search. |
Query | Searches rows using Google Charts Query Language. The language is similar to SQL and it is possible to make complex queries. Unfortunately, the response doesn't contain IDs of returned rows. Due to Google Charts, the service is intended for data visualization where the row numbers aren't needed. You can find more information about the query language in the documentation. An example: |
Maximum number of returned rows | The maximum number of rows Celonis platform should return during one scenario execution cycle. |
Clears values from a specific row.
Connection |
|
Search Method | Select an option to choose the spreadsheet in which you want to clear a row.
|
Spreadsheet ID | Enter the Spreadsheet ID in which you want to clear a row. You can extract the Spreadsheet ID from the spreadsheet URL. For example, the URL is the following: |
Sheet Name | Enter a sheet name in which you want to clear a row. |
Row Number | Enter the number of the row you want to clear, e.g. |
Deletes a specific row.
Connection |
|
Search Method | Select an option to choose the spreadsheet and sheet whose row you want to delete.
|
Spreadsheet ID | Select or map the Spreadsheet ID from which you want to delete the row. You can extract the Spreadsheet ID from the spreadsheet URL. For example, the URL is the following: |
Sheet ID | Enter the Sheet ID whose row you want to delete. |
Row Number | Enter the number of the row you want to delete, e.g. |
Cells
Triggers when a cell is updated. You must have a Sheets Add-On.
The module only watches for changes made in the Google Sheets app by the user. Script executions and API requests do not trigger this module. The module does not watch for newly added rows to the sheet.
Webhook | Establish a connection to the spreadsheet using the add-on. |
Updates a specific cell.
Connection |
|
Search Method | Select an option to choose the spreadsheet and sheet whose value you want to update.
|
Spreadsheet ID | Select or map the Spreadsheet ID for the spreadsheet where you want to update a cell. You can extract the Spreadsheet ID from the spreadsheet URL. For example, the URL is the following: |
Sheet Name | Enter the name of the sheet where you want to update a cell. |
Cell | Enter the ID of the cell you want to update, e.g. |
Value | Enter the new value. |
Value input option | User entered The values will be parsed as if the user typed them into the UI. Numbers will remain numbers, but strings may be converted to numbers, dates, etc., following the same rules that are applied when entering text into a cell via the Google Sheets UI. Raw The values the user has entered will not be parsed and will be stored as-is. |
Updates a specific cell.
Connection |
|
Search Method | Select an option to choose the spreadsheet and sheet whose value you want to get.
|
Spreadsheet ID | Select or map the Spreadsheet ID from which you want to get a cell. You can extract the Spreadsheet ID from the spreadsheet URL. For example, the URL is the following: |
Sheet ID | Select or map the Sheet ID that contains the cell you want to retrieve data from. |
Cell | Enter the ID of the cell you want to get, e.g. |
Clears a specific cell.
Connection |
|
Search Method | Select an option to choose the spreadsheet and sheet whose value you want to clear.
|
Spreadsheet ID | Select or map the Spreadsheet ID for the spreadsheet where you want to clear a cell. You can extract the Spreadsheet ID from the spreadsheet URL. For example, the URL is the following: |
Sheet Name | Enter the name of the sheet where you want to clear a cell. |
Cell | Enter the ID of the cell you want to clear, e.g. |
Other
Performs an arbitrary authorized API call. See the example of usage in the Tips & Tricks section.
Connection | Establish a connection to the spreadsheet using your Google account. |
URL | Enter a path relative to For example: For the list of available endpoints, refer to the Google Sheets API Documentation. |
Method | Select the HTTP method you want to use: GET - to retrieve information for an entry. POST - to create a new entry. PUT - to update/replace an existing entry. PATCH - to make a partial entry update. DELETE - to delete an entry. |
Headers | Enter the desired request headers. You don't have to add authorization headers; we already did that for you. |
Query String | Enter the request query string. |
Body | Enter the body content for your API call. |
Tips & Tricks
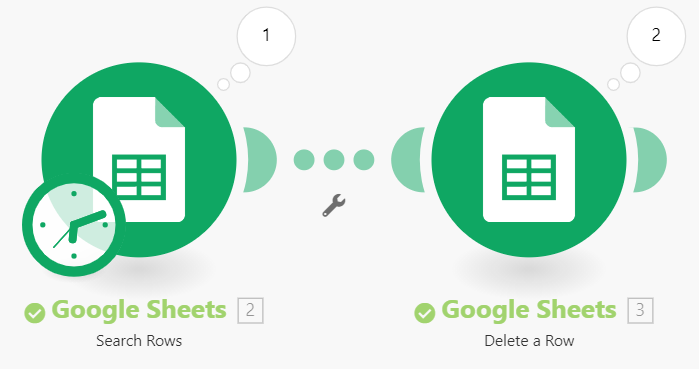
To delete multiple rows based on filter criteria use the Search Rows module linked to the Delete a Row module as in the following example:
Add the Search Rows module and the Delete a Row module to the Action Flow.
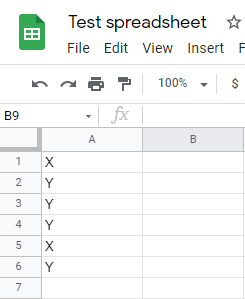
Let's assume that you have a table where you need to delete all rows where column A equals Y.
Open the Search Rows module settings and set the fields as follows:
Filter
AEqual toYSort order
DescendingOrder by
Row number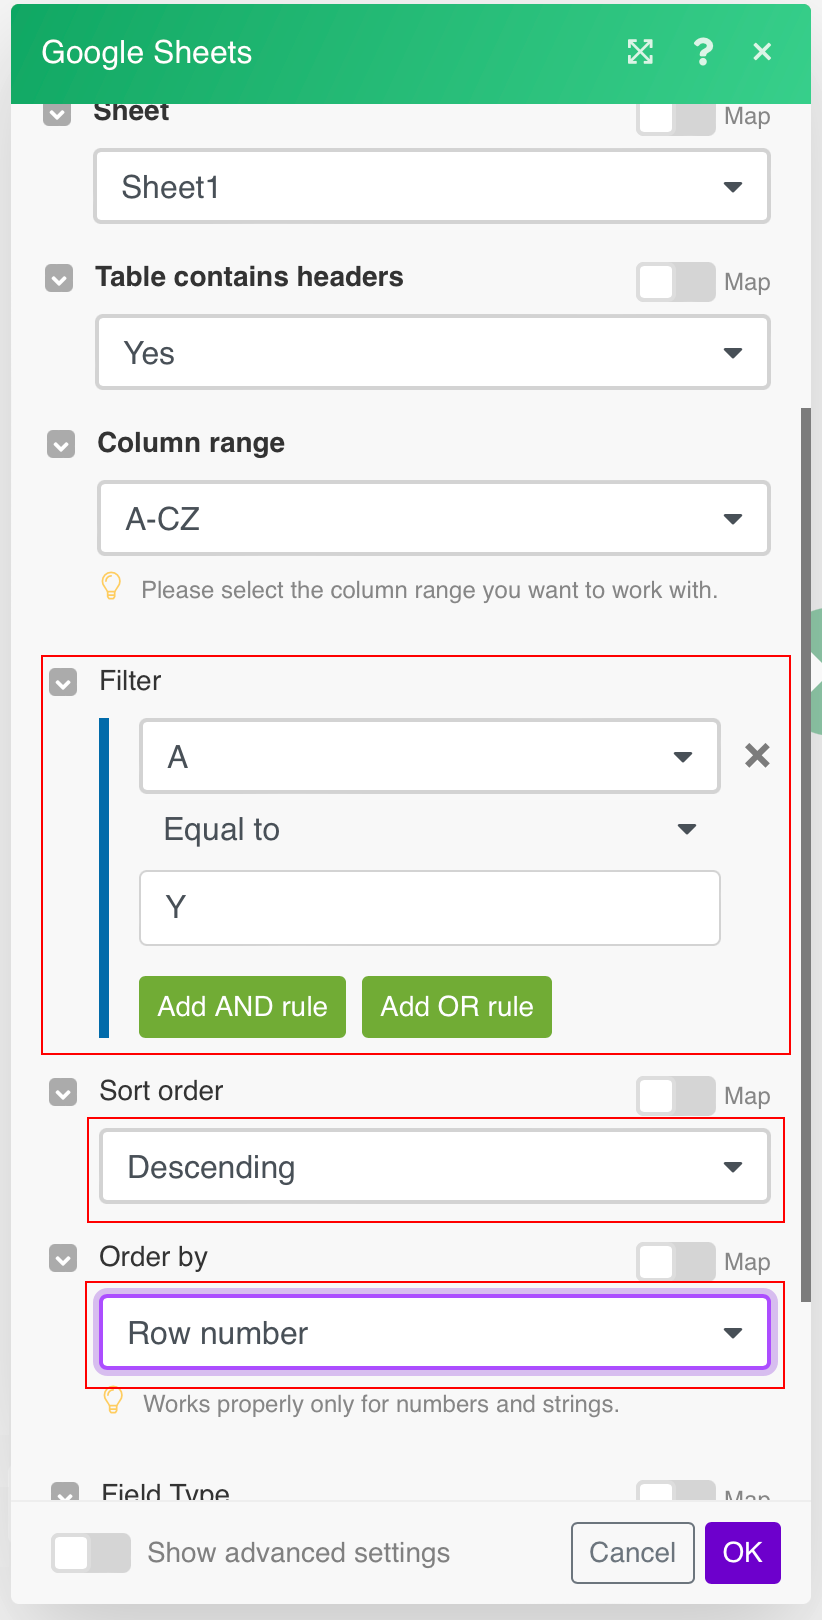
Caution
Make sure that the Sort order and Order by fields are set as above, otherwise values will not be deleted correctly from the table!
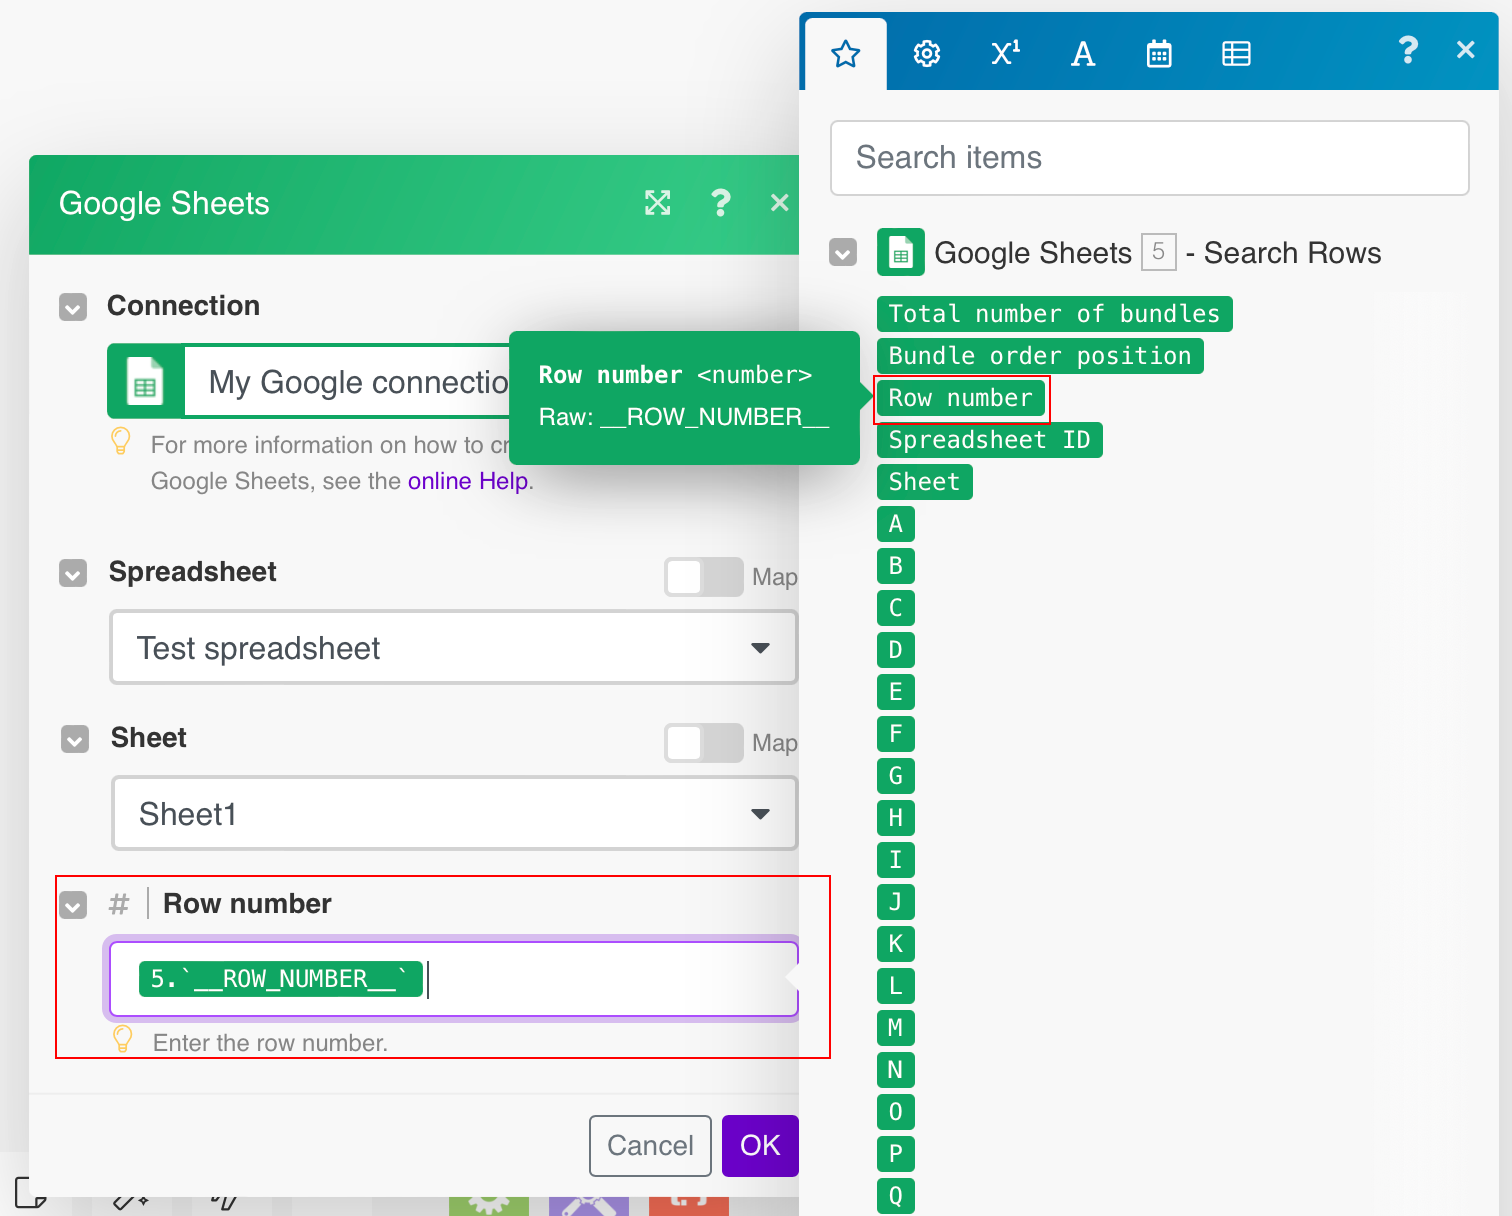
Add the Delete a Row module to the Action Flow and connect it to the Search Row module.
Map the Row number item from the Search Rows module to the Delete a Row module's Row number field.
Run the Action Flow to delete values that match the filter criteria from the sheet.
Use the Search Rows (Advanced) module and use this formula to get empty columns.
select * where E is null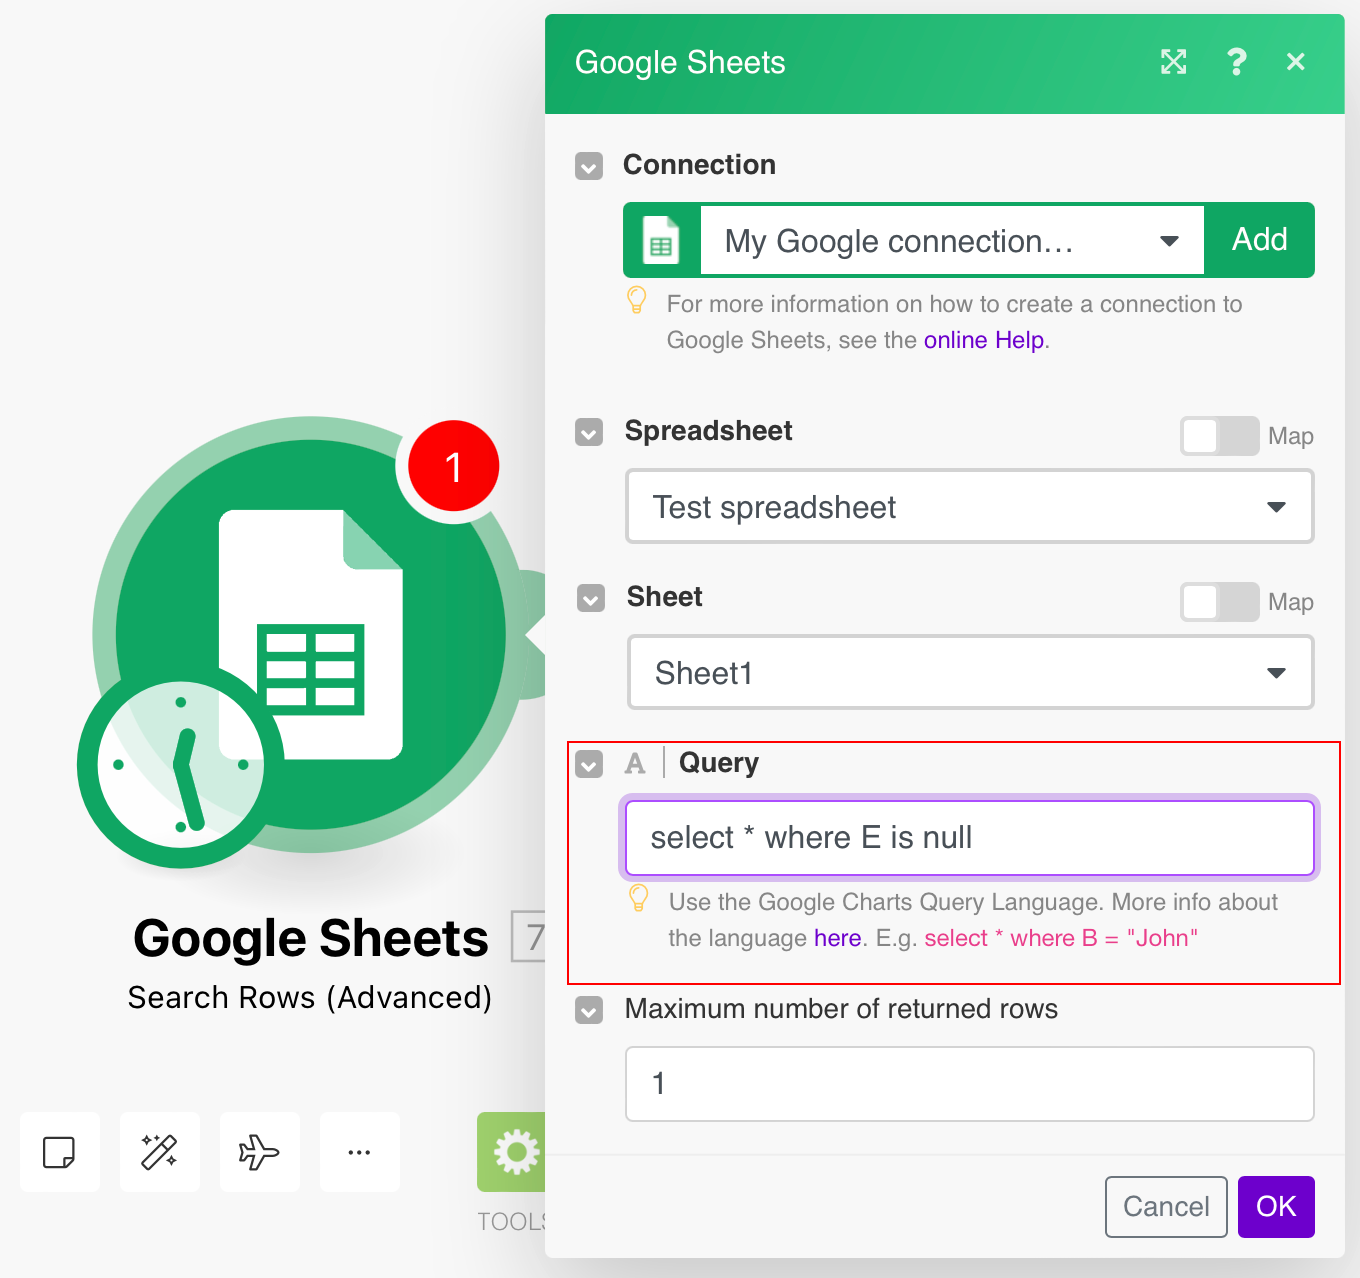 |
Here "E" is the column and "is null" is the condition. You can create a more advanced query using Google Query Lang
In Celonis platform, insert the Webhook > Custom webhooks module/trigger into the Action Flow and configure it (see Webhooks).
Note: Once you have configured the custom webhook module, be sure to save the Action Flow .
Copy the webhook's URL.
Execute the Action Flow.
In Google Sheets, choose Insert > Drawing from the main menu bar.
Click the Text box icon:
Design a button and click Save and Close in the top-right corner:

The button will be placed in your worksheet. Click the three vertical dots in the button's top-right corner:
Choose Assign script from the menu.
Enter the name of your script (function). For example,
runAction Flowand click OK:Choose Extensions > Apps Script from the main menu bar.
Insert the following code:
The name of the function must correspond to the name you specified in step 9.
Replace the
https://hook.celonis.com/xxx...xxxURL with the webhook's URL you copied in step 2.function runAction Flow() { UrlFetchApp.fetch("https://hook.make.com/xxx...xxx"); }

Press Ctrl+S to save the script file, enter a project name, and click OK.
Switch back to Google Sheets and click your new button.
Grant the required authorization to the script:
In Celonis platform, verify that the Action Flow has successfully executed.
Note
This will only trigger a Action Flowscenario to run when Scheduling is enabled. The linked webhook URL will not return any data but instead will trigger the Action Flow to run and allow the connected modules to return data.
If you store a Date value in a spreadsheet without any formatting,
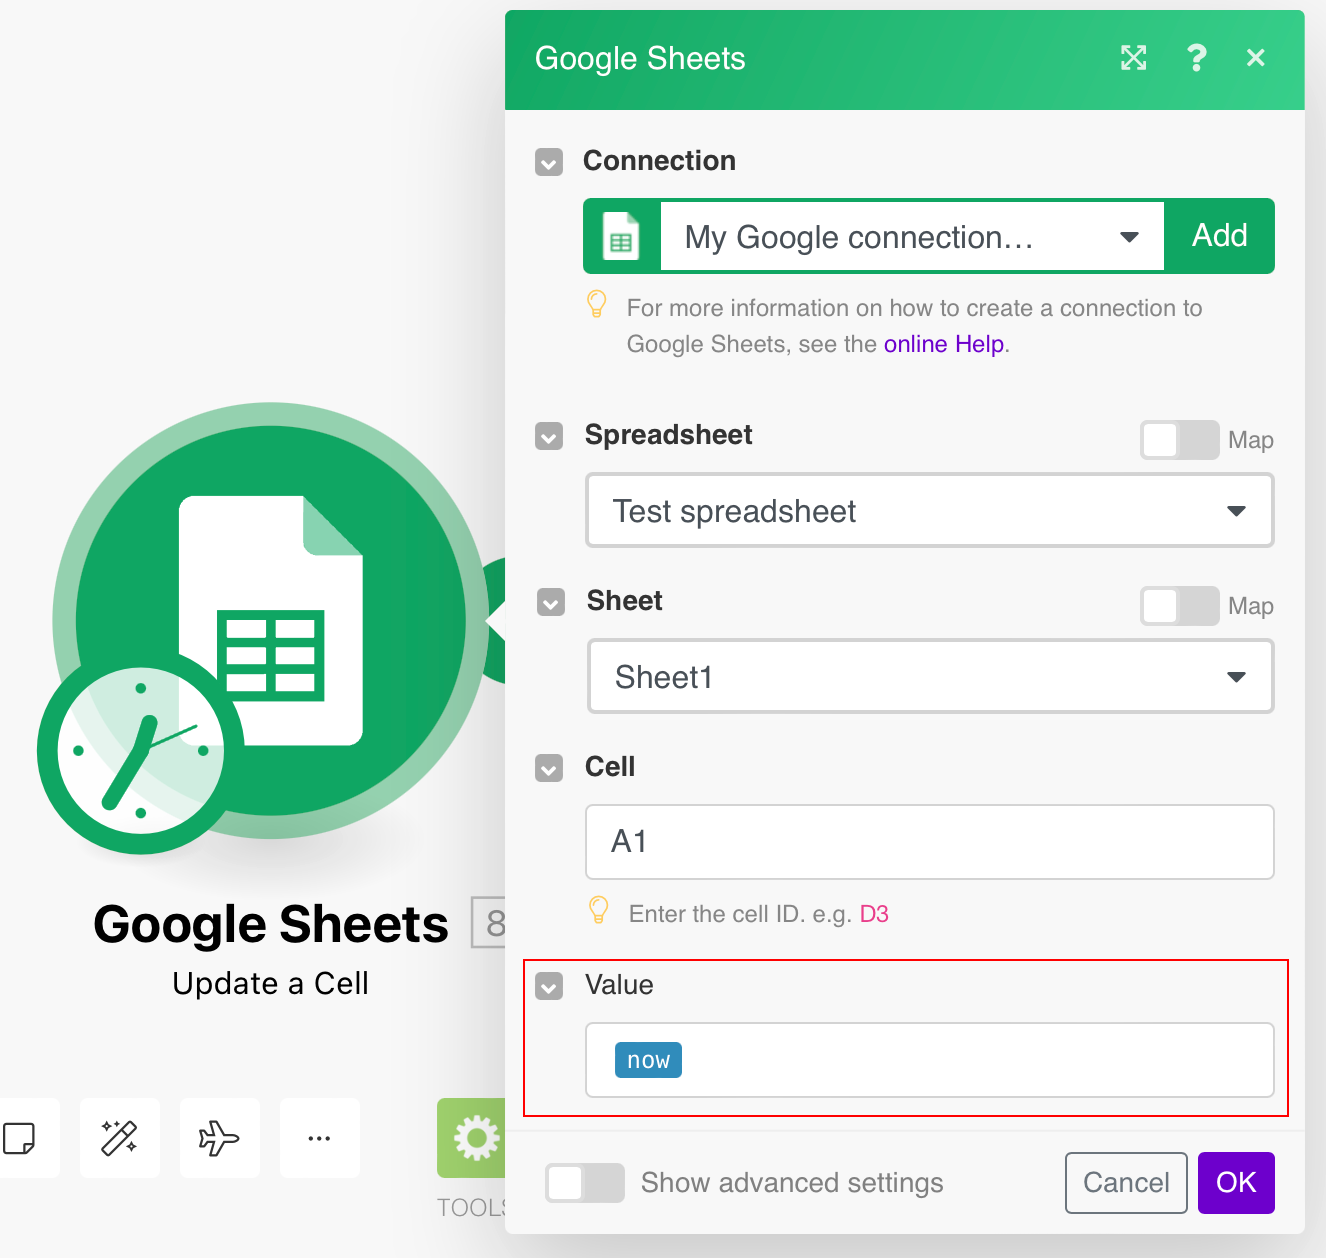
it will appear as text in ISO 8601 format in the spreadsheet. However, Google Sheets formulas or functions that work with dates do not understand this text. E.g. formula =A1+10 will display the following error:

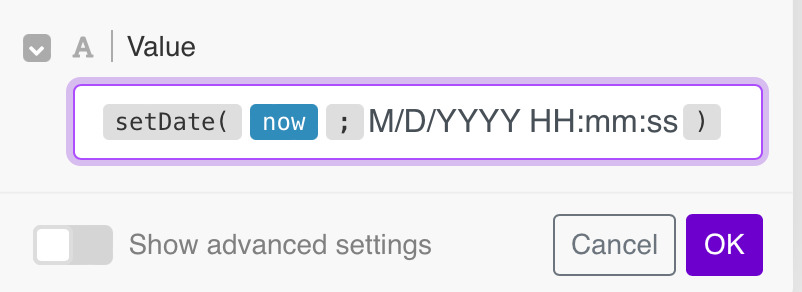
To help the GS to understand the date, format it with the formatDate(.) function. The correct format passed to the function as the second argument depends on the spreadsheet's locale settings. Choose File ▶ Spreadsheet settings from the main menu to verify/set the locale:
Once you have verified/set the proper locale, determine the corresponding date and time format by choosing Format ▶ Number from the main menu. The format is displayed next to the Date time menu item.
The following example shows the use of M/D/YYYY HH:mm:ss format for the United States locale:
If you miss a built-in function but it is featured by Google Sheets, you may exploit it.
Sample sheet | The Total-EUR amount SUM will be converted, according to the current exchange rate, to the Total - USD amount and will be inserted into the desired field using Celonis platform. 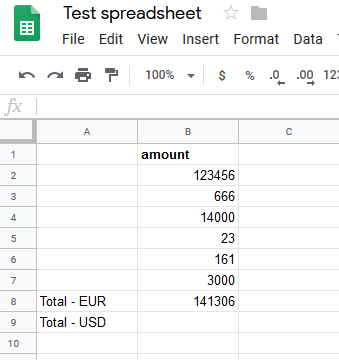 |
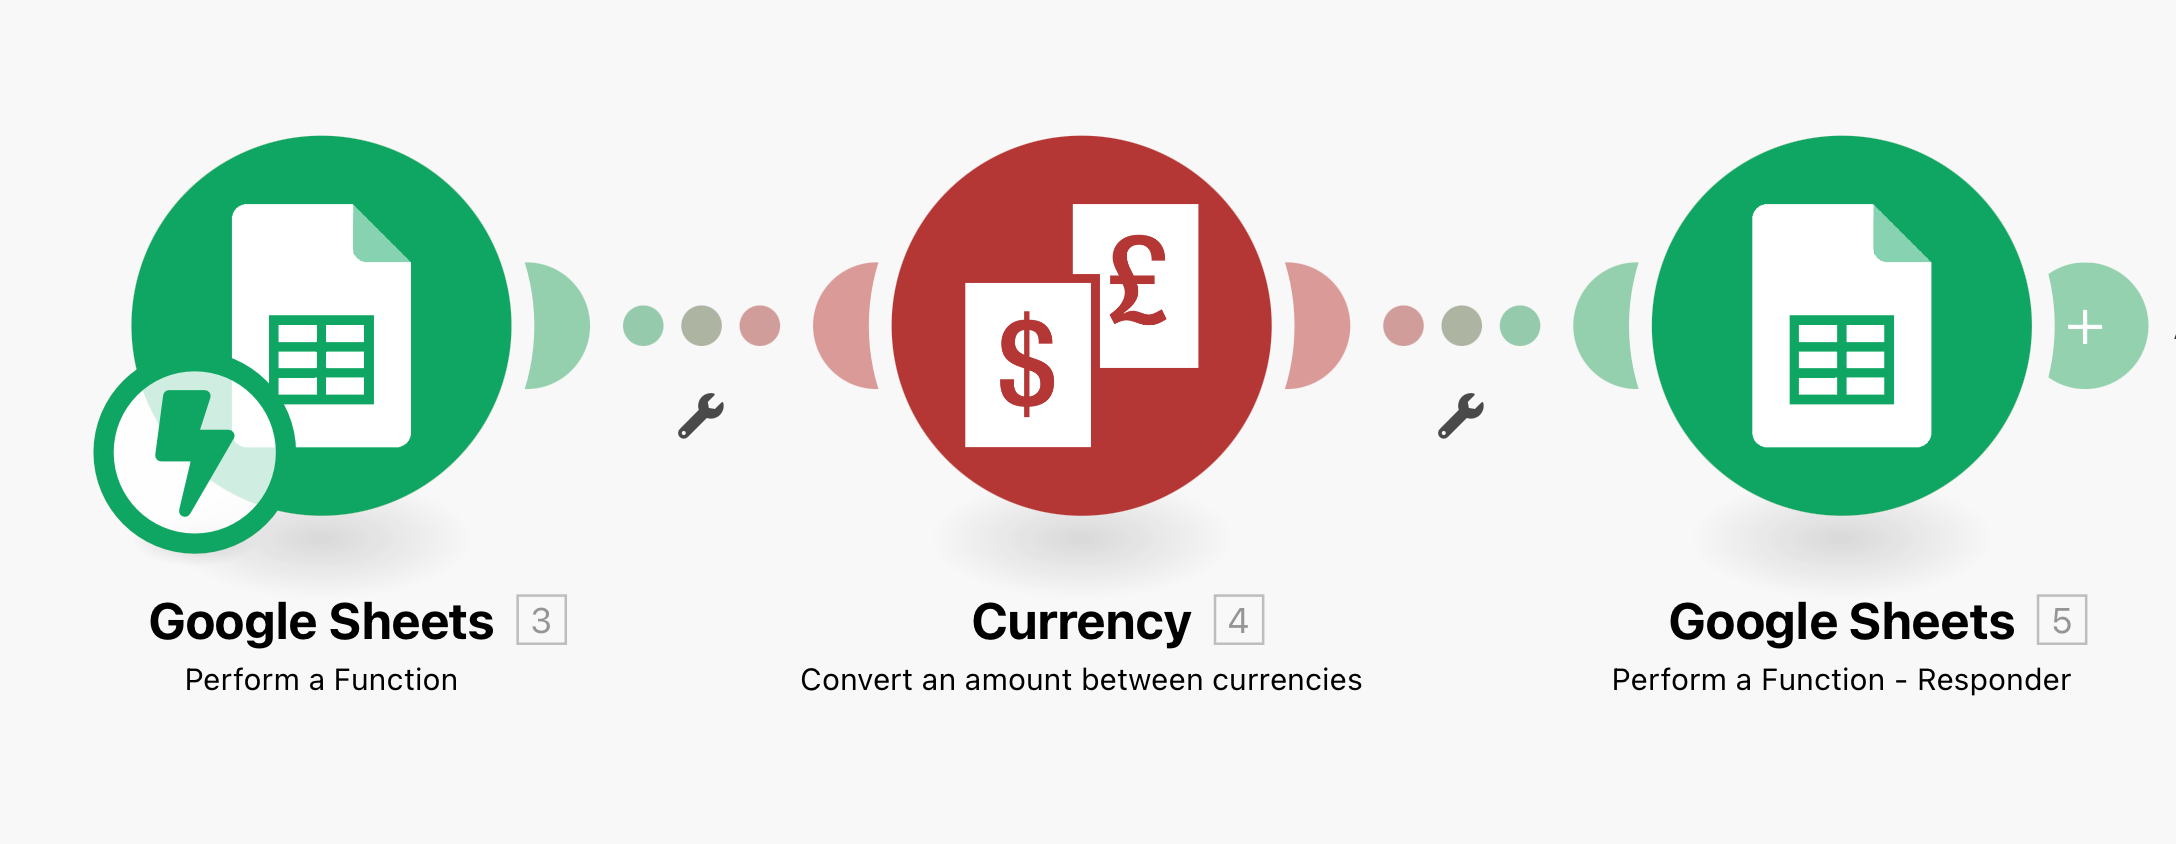
Create a Action Flow. Use the following modules:
Google Sheets > Perform a Function
Currency > Convert an Amount Between Currencies
Google Sheets > Perform a Function - Responder
Google Sheets > Perform a Function
Generate a webhook and paste it into the Celonis platform add-on in Google Sheets.
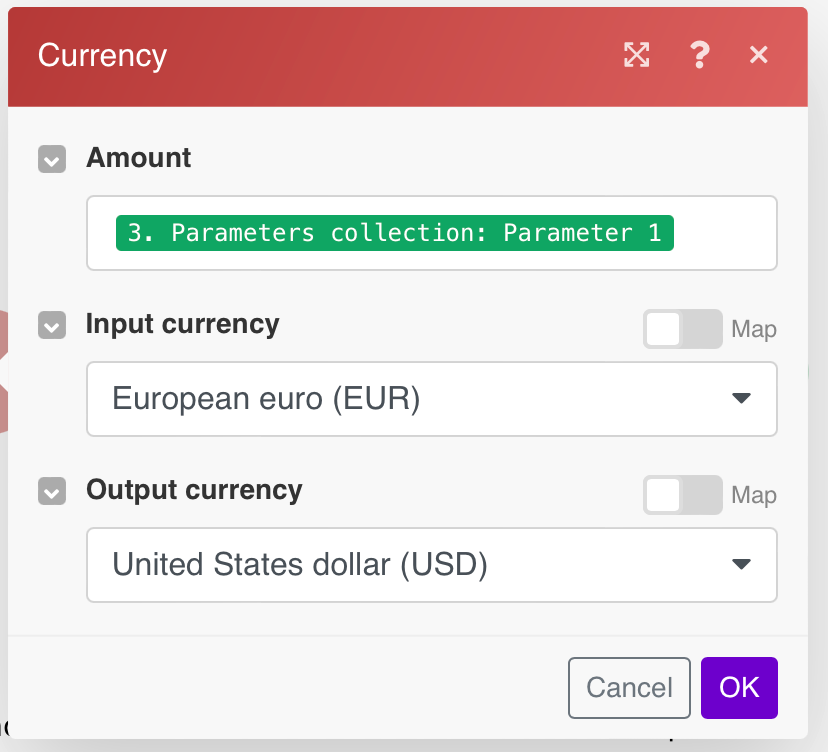
Currency > Convert an Amount between Currencies
Converts the mapped EUR amount to USD.
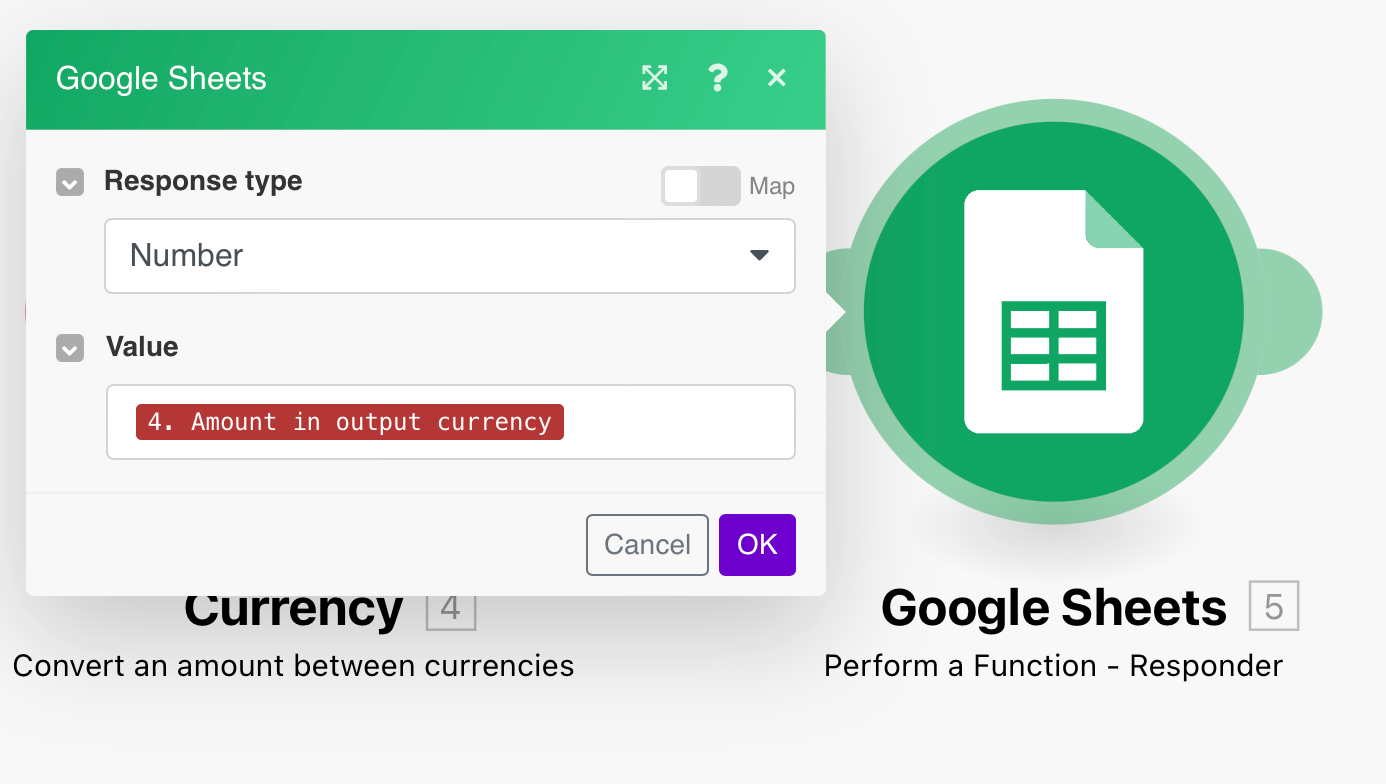
Google Sheets > Perform a Function - Responder
Inserts the converted amount into the sheet cell.
Run the Action Flow
Enter the
FUNCTIONinto the desired cell to load the converted amount.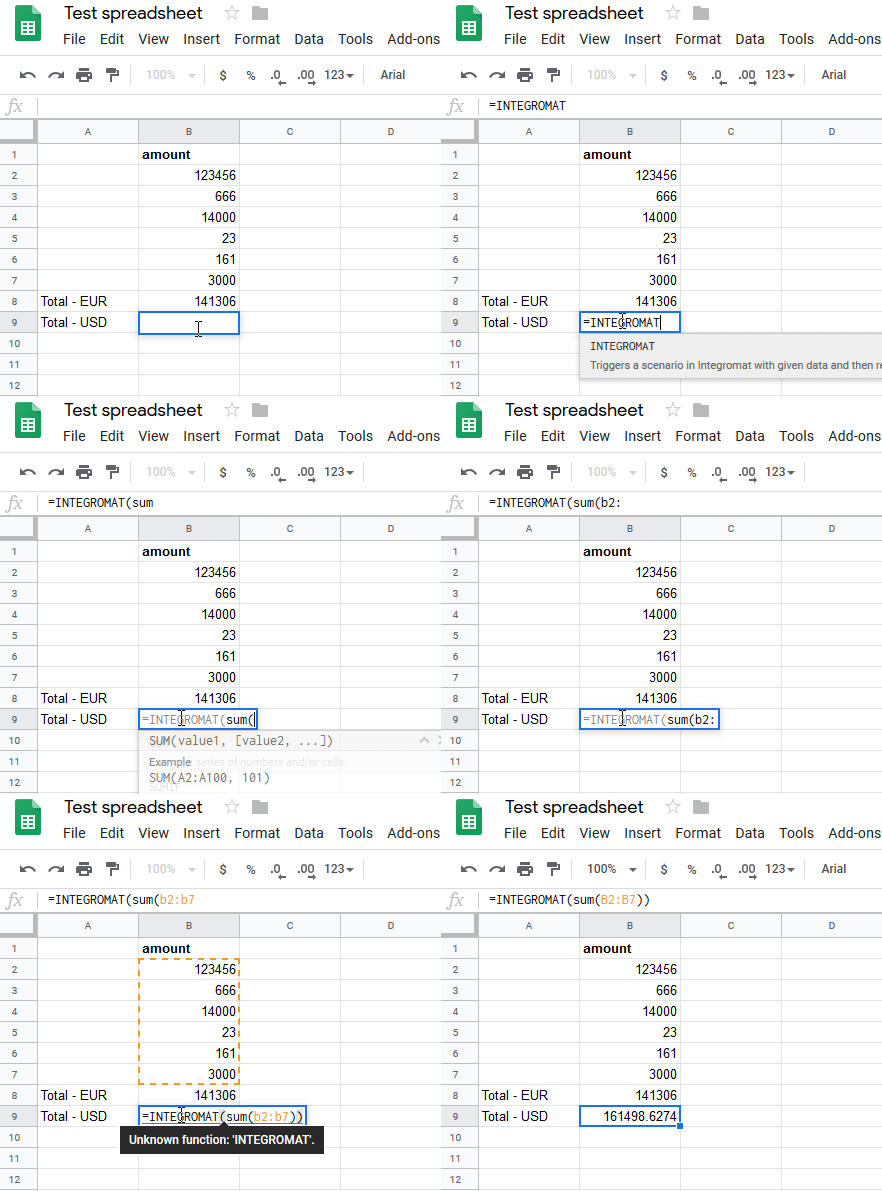
When the user changes the amount, the
FUNCTIONre-calculates the Total - USD according to the current exchange rate: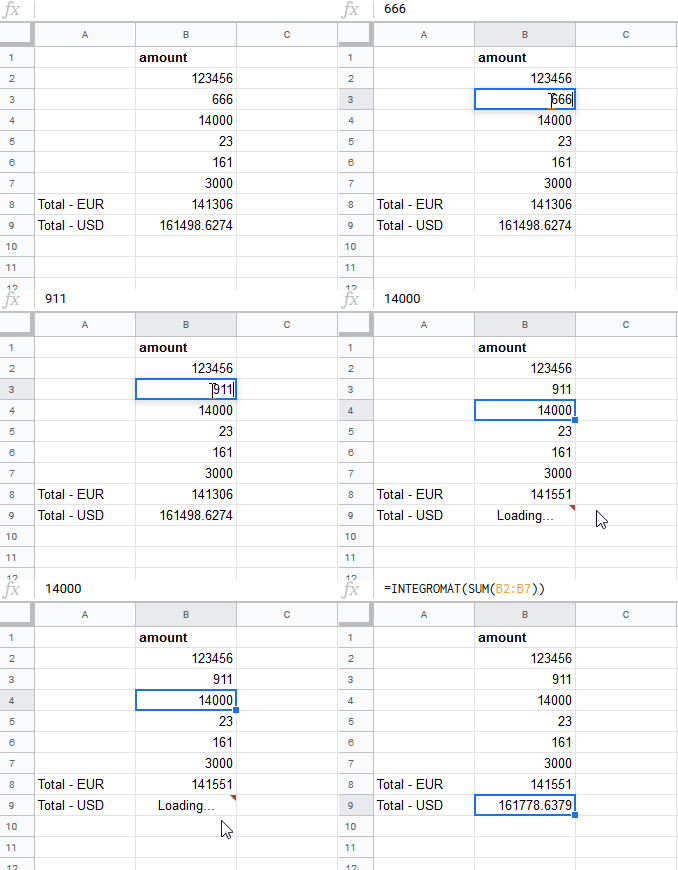
You can simply use the function like built-in functions in Google Sheet.
Create a new Action Flow with the following modules:
Perform a Function - the module receives the parameters passed to the function
Perform a Function - Responder - the module returns the result of the function execution back to the sheet
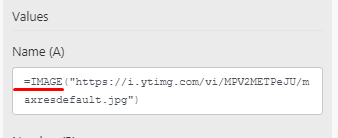
When getting an image from Google Sheets, first make sure you enter the image as a formula. For example:=IMAGE("https://i.ytimg.com/vi/MPV2METPeJU/maxresdefault.jpg") making use of the =IMAGE(...)

After you have done so, open the Google Sheets module (e.g. Watch Rows, Search Rows, Get a Cell) and select Show advanced settings. Then select the Formula option in the Value render option field.
The output will be as shown below:
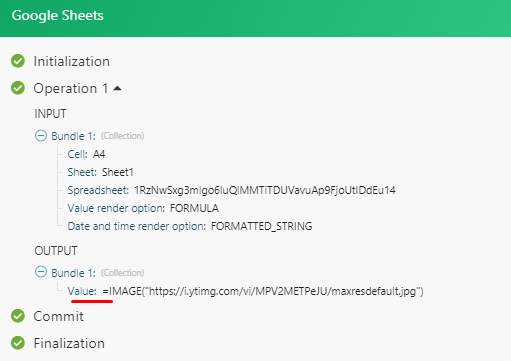
Then you can extract the URL using the replace function. The output will be just the URL.
To be able to post an image, make sure to enter the =IMAGE(...) formula that will be used in the cell and then enter the Image URL address.
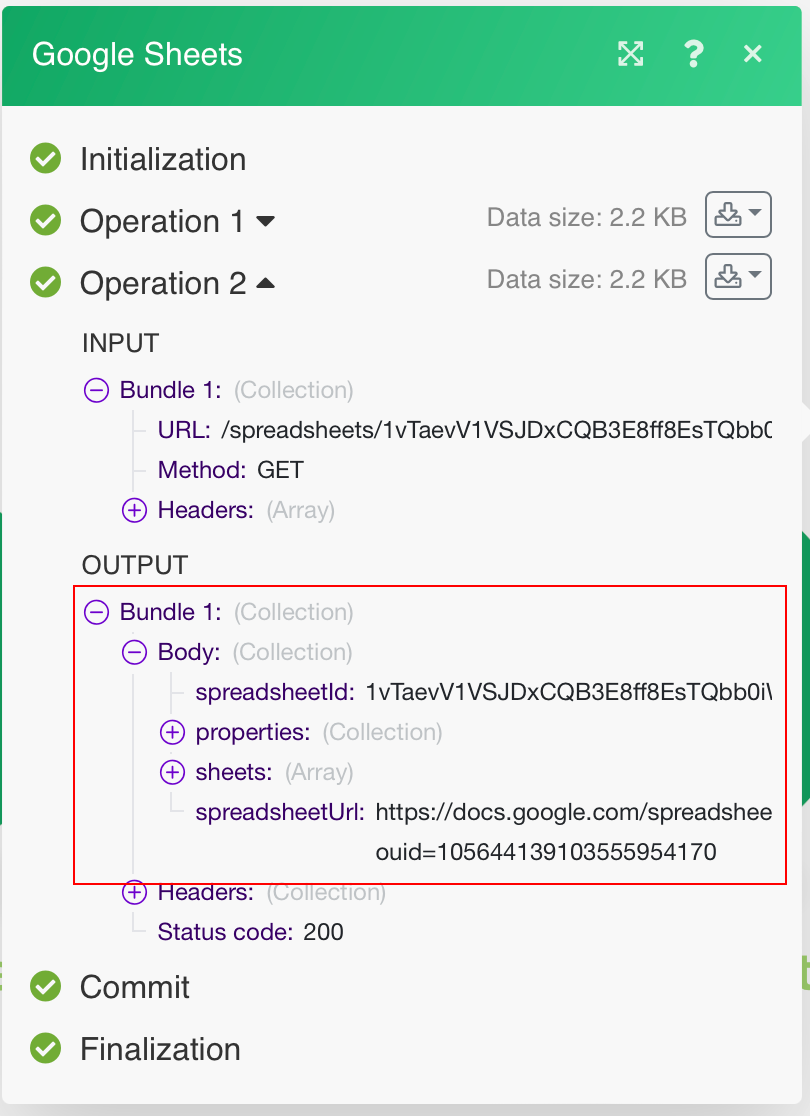
The following API call returns specified spreadsheet details.
URL:
/spreadsheets/{{spreadsheetID}}
Method:
GET
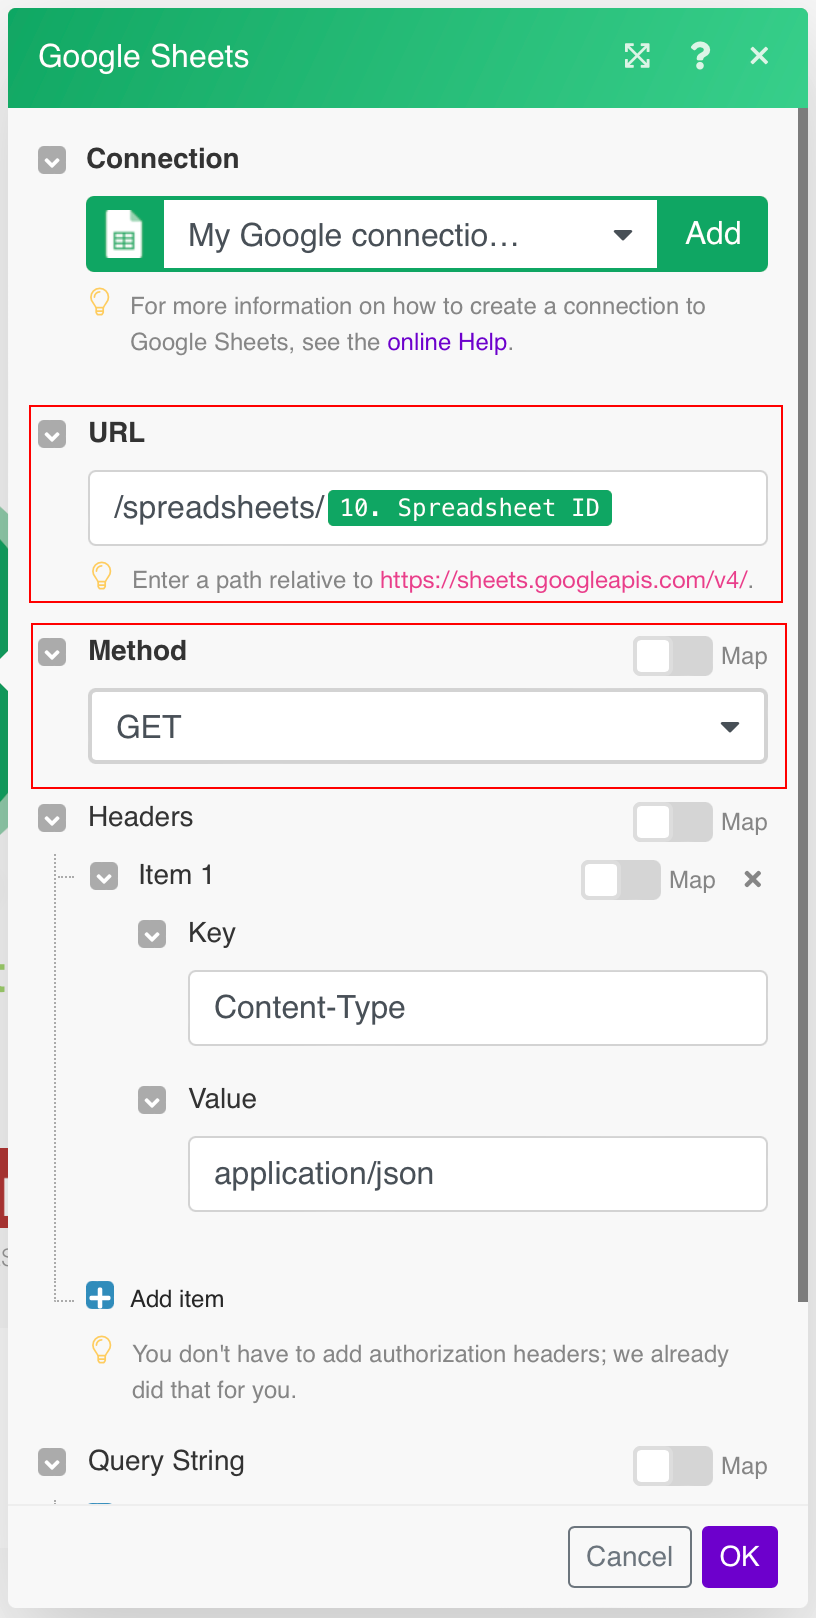
The result can be found in the module's Output under Bundle > Body:
If the error 429: RESOURCE_EXHAUSTED occurs, you have exceeded the API rate limit.
The Google Sheets API has a limit of 500 requests per 100 seconds per project, and 100 requests per 100 seconds per user. Limits for reads and writes are tracked separately. There is no daily usage limit.
See more details at developers.google.com/sheets/api/limits.