Using the Celonis Kafka connector
Important
Any references to third-party products or services do not constitute Celonis Product Documentation nor do they create any contractual obligations. This material is for informational purposes only and is subject to change without notice.
Celonis does not warrant the availability, accuracy, reliability, completeness, or usefulness of any information regarding the subject of third-party services or systems.
The Celonis Kafka connector is a sink plugin, designed specifically to execute through the Kafka Connect runtime. The Celonis Kafka connector's purpose is to continuously read records from one or multiple source topics, transform them into a canonical format, and then load it into the Celonis Platform via the Standard Data Ingestion API.
Tip
Refer to the official Kafka Connect documentation for instructions on how to install Kafka Connect plugins.
Using the Celonis Kafka connector requires a Celonis Platform data pool. For more information on data pools, see Creating and managing data pools.
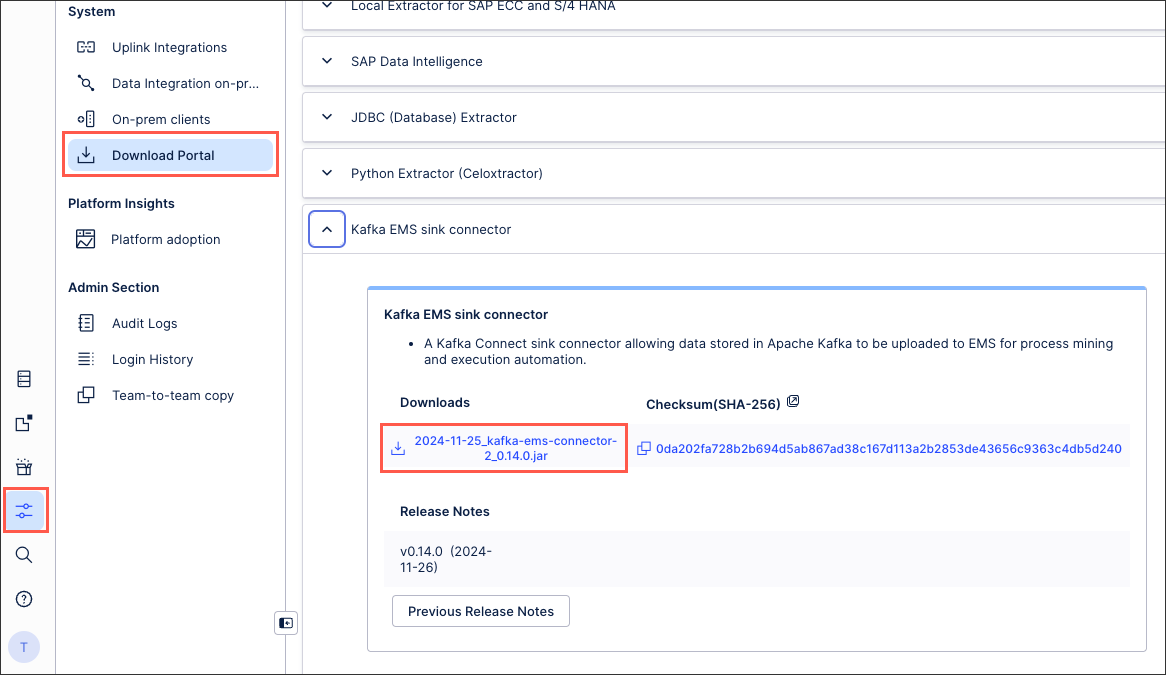
Download the latest version of the Celonis Kafka connector from the Download Portal. This is listed as Kafka EMS sink connector:
Follow the instructions on Download portal.
Find the Kafka EMS sink connector section, and select the JAR link to start the download.
To set up the Celonis Kafka connector connection:
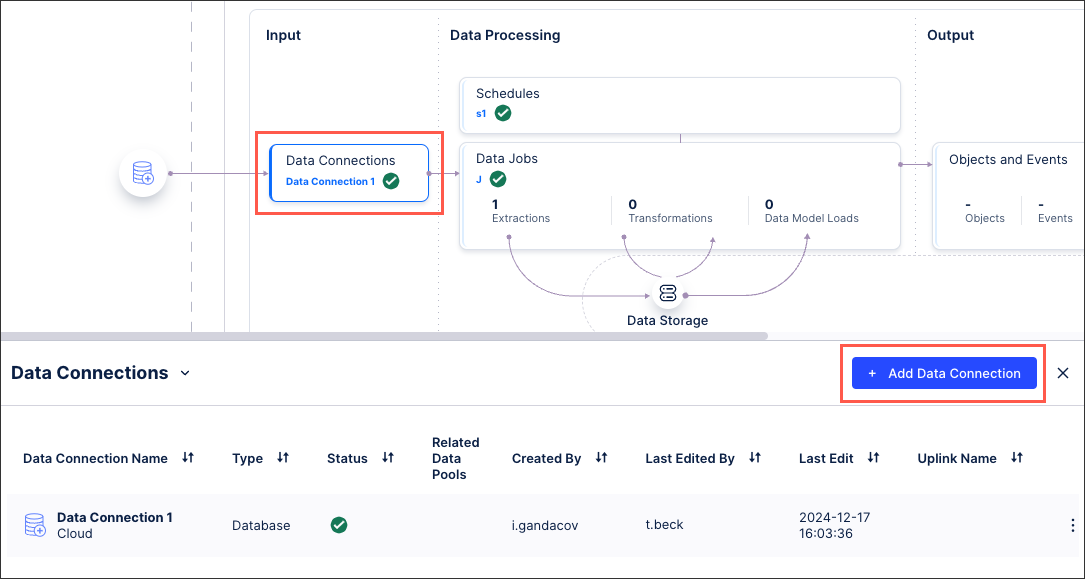
In the Celonis Platform, go to Data > Data Integrations, and select your data pool.
In your data pool diagram, select Data Connections > Add Data Connection.
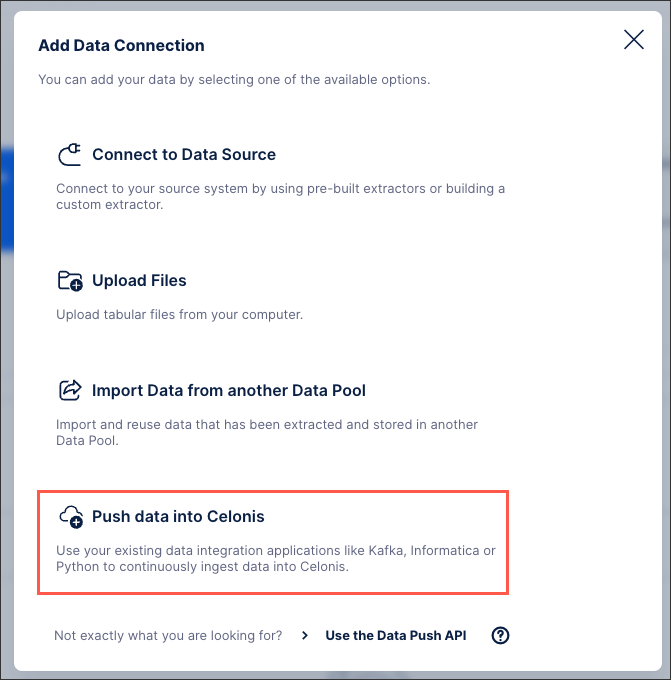
Select Push data into Celonis.
In the Configure your Data Ingestion application window, define the following configuration details:
Name: Provide a name for the ingestion application.
Source Table Name: Provide the Kafka topic name.
Target Table Name: Provide the name you want to use for this table in the data pool. By default, this is same value as Source Table Name.
Tip
If your data uses nested tables, we recommend using a table schema to define the remaining fields, as described in the next step.
Primary Key: Provide the unique identifier column(s) for each record that uniquely identifies a row. Press Space after an entry to add additional ones.
Note
If you do not assign primary key to tables, the Data Ingestion pipeline automatically creates a synthetic column called
_celonis_idand uses it as the primary key for unnested tables.Age Columns: Provide the name of the column(s) that specifies the version or timestamp of the row. Press Space after an entry to add additional ones.
Note
Incoming records are processed only if the Age Columns value is greater than or equal to (≥) the existing record’s value for the Primary Key.
If your data uses nested tables, define a table schema:
Note
If your data is flat/normalized, you do not need to define a table schema.
If your data is nested, we recommend using one representative record from the Kafka topic to configure the table schema, which is used as the underlying ingestion logic.
Select Options (⋮) > Configure Table Schema.
A new window opens.
In the left-side code block, paste your JSON schema. If it is valid, the target table structure on the right side is updated with the corresponding column names.
Note
If you are getting the error message:
An unexpected error occurred. Please send this error code 'undefined' to Celonis Customer Support.
It is typically because the JSON payload is invalid. Verify that the JSON follows a valid structure and matches the schema defined in your configuration.
Select the checkboxes (or combinations) in Primary Key and Age Column to define each.
Select Finish. The Primary Key and Age column values defined as part of the schema configuration are automatically applied.
As needed, you can define multiple table configurations by selecting + Add and repeating the previous instructions.
Important
Before saving your configuration, it is critical to verify all Primary Key values for tables are correct. After saving the configuration, it is not possible to change the Primary Key values of an existing table.
In the Configure your Data Ingestion application window, verify all values are correct, and select Save. This opens the Ingestion application credentials window.
In the the Ingestion application credentials window, copy the Access Key and Access Secret to a safe location. These are the required credentials your Kafka Connector will use to authenticate with the Celonis Platform when pushing data.
Important
This is the only time the Access Key and Access Secret will be accessible. If you do not retain them, you must create a new configuration.
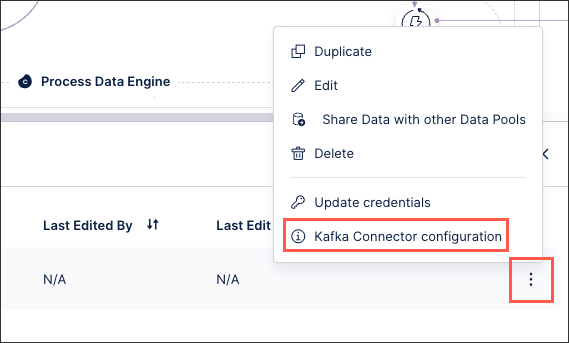
Retrieve and update the Celonis Kafka connector configuration from the UI:
Select Options (⋮) > S3 Clients configuration:
In the S3 clients configuration window, select the Kafka Connector–JSON tab.
Select Copy to clipboard, and edit it on your local device.
Update
connect.ems.uploader.s3.access.keywith your Access Key andconnect.ems.uploader.s3.access.secretwith your Access Secret.Add the following values:
connect.ems.commit.interval.ms=600000
connect.ems.commit.record
s=10000
connect.ems.commit.size.bytes=25000000
Important
These parameters act as a "flush trigger" that ensures data is committed to S3 whenever a specific time, record count, or file size threshold is reached. Without them, the connection may use default settings that could lead to significant data delays, inefficiently sized files, or system crashes during high-traffic spikes.
Update the S3 client configuration JSON as need based on your use case. Refer to Additional Celonis Kafka connector configuration details and Configuration reference for the Kafka EMS sink Connector for specific configuration options.
Save your S3 client configuration.
You can now use this configuration for the Celonis Kafka connector.
Note
If you make changes in the Data Connection (e.g. add a new table), the configuration only gets updated within Celonis.
To make changes effective, you need to replace your existing S3 client configuration with the new configuration (ensuring you follow the same steps above), and restart your Celonis Kafka connector.
Start the connector with your S3 client configuration.
You can now use the Standard Data Ingestion API with the Celonis Kafka connector.
Note
For additional configuration references, see Configuration reference for the Kafka EMS sink Connector.
Using Kafka from a managed service provider
If you are using Kafka or Kafka Connect from a managed service provider, follow the instructions from your service:
AWS MSK Connect: To create the connector, follow the steps provided here. The steps involved will require installing a custom connector, and for that, follow this link and use the connector release jar.
Confluent: Connector installation will be performed using Confluent Hub. Follow the instructions here to enable the Kafka Connect sink.
Azure event hub: If you're running Event Hub, you can leverage Kafka Connect and the Celonis Kafka connector to load data into Celonis Platform. The instructions to enable Kafka Connect for Event Hub can be found here. Once the installation is done, follow the manual steps to enable the connector before creating an instance of it.
Reading unstructured JSON data
The Celonis Kafka connector ships with a special serializer that dynamically infers a schema based on the structure of the incoming JSON records and converts them in the canonical representation used internally by the Celonis Kafka connector.
value.converter = cloud.celonis.kafka.connect.json.SchemaInferringJsonConverter
Reading data in AVRO format
If your data is in AVRO format, or another format supported by Confluent (i.e. Protobuf, Thrift), the value.converter key needs to be set to the appropriate Confluent converter and point to a reachable Schema Registry instance.
value.converter = io.confluent.connect.avro.AvroConverter
value.converter.schema.registry.url = http://<SCHEMA-REGISTRY-HOST>:<PORT>
Reading from multiple source topics
A single instance of the Celonis Kafka connector can read from multiple source topics, provided that the data they hold is in the same format (e.g. all AVRO).
tasks.max = 3
topics=sourceA,sourceB,sourceC
# or alternatively topics.regex=source.*
By default, the Celonis Kafka connector persists records for each source topic in a Celonis Platform table with the same name.
Tip
When reading data from multiple topics, or from a simple topic that has multiple partitions, you may improve throughput by setting tasks.max with a value greater than one, thus allowing the Kafka Connect runtime to allocate up to N tasks to the connector instance.
Ensuring partition affinity
By default, the Kafka producer determines the target partition based on the message Key raw bytes values. To compute the target partition, it hashes the value using Murmur3, and then it does a modulo-Number of partitions.
Therefore to ensure the records with the same primary key end up always in the same partition, the Kafka message Key should contain only the primary key(s) values.
Note
The Celonis Kafka connector does not consider the Key fields.
You must add the primary key(s) to the record Value, either at produce time (duplicating data between the Key and the Value) or at the Celonis Kafka connector level by using Kafka Connect Single Message Transform which will transfer fields from the Key into the Value (a reverse of this).