Configuring on-premise JDBC Extractors
Celonis on-premise extractors are designed for deployment on physical local servers or within secure private cloud environments (VPCs/VNets) to bridge the gap between your protected data and the Celonis Platform.
This page covers both required and optional configuration settings for the JDBC Extractor.
To configure the JDBC Extractor, the following prerequisites are required:
Ensure your environment meets the required Prerequisites.
If you have not already done so, complete Downloading.
When configuring the JDBC Extractor, at a minimum, you must configure the uplink values and if you are using a proxy, the proxy values.
When making changes to an existing JDBC Extractor configuration, you must restart the extractor for the changes to take effect.
Note
When configuring the JDBC Extractor, at a minimum, you must configure the uplink values, and if you are using a proxy, the proxy values.
After configuring the minimum required configurations for your environment, it recommended (for troubleshooting purposes) to run the JDBC Extractor and test the connection between it and the Celonis Platform. After you confirm the connection is successful, incrementally continue to configure other required values, restarting the JDBC Extractor and testing the changes in Celonis Platform with each change.
The first step to figure your on-premise JDBC Extractor is to create an Uplink connection in the Celonis Platform. This will provide the Client ID and Client Secret keys required by the JDBC Extractor configuration to connect to the Celonis Platform.
Warning
To function properly, each JDBC Extractor requires unique Client ID and Client Secret keys. Cloning or copying an extractor's keys to multiple machines will cause the extractor to malfunction.
This means you must configure the Uplink connection values for each JDBC Extractor used in your environment.
To do so, in the Celonis Platform:
Go to your team settings, and then Admin & Settings > Uplink Integrations.
Select Connect new system, and create a new uplink with the type Connector.
Copy the Client ID and Client Secret keys, and save them to a secure location, as they are required in future steps.
Important
The Client ID and Client Secret keys are required as part of the JDBC Extractor configuration. This is the only time the keys will be shown. If you do not retain a copy, you must create a new Uplink Integration to complete follow-on steps.
For the JDBC Extractor to connect to your environment, you must next configure the uplink values in the application-local.yml.
To do so:
Navigate to your JDBC Extractor package directory, and open the
application-local.yml, located in the base directory.Locate the
uplinkvalues.Configure the following
uplinkvalues in theapplication-local.yml:YAML indentation and syntax
When making any changes to the
application-local.yml, ensure you maintain the exact whitespace and nesting hierarchy provided in the template. Additionally, when adding any new configurations, ensure you follow YAML syntax. Failing to do so may cause the extractor to fail on startup.uplink: enabled: true url: https://[team].[realm].celonis.cloud/uplink/api/public/uplink clientId: id clientSecret: secret
uplink.url: Update with your team and realm information.uplink.clientId: Provide the Client ID key you saved when creating the uplink.uplink.clientSecret: Provide the Client Secret key you saved when creating the uplink.
For these changes to take effect, you must start the extractor using your preferred method as described in Running JDBC extractor.
Note
If you are using a proxy, perform the steps in Proxy settings for on-premise extractors before performing the next steps.
Once the JDBC Extractor, is started:
In the Celonis Platform, navigate to Admin & Setting > Uplink Integrations.
Locate your uplink in the list, and verify there is a circle checkmark (
 ) in the Status column.
Note
It may take may several minutes before the JDBC Extractor initially pings the platform.
The following sections describe how to configure the JDBC Extractor for your environment.
Important
If you have not already done so, Downloading and (REQUIRED) Configuring Uplink connection valuesare required before starting.
The following is a copy of the default application-local.yml located in the JDBC Extractor package. Refer back to the default values as needed:
logging:
  level:
    org.apache.parquet.hadoop: WARN
    org.springframework.security: INFO
    #cloud.celonis: TRACE
  file: jdbc_connector.log

uplink:
  enabled: true
  url: https://[team].[eu-1].celonis.cloud/uplink/api/public/uplink
  clientId: id
  clientSecret: secret

feature:
    skip-record-sanitization:
      connection-id-whitelist: # adding entries here ignores the global feature flag
        - "example-connection-id-asdf98af"

server:
  port: 8099

spring:
  servlet:
    multipart:
      max-file-size: 1000MB
      max-request-size: 1000MB

celonis:
  #proxy-config-path: proxy.yml
  #internal-proxy-config-path: proxy.yml
To prevent JDBC Extractor logs from consuming unnecessary disk space, you can configure a rolling policy in the application-local.yml. To do so:
Open your
application-local.yml, and locate theloggingvalues.Add the following values in the
loggingsection:logging: ... logback: rollingpolicy: max-history: 7 # Retains logs for 7 days total-size-cap: 1GB # Limits total log storage to 1GBEnsure the
logbackvalues are correctly indented and nested, and save the file.For these changes to take effect, you must start/restart the extractor using your preferred method as described in Running JDBC extractor.
You have now configured the logging values for the JDBC Extractor. For more information on log files, see Accessing log files.
Note
Using proxies is optional and it is not required by on-premise extractors. It is only needed if your infrastructure demands it.
If you need to use a proxy server between the on-premise extractor and the source system or between the on-premise extractor and Data Integration in the cloud, you need to create a configuration file per connection and then link their configuration files in the extractor configuration.
Specifying the location of the configuration file
 |
In the file application.yml (see above) you need to add the configurations displayed on the left
proxy-config-path: This defines the path to the configuration of the proxy server between the source system and the extractor.
internal-proxy-config-path: This defines the path to the configuration of the proxy server between the extractor and the cloud endpoint. It is called "internal" because it is used for the communication of two components provided by Celonis.
The path always needs to be defined relative to the extractor file.
Example 1: If the configuration file proxy.yml for the proxy between the source system and the extractor is in the same folder, the configuration should look as follows:
application-local.yml
celonis:
  proxy-config-path: proxy.yml
Example 2: If the configuration file proxy.yml for the proxy between the extractor and Data Integration in the cloud is in the subfolder conf, the configuration should look as follows:
application-local.yml
celonis:
  internal-proxy-config-path: conf/proxy.yml
Creating a configuration file for the proxy server
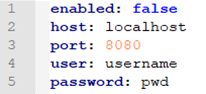
For each separate proxy server you need to create a configuration file with the connection details:
enabled: true if the proxy server should be activated, false otherwise
host: the IP address or hostname of the proxy server
port: the port at which the server can be reached
user (optional): the user name for basic authentication with the proxy
password (optional): password for basic authentication with the proxy
This configuration guide explains how to use Vault to secure your Celonis-specific clientSecret for the Uplink.
Step 1: Download the connector.jar file
You can find the connector.jar file in the Celonis Platform Download Portal.
Click Admin & Settings > Download Portal.
Scroll down and open JDBC (Database) Extractor.
You'll see a list of the available connector-jdbc.jar files. Select the latest one.
Step 2: Generate a private key file
Run the help command to see all your options.
java -jar connector-jdbc.jar help-vault
Place the connector.jar file in the same directory as the extractor.
Generate a private key file, using the command:
java -jar connector-jdbc.jar genkey
You will be asked to enter a master password. This password will later be used to encrypt your private passwords.
Save the output to a file which is only readable by your service account.
For example, in the YAML file below, we've used vault.file.
Step 3: Adjust the configuration of the application-local.yml
Add or update this line in your application.yml file:
credentialsProvider:VAULT_CREDENTIALS_PROVIDER:vaultFile:<Path to your keyfile>
You can encrypt the clientSecret using:
java -jar connector-jdbc.jar genpass
Enter your master password and the password you want to encrypt.
Use the encrypted password in the configuration files where appropriate.
Here's an example of the adjusted application-local.yml file:
uplink:
  enabled: true
  url: http://dev.eu-1.celonis.cloud/uplink/api/public/uplink
  clientId: e102a1e3c3cabcf5cf6c74134ad25baaccbf83f80ea99262b6611bf902d3
  clientSecret: 676sad7a6d7as5d6asd564d5sa476766 65c6dc8b4feced32401b608792872e9cbe69a8ea9456f98dcd0887470245c9700c2eab0ffebe0536c7baea4717b799dfc9f21892d757ff48706404fd8f3587a26b1b220dc1098b71a4fdb7d66d67989b1ff52b2b34a5c04a6bc50767a283119f6be30ad81e31b99cf3de7304ec95e157a6cb649fc9680299c9427b3205167c36cb71c0a42911e7e879b4f44cf1c1bef3db7fe3c83a598b9c9289e86fe8dfcfcd5aa056ba7eea9426910fe92eee58b9a1cdc9e56216eb9e094d6750cc1609415c0c5280bb5ab285192943a5cdec899f5a8a83f1d9658d8b8a49de312353b918c2c5750c2a4d0adbdc5824a605325122663058b0144aa64c8a20dd57d7078af1274a9aaf0a7b03ea146df63797c64969bac57f2d8fd12d87bb59dbd6f245583bee0d73b23780dead86f763882b17000c239b34a154498c950803f05ded82d8c1a434a1005d99515e271c4ec0b8ad7eb9f3f017befb9cc9471f92b3c67791f85f6a694fe2ff2b96ffb5370113ac15bdd530bcac49a7f71b63e29846717a8aacb59ee0eaf6f29d5ca22608a472ac4c16df7278980e9dced90e562440ac510e8f304a3379bcc4e9daa776a68d099ff55ba7817063391175eb0734dbc101bad03a36cd7c7b58940f0bb3d69a9f2fc4b9179f25877c8c6cd544916bbd2d344aa5ce71fcef4cc31b864ce211cd0b1096d3d5e180de6886f109128d28ae24e9149fb
  useCredentialsProvider: true

credentialsProvider:
  enabled: false
  type: VAULT_CREDENTIALS_PROVIDER
  VAULT_CREDENTIALS_PROVIDER:
    vaultFile: /full/path/to/vault.file
Step 4: Restart the extractor server
When extracting data from a database via JDBC, the connection is established using the credentials stored in the Celonis Platform to send requests. These credentials are encrypted, offering a secure connection between the database and the Celonis Platform. Despite this, you can also choose to use external password providers for your database connections.
The following external password providers can be configured:
Custom password provider: The custom password provider needs to be packaged as a jar file and added to the class path of the extractor application.
CyberArk: The CyberArk agent needs to be installed on the same on-premises extractor server in your network and provides the password for the database connection.
To use a custom password provider for the connection between your database and the Celonis Platform:
Step 1: Defining custom password provider
The first step to define your custom password provider is to implement a custom password provider. For this you will need our connector-external-clients.jar library.
With this library, you can implement a simple custom password provider like below:
package com.mycompany;

import cloud.celonis.connector.external.client.model.PasswordRequest;
import cloud.celonis.connector.external.client.model.PasswordResponse;
import cloud.celonis.connector.external.client.passwordprovider.CustomPasswordProvider;

public class MyConfidentialPasswordProvider implements CustomPasswordProvider {

    public PasswordResponse getPassword(PasswordRequest passwordRequest) {
        PasswordResponse passwordResponse = new PasswordResponse();
        passwordResponse.setPassword(myInternalPasswordProvider.getPassword());
        return passwordResponse;
    }
}
In this example, you have the following objects:
CustomPasswordProvider: This can be used for providing the source system password or proxy passwords. In addition to this, you can provide passwords for multiple source systems. In order to differentiate between different types of password requests, you can use the PasswordRequest object.
PasswordRequest.passwordType: An enum of type PasswordType, describing the type of password requested. Possible values are SOURCE_SYSTEM, PROXY, INTERNAL_PROXY.
PasswordRequest.host: This field will be populated with the Server Name you specified in the data connection if the passwordType is SOURCE_SYSTEM. If the passwordType is PROXY or INTERNAL_PROXY, this field will be populated with the host in the proxy configuration.
PasswordRequest.username: This field will be populated with the Username you specified in the data connection if the passwordType is SOURCE_SYSTEM. If the passwordType is PROXY or INTERNAL_PROXY, this field will be populated with the user in the proxy configuration.
PasswordRequest.password: This field will be populated with the Password you specified in the data connection if the passwordType is SOURCE_SYSTEM. If the passwordType is PROXY or INTERNAL_PROXY, this field will be populated with the password in the proxy configuration.
And a further example using the PasswordRequest object to retrieve data for proxy and different source systems:
package com.mycompany;

import cloud.celonis.connector.external.client.model.PasswordRequest;
import cloud.celonis.connector.external.client.model.PasswordResponse;
import cloud.celonis.connector.external.client.passwordprovider.CustomPasswordProvider;

public class MyConfidentialPasswordProvider implements CustomPasswordProvider {

    public PasswordResponse getPassword(PasswordRequest passwordRequest) {
        PasswordResponse passwordResponse = new PasswordResponse();
        if(passwordRequest.getPasswordType() == PasswordType.PROXY) {
            passwordResponse.setPassword(myInternalPasswordProvider.getProxyPassword());
        } else if (passwordRequest.getHost().equals("prod-server-01") && passwordRequest.getUsername().equals("celonis")) {
            passwordResponse.setPassword(myInternalPasswordProvider.getPasswordForProdServer01());
        } else if (passwordRequest.getHost().equals("prod-server-02") && passwordRequest.getUsername().equals("celonis")) {
            passwordResponse.setPassword(myInternalPasswordProvider.getPasswordForProdServer02());
        } else {
            passwordResponse.setPasswordResponseStatus(PasswordResponseStatus.FAILED);
        }
        return passwordResponse;
    }
}
Step 2: Registering your custom password provider
In order to register your custom password provider, you need to add the following configuration to your application-local.yml file:
credentialsProvider:
     enabled: true
     type: CUSTOM_CREDENTIALS_PROVIDER
     CUSTOM_CREDENTIALS_PROVIDER:
     passwordProviderImplementation: com.mycompany.MyConfidentialPasswordProvider
You then need to package your custom password provider to a jar file and add it to the class path of the JDBC Extractor Application. This can be achieved with the following command:
java -Dloader.path=mycustom-password-provider-1.0-SNAPSHOT.jar -Dspring.config.location=application-local.yml -jar connector-jdbc.jar
When using CyberArk as a password provider, the CyberArk agent needs to be installed on the same on-premises extractor server in your network and provides the password for the database connection. As the CyberArk password is constantly changing for security reasons, the database credentials are not stored in the Celonis Platform.
For the latest CyberArk documentation, see: CyberArk Docs.
To use CyberArk for the connection between your database and the Celonis Platform:
Step 1: Configure CyberArk requirements
A CyberArk string needs to be prepared for the password that needs to be fetched from CyberArk. As an example:
cyberark-sdk:appID=MY_APP_ID&safe=MY_SAFE&folder=MY_FOLDER&policyId=MY_POLICY_ID&Object=MY_OBJECT&reason=MY_REASON
In order for CyberArk integration to work, a CyberArk agent needs to be installed in the same server where the extractor server is installed
On Linux, the service can be checked with the command below:
sudo service aimprv start
sudo service aimprv status
The CyberArk agent needs to be able to resolve the CyberArk string that is going to be used. We recommend testing the CyberArk string with the local agent before testing with Celonis Platform.
On Linux, the password string for the example above can be retrieved with the command below:
/opt/CARKaim/sdk/clipasswordsdk GetPassword \
    -p AppDescs.AppID="MY_APP_ID" \
    -p Query="Safe=MY_SAFE;Object=MY_OBJECT"\
    -o Password
Step 2: Add CyberArk string to data connection
In the related database connection configuration, the CyberArk string needs to be provided in the password field.
Step 3: Update application-local.yml file
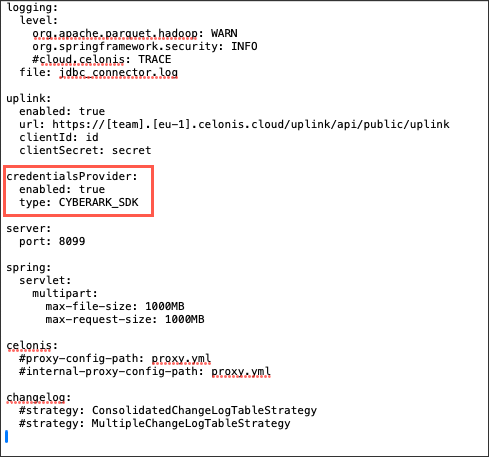
In the application-local.yml file of the extractor application, the following configuration needs to be added:
credentialsProvider:
  enabled: true
  type: CYBERARK_SDK
For example:
 |
Step 4: Restart extractor
You now need to restart the extractor for the changes to be implemented.
Starting with driver version 4.38.1 (2026-06-02), you can enable an optional internal health server to monitor the application-level state of the JDBC Extractor and expose it to your container orchestrator (such as Kubernetes, Azure Container Apps, or Docker Compose).
To enable on-premise JDBC Extractor health checks:
Open your version
4.38.1or laterapplication-local.ymlfile.Append the following configuration:
Note
This feature is not included in the
application-local.ymland is disabled by default. If you wish to add the configuration, but have it remain disabled, changehealth.probe.enabled: truetohealth.probe.enabled: falsein the following code block.health: probe: enabled: true host: "0.0.0.0" port: 8080Modify the default property parameters as required by your cluster network:
Specify the binding network interface address for
health.probe.host(defaults to"0.0.0.0"to listen on all interfaces).Define the network port for
health.probe.port(defaults to8080).Caution
The port used for
health.probe.portshould only be accessible within the internal pod or private container network layer. Exposing a port that is publicly accessible can pose severe security risks.
Ensure your YAML is valid, and save the file.
Restart the extractor application to apply the configuration changes.
Once the configuration changes are applied, the local health server exposes the following endpoints:
GET /health/liveness→200 {"status":"UP"}or503 {"status":"DOWN"}GET /health/readiness→200 {"status":"UP"}or503 {"status":"DOWN"}