Configuring the Case Explorer
The Case Explorer component allows you to show detailed information about the cases listed in your Data Model within your Studio View. You can then click individual cases to view their time stamped activity history (mapped from the activity table in your Data Model).
You can configure the Case Explorer in two ways:
You can also use event logs in the Case Explorer. Event Logs take the sequence of events described in your activity tables and allow you to store these as objects in the KM. This enables you to use the content of your activity tables inside your Studio Views.
For more information about event logs, see: Event logs (case-centric).
To configure the Case Explorer for your View:
In View Edit Mode, drag and drop the case explorer component into your View.
Open the component settings menu and customize your configuration using the following options:
Main event: This defaults to the activity table in your Data Model.
Event logs: Select from an existing event log or create a new one.
Exclude from user filtering: When a user is filtering the whole View, this case explorer will remain unfiltered.
Can't be used to set filters: While the user can interact with this component, their selections can't then be used to filter the whole View.
Click Interactive Mode and preview your configuration.
Optional: To see the latest version of your View, deploy the package
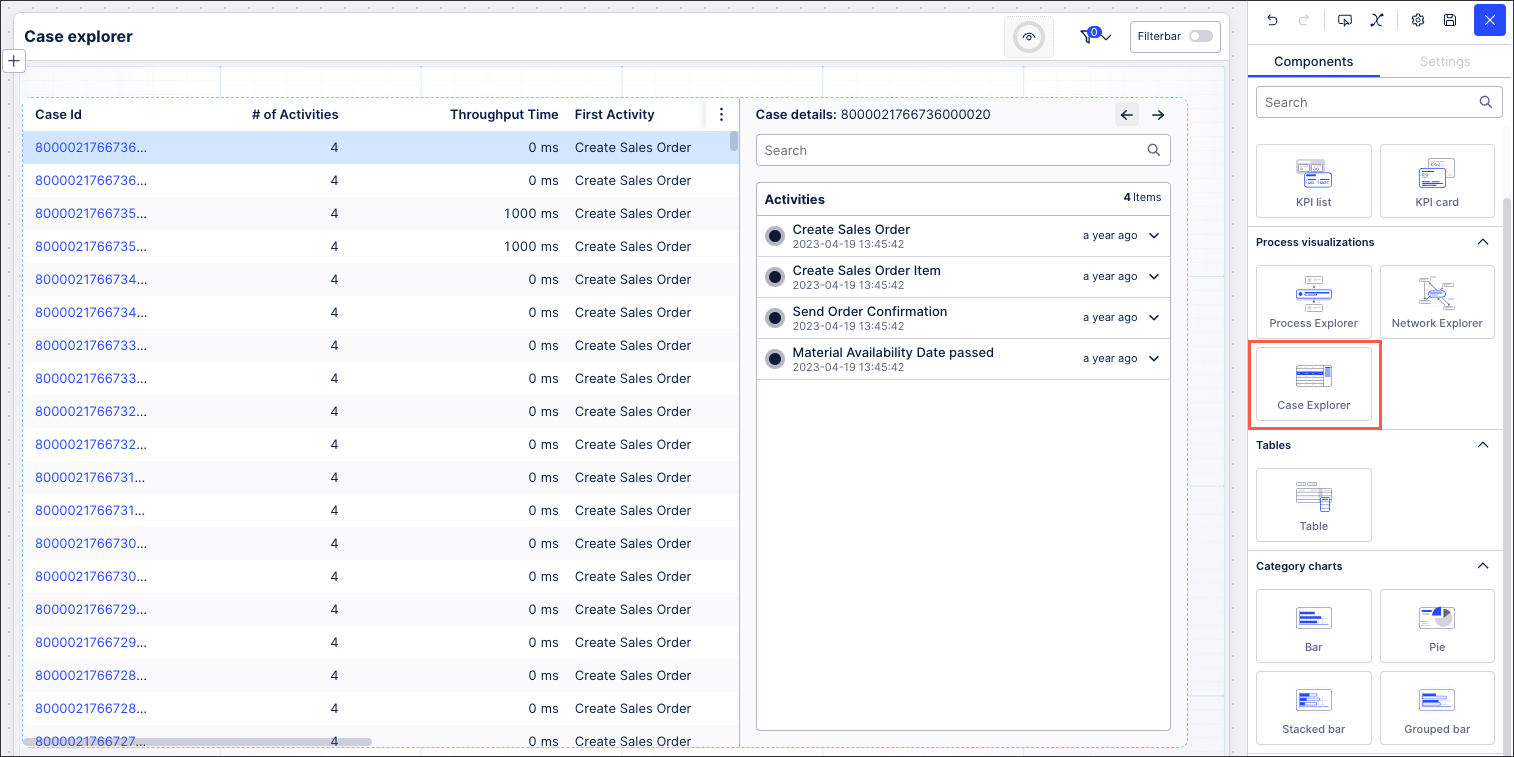 |
The Case Explorer displays the following columns by default:
Case ID
# of Activities
TPT Duration
First Activity
First Activity Timestamp
Last Activity
Last Activity Timestamp
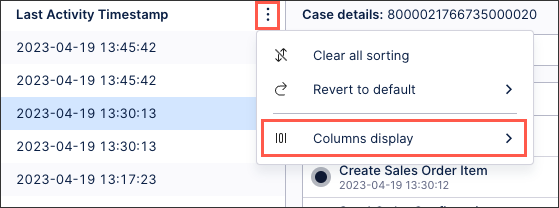
If the activity table contains more columns, they can be displayed by changing the column visibility of the table. To change the visibility, click Column Settings - Columns display:
Basic Case Explorer YAML configuration
To configure a basic Case Explorer, use the following YAML:
id: case-explorer
type: case-explorer
settings: {}
Advanced Case Explorer YAML configuration
If you have multiple event logs, using the basic configuration settings: {} would only include the main event log for case explorer. The main event log for Case Explorer is the default event log set in the data model. Using the advanced configuration below, you can include all available event logs. The columns of the case explorer table are taken from the main event log. You define which event log is the main event log for the case explorer by listing it in the first place of the event log list. So in the example below, Invoice_Order is the main event log.
id: case-explorer1
type: case-explorer
settings:
     name: Retail order management
     data:
          record: km_invoice_record -- optional
          eventlogs:
               - eventLog: Invoice_Order
               - eventLog: Return_Order
               - eventLog: Sales_Order
               - eventLog: Delivery_Order
Attribute | Required | Type | Possible values | Description |
|---|---|---|---|---|
name | No | String | Defines the case explorer name that will be displayed on the top left corner of the component. | |
data record | No | string | Record Ids from the Knowledge Model | If you don’t want to use the default auto-generated record in the Knowledge Model for the Case Table, you can configure your own record in the KM with the appropriate attributes and correct unit/format. Then use the RecordId from the record you configured as the main record rendered in the case table section of this CaseExplorer component. Note The attributes and PQL statements used in this record should have a data model relation with the actual case table. Otherwise the component will not be able to render and you will get an error message. |