Connecting to ServiceNow (extractor)
Important
Any references to third-party products or services do not constitute Celonis Product Documentation nor do they create any contractual obligations. This material is for informational purposes only and is subject to change without notice.
Celonis does not warrant the availability, accuracy, reliability, completeness, or usefulness of any information regarding the subject of third-party services or systems.
The Celonis ServiceNow extractor integrates the Celonis Platform with your ServiceNow tenants. It supports the following basic features:
This section details important prerequisites or prerequisite knowledge for using this extractor.
The ServiceNow extractor allows you to authenticate using either:
Stored Credentials: Connect via basic authentication with the username and password of a ServiceNow user account.
Note
Specific permissions are required for the ServiceNow user account. For more information see Configuring ServiceNow user permissions (Stored Credentials).
OAuth (Recommended): Connect via a ServiceNow application endpoint. For the application endpoint, use the following URL:
https://auth.redirect.celonis.cloud/service-now_redirect
When using the OAuth method, you will need the client ID and client secret of the ServiceNow application.
Note
In Configuring the ServiceNow extractor, you will find a video that includes the steps in this process. For instructions, refer to the ServiceNow documentation.
If your ServiceNow instance is only reachable within a certain IP range, you need to allowlist the outbound IPs of the Celonis Platform, otherwise data cannot be extracted. The IPs of the Celonis Platform are different depending on the cluster (eu-1 or us-1). For more information, see: Allowlisting Celonis domain names, IP addresses, and third-party domains.
To extract data from your ServiceNow tenant using basic authentication (Stored Credentials), you need access to a user with the following permissions:
Tip
These steps are not needed if your are using OAuth credentials.
Roles:
soap_queryandsnc_platform_rest_api_accessTable access: Access to the table
sys_db_objectand all tables you want to extract.View access: Access to the table ‘sys_db_view’ and all views you want to extract.
Endpoint access: Access the following endpoint for each table, which is then used to derive the schema:
https://<instance>/<table>?SCHEMA
For example:
https://<instance>/incident.do?SCHEMA
To configure this user, we recommend the following steps:
Note
For the latest ServiceNow documentation and the steps involved, see: ServiceNow - Product Documentation.
In Configuring the ServiceNow extractor, you will find a video that includes an overview of the steps in this process.
Create a new role: In order to assign the correct access right to the user used for the Celonis extraction, we recommend creating a new role in the user administration section.
Create a new user and assign the required roles: Assign the roles
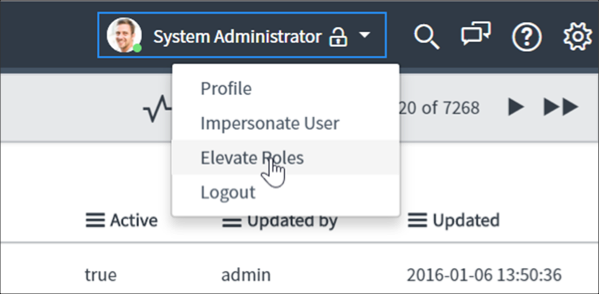
soap_querysnc_platform_rest_api_access, and the role you created in step 1.Elevate privileges of your user: To modify access control for the newly created Celonis role, you need to elevate your privileges. You can do this by selecting Elevate Roles.
With the elevated role, you can then open access control lists (ACL).
Create two ACL:
ACL One:
Operation: read
Active: true
Name: Table [sys_db_object]
Field (Column): *
Required roles: the role created in step 1.
ACL Two:
Operation: read
Active: true
Name: Table [sys_db_object]
Field (Column): --None--
Required roles: the role created in step 1.
Settings that take an asterisk (
*) are dependent on their ServiceNow permission settings. If you experience problems, change*to None.Allow access to all tables: You should now allow access to all tables you want to extract. With the elevated role you can open access control lists (ACL). Here you need to create a new ACL with the following attributes:
Operation: read
Active: true
Name: the name of the table
Field (Column): all fields selected
Required roles: the role created in step 1.
Repeat the previous step for all tables you want to extract.
This section describes the basic setup of configuring the ServiceNow extractor.
To configure the extractor:
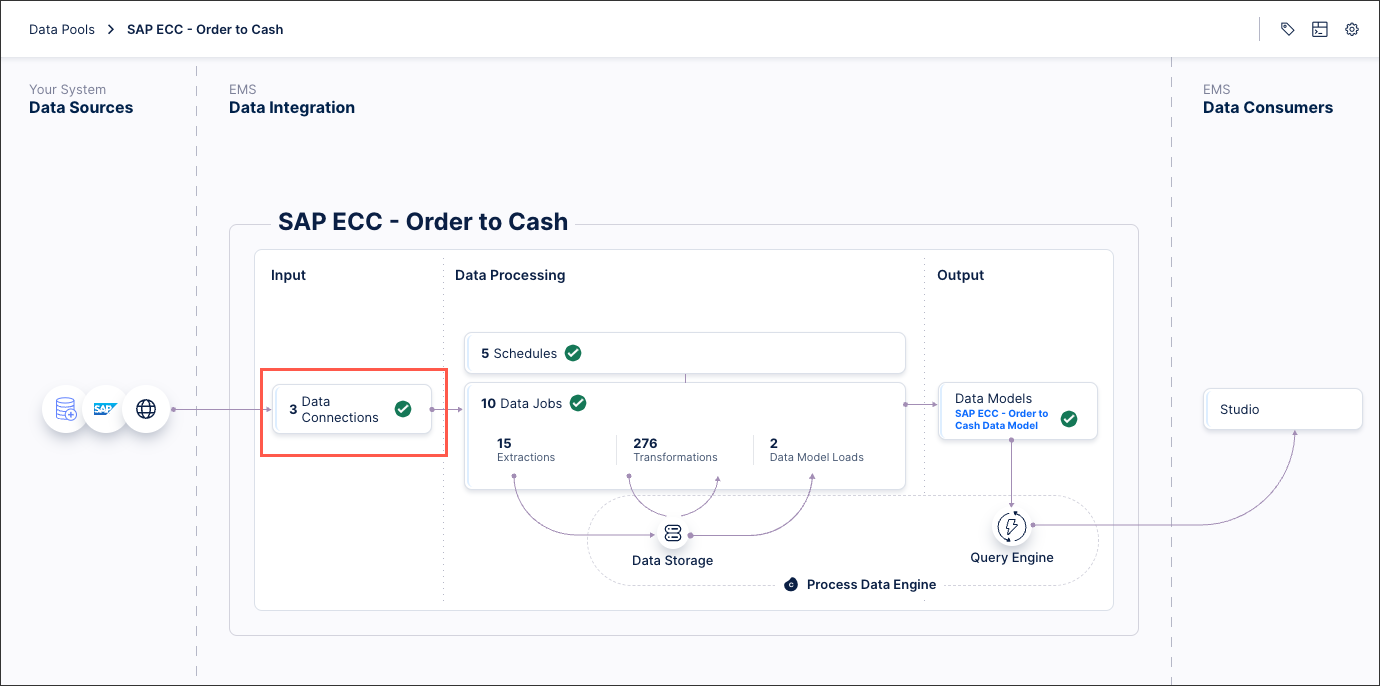
From your data pool diagram, Select Data Connections.
Select Add Data Connection and select Connect to Data Source.
Select Cloud - ServiceNow.
Configure the following connection details:
Name: An internal reference for this data connection.
Authentication method: Choose between Stored Credentials (username and password a Service now user) or OAuth.
Note
For more information, see ServiceNow authentication methods.
Tenant or URL: The realm of your ServiceNow instance. The realm can be found by looking at the system URL. For example, in the following URL
mycompanyis the realm:https://mycompany.service-now.com
Select Test Connection and correct any issues highlighted.
Select Save.
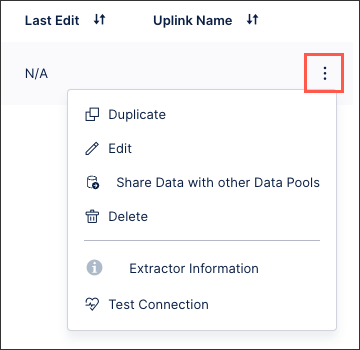
The connection between your ServiceNow tenant and the Celonis Platform is established. You can manage this connection at any time by selecting options:
When configuring your ServiceNow extraction tasks, we recommend the following the :
When executing your ServiceNow extractions, you can filter the data you extract. However you can't use all combinations of AND / OR filters, so we recommend the following:
Option 1
ANDOption 2, for example:sys_created_on > '2011-09-14' AND sys_updated_by = 'system'
Option 1
OROption 2, for example:sys_created_on > '2011-09-14' OR sys_updated_by = 'system'
(Option 1
ANDOption 2)ANDOption 3, for example:(sys_created_on > '2011-09-14' AND sys_updated_by = 'system') AND sys_updated_on > '2018-12-05'(A AND B) AND C, example:
(Option 1
OROption 2)OROption 3, for example:(sys_created_on > '2011-09-14' OR sys_updated_by = 'system') OR sys_updated_on > '2018-12-05'
Option 1
OR(Option 2ANDOption 3), for example:sys_updated_by = 'system' OR (sys_created_on > '2011-09-14' AND sys_updated_on > '2018-12-05')
Filters are case-sensitive
When filtering in ServiceNow, the filters are case-sensitive. This means that FIELDNAME and fieldname are handled as separate filter queries.
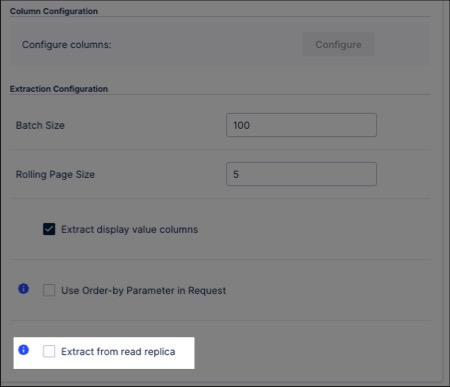
You can enable Extract from read replica on a table level for your ServiceNow extractions. In ServiceNow, a read replica is a read-only copy of the primary database used to improve performance and scalability. It allows high-volume data reads, like analytics, reporting, or integrations, without impacting the performance of the main (read/write) transactional database.
Enabling this option for your ServiceNow extractions uses the parameter sysparm_query_category=reporting in all extraction requests. This will direct the query to the reporting read replica of ServiceNow.
To enable this for your ServiceNow extractions, select Data Jobs - Table Configuration and select Extract from read replica:
To increase the performance and limit the source system impact when extracting the sys_audit table:
The
sys_audittable should not be extracted as a primary table, only as a dependent table. The extractor automatically adds thesys_audittables as a dependent table for most objects. This means extractions are limited to the retrievedsys_isfields (which are unique), and lead to a better performance.Applied filters should be limited to indexed columns only.
Additional filtering on
sys_created_onorsys_updated_oncan also improve performance.
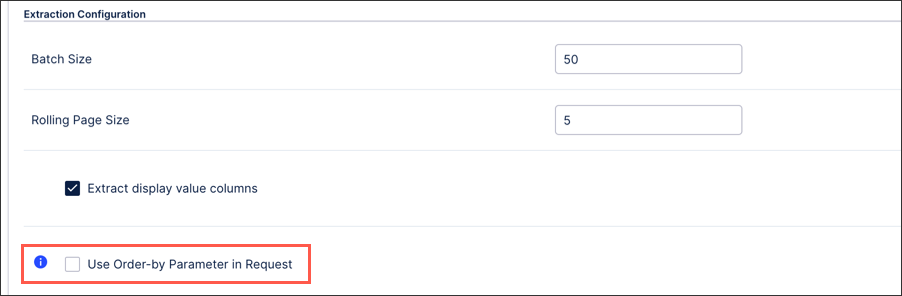
When configuring your ServiceNow extractions, you can enable Use Order-by Parameter in Request for all API requests at the table level.
Enabling this option ensures data integrity by preventing missing records and duplicates. However, it will also lead to a longer extraction time and an increased load on the source system. To help minimize this impact, we recommend that you apply partitioning to reduce both the peak impact and the duration of the system being occupied or increase the batch size, which increases the peak impact but decreases the duration of the system being occupied.
 |