Navigation
You can easily add navigation items to the toolbar with small configuration steps. There are predefined locations in the Toolbar (e. g. Services) where you can add your own buttons. You can use the following button types:
Open dialog button: This button you can use if you want to open an external page inside of a dialog. You can use [ATX_NAME] replacements to insert attributes from the selected element into the URL.
Execute hook button: This button you can use if you want to execute an hook manually. There are different types of hooks, e. g. web hooks, automation hooks, ….
You can find the settings for the navigation in the admin area:

Before you begin, ensure you have completed the following steps or meet the requirements listed below:
You must have the Administrator role to add navigation items to the toolbar
Create a Google API Key
Go to the Google Cloud Platform Console.
Click the project drop-down and select or create the project for which you want to add an API key.
Click the menu button and select APIs & Services > Credentials.
On the
Credentialspage, click + Create Credentials > API key. TheAPI key createddialog displays the newly created API key.Click
Close. The new API key is listed on theCredentialspage underAPI Keys. (Remember to restrict the API key before using it in production.)
Go to the admin area.
Click in the
Configurecategory onNavigation.Create a new button:
Expand
Toolbarelement (see 1 on graphic)Select
Services (Architecture)element (see 2 on graphic)Select type
Open dialog button(see 3 on graphic)Enter the name
Open in Google Maps(see 4 on graphic)Click on
Newto create the button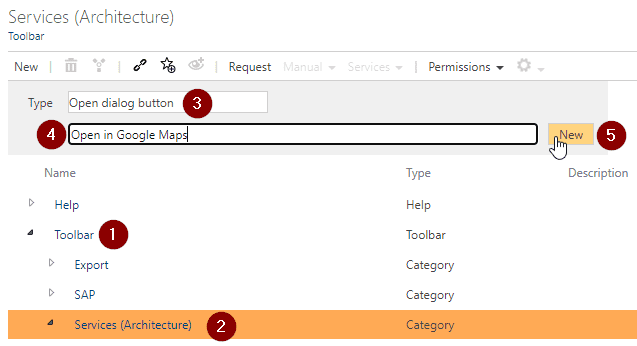
Go to the detail content of the created button element and do the following changes:
Activated: Activate the checkbox to enable the buttonValid for facet: Select theLocationsfacetURL: Use the following URL:
https://www.google.com/maps/embed/v1/place?q=[ATX_LATITUDE],[ATX_LONGITUDE]&key={YOUR_CREATED_GOOGLE_API_KEY}
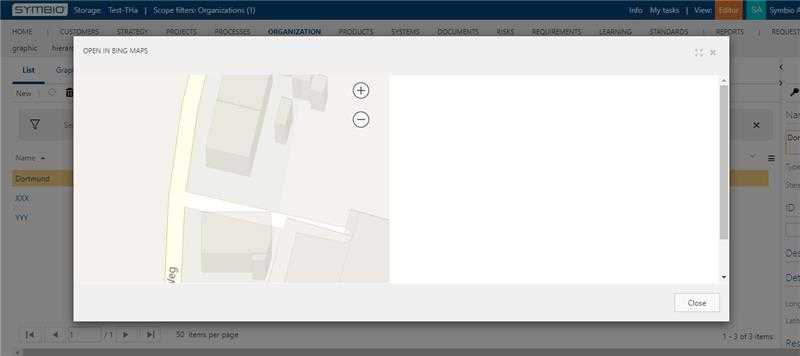
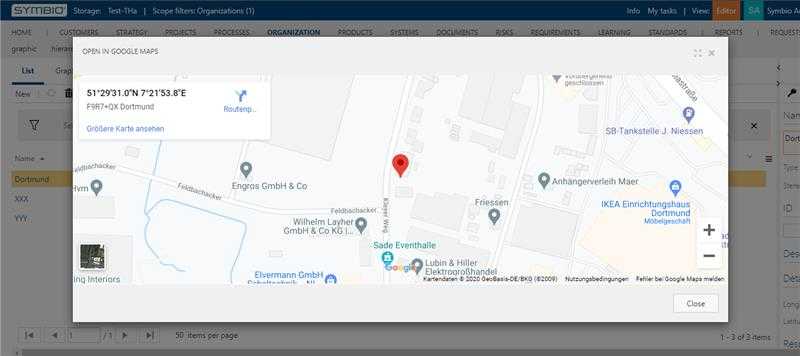
Now you can open the locations (Organizations -> Locations), create or select a location with longitude and latitude and open the dialog by clicking on Services -> Open in Google Maps.
Go to the admin area.
Click in the
Configurecategory onNavigation.Create a new button:
Expand
Toolbarelement (see 1 on graphic)Select
Services (Architecture)element (see 2 on graphic)Select type
Open dialog button(see 3 on graphic)Enter the name
Open in Bing Maps(see 4 on graphic)Click on
Newto create the button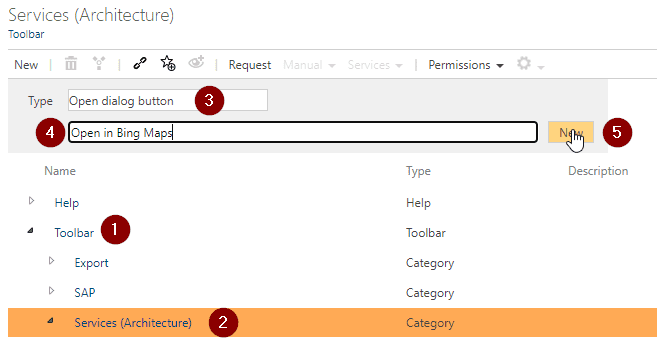
Go to the detail content of the created button element and do the following changes:
Activated: Activate the checkbox to enable the buttonValid for facet: Select theLocationsfacetURL: Use the following URL:
https://www.bing.com/maps/embed?h=400&w=500&cp=[ATX_LATITUDE]~[ATX_LONGITUDE]&lvl=20&typ=d&sty=r&src=SHELL&FORM=MBEDV8
Now you can open the locations (Organizations -> Locations), create or select a location with longitude and latitude and open the dialog by clicking on Services -> Open in Bing Maps.