LeanIX - Celonis Process Management integration
This integration allows you to pull data from LeanIX and use it within Process Designer. You can access this integration via the Celonis Marketplace.
Celonis modules must be configured. You can click on them and select an existing one. The first time you do this, it will create a connection.
Important
If for some reason the connection you picked is not working, just delete it from your Automatization and start over.
The configuration parameters are:
Name (by default, “My CPM Auth Token connection”): Set a meaningful name
Base Url: It will be based on the Process Designer instance storage in this format: https://[StorageCollection]/[Storage]
API Token: The token configured in the Process Designer instance storage
Tip
If you don't have a CPM Auth Token, see Generate Admin Auth token
An outbound processor must be created in the LeanIX side using the following configuration:
{{
    "connectorType": "LeanIXToCelonis",
    "connectorId": "LeanIXToCelonis",
    "connectorVersion": "1.0.0",
    "processingDirection": "outbound",
    "processingMode": "partial",
    "scope": {
        "ids": [],
        "facetFilters": [
            {
                "keys": [
                    "Application"
                ],
                "facetKey": "FactSheetTypes"
            }
        ]
    },
    "processors": [
        {
            "processorType": "outboundFactSheet",
            "processorName": "Export Apps",
            "processorDescription": "Export factsheet fields for CPM",
            "enabled": true,
            "fields": [
                "lifecycle",
                "name",
                "description"
            ],
            "relations": {
                "filter": [
                    "relApplicationTodeliveryOrg"
                ],
                "targetFields": [
                    "name",
                    "displayName",
                    "description",
                    "lifecycle",
                    "externalIdDeliveryOrg",
                    "category"
                ]
            },
            "tags": {
                "groups": [
                "Roadmap"
                ]
            },
            "output": [
                {
                    "key": {
                        "expr": "content.id"
                    },
                    "mode": "selectFirst",
                    "values": [
                        {
                            "expr": "${lx.factsheet.id}"
                        }
                    ]
                },
                {
                    "key": {
                        "expr": "content.type"
                    },
                    "mode": "selectFirst",
                    "values": [
                        {
                            "expr": "${lx.factsheet.type}"
                        }
                    ]
                },
                {
                    "key": {
                        "expr": "name"
                    },
                    "mode": "selectFirst",
                    "values": [
                        {
                            "expr": "${lx.factsheet.name}"
                        }
                    ]
                },
                {
                    "key": {
                        "expr": "updatedAt"
                    },
                    "mode": "selectFirst",
                    "values": [
                        {
                            "expr": "${lx.factsheet.updatedAt}"
                        }
                    ]
                },
                {
                    "key": {
                        "expr": "description"
                    },
                    "values": [
                        {
                           "expr": "${lx.factsheet.description}"
                        }
                    ]
                },
                {
                    "key": {
                        "expr": "active"
                    },
                    "mode": "selectFirst",
                    "values": [
                        {
                            "expr": "${lx.factsheet.lifecycle.active}"
                        }
                    ]
                },
                {
                    "key": {
                        "expr": "phaseOut"
                    },
                    "mode": "selectFirst",
                    "values": [
                        {
                            "expr": "${lx.factsheet.lifecycle.phaseOut}"
                        }
                    ]
                },
                {
                    "key": {
                        "expr": "endOfLife"
                    },
                    "mode": "selectFirst",
                    "values": [
                        {
                            "expr": "${lx.factsheet.lifecycle.endOfLife}"
                        }
                    ]
                },
                {
                    "key": {
                        "expr": "link"
                    },
                    "mode": "selectFirst",
                    "values": [
                        {
                            "expr": "https://mockCompany/factsheet/Application/${lx.factsheet.id}"
                        }
                    ]
                },
                {
                    "key": {
                    "expr": "tags"
                    },
                    "mode": "list",
                    "values": [
                        {
                        "forEach": {
                            "elementOf": "${lx.tags}",
                            "filter": "${true}"
                        },
                        "map": [
                            {
                                "key": "tagGroup",
                                "value": "${integration.output.valueOfForEach.tagGroup.name}"
                            },
                            {
                                "key": "tagName",
                                "value": "${integration.output.valueOfForEach.name}"
                            }
                        ]
                        }
                    ]
                }
            ]
        }
    ]
}

Function
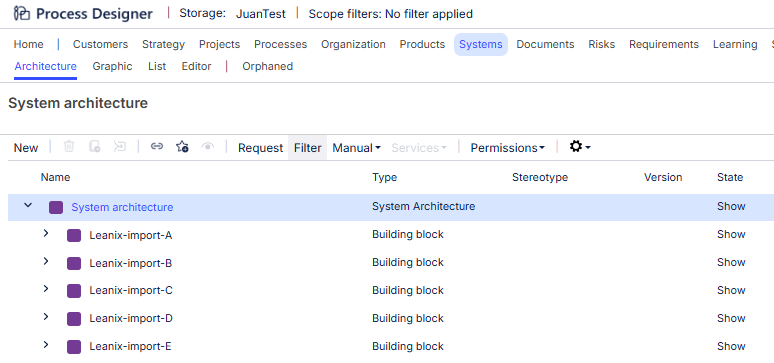
This action flow will create Building Blocks in Process Designer. It will avoid creating duplicates, so there is no danger in running this flow several times. The final result in Process Designer will look similar to this (with names going from A to Z):
Configuration
The first module holds the variables to configure the whole action flow. Do not change the variable names, just the values.
BuildingBlockNamePrefix: Use this prefix when naming Building Blocks
SystemArchitectureId: This can be obtained in Process Designer by selecting the root node and pressing Ctrl+Alt+D. In the ensuing popup, it's called “Context Key”

Function
This action flow will take the existing Building Blocks in Process Designer, take applications from LeanIX, put the LeanIX Applications data into structured JSON blocks that are associated with the corresponding Building Blocks, and then send these JSON blocks to a webhook.
Important
A data structure must be set to the module red circled (see configuration below). Ideally this action flow should be configured to run manually the first time, but with the the “FirstRun” configuration variable set to “true”. After that, the variable should be set to “false” and the action flow can be set to run as scheduled.
If the Building Block assigned to the Application cannot be found, it will try to get a request to a non existing url (http://ProcessDesignerBlockNotFound/{blockName}) that will cause an error, so the user is notified and can take corresponding actions.
Configuration
Before starting to configure this module, create a second browser tab. In that tab, jump to step 3 and start the webhook listening. Then come back here to continue configuring this action flow.
The first module holds the variables to configure the whole action flow. Do not change the variable names, just the values.
lean_ix_token_psw: This is the LeanIX token used to make requests to its API
lean_ix_base_url: This is the base url of the LeanIX API
lean_ix_is_test_run: This is a parameter requested by the LeanIX API
webhook_url: This is the url where the data will be sent. The value is the address you copied when configuring the webhook in step 3
System Architecture Id: The same as in the previous action flow. It is the Id of the root node for the Building Blocks
BuildingBlockName: The prefix used to determine in which Building Block the application will be placed. It is the same as the “BuildingBlockNamePrefix” in the previous action flow
FirstRun: If set to “true” it will bring all the LeanIX applications. If set to “false” it will bring only the modified LeanIX applications in the latest 24 hours
The data structure needed to configure the JSON module (circled in red) can be generated as follows:
Select Create data structure and give it a name.
Select Generate. Copy the data from Appendix A to the Sample Data field. You will see some field references with a transparent background.
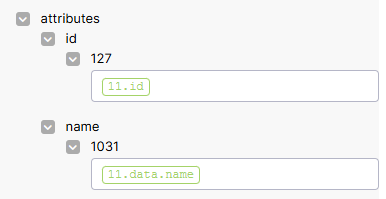
Click Save and execute the action flow.
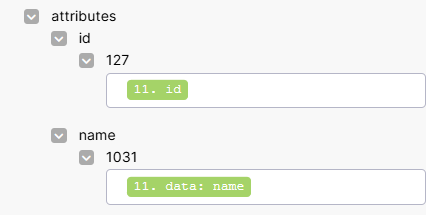
Open the JSON module again. You will see the same field references, but this time with a solid background.
Close the popup and save the action flow.
Note
If you’ve run the action flow correctly, the webhook in your other browser tab will have received data.
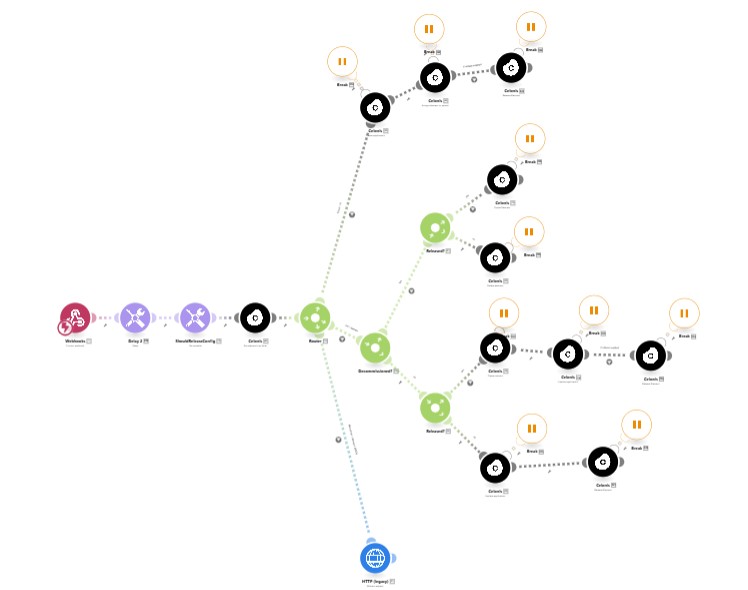
Function
This action flow will:
Take the LeanIX Application (LA) data from a webhook
Depending on the state of LA and the matching Process Designer Applications (PDA):
If LA does not match a PDA and it is not decommissioned: Create and release a PDA
If LA matches more than one PDA: PDA is in an unstable state. It means there is at least one PDA in “in process” state and at least one in “released” state. It will make a POST to an inexistent url (https://sendErrorUrl) which will cause an error. In this request the content has information of which PDA/version is in this state (*).
If LA matches just one PDA:
If LA is decommissioned:
If PDA is in “release” state: It will expire the PDA
If PDA is in “in process” state: It will delete the PDA
If LA is not decommissioned:
If PDA is in “release” state: It will create a new version (PDA1), update and release PDA1 (and this will expire PDA).
If PDA is in “in process” state: It will update and release the PDA
Important
Each module that interacts with Process Designer has an error handler attached. It will retry an operation up to 3 times. If the operation still doesn't work, it will fail after the 3rd try.
Configuration
Configure the webhook:
You should be configuring the webhook in a duplicated browser tab as outlined in step 2.
Select Webhook, click the Create a webhook button, give it a meaningful name, and it will start “listening”:
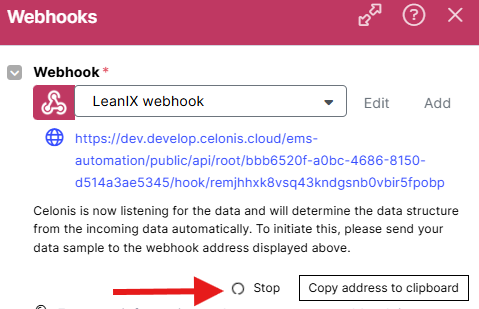
Click the Copy address to clipboard button. Go back to the tab where you have step 2 open, and finish the step. Then you can come back here and continue configuring the webhook.
The module “ShouldReleaseConfig” contains a variable called “shouldRelease”. This will indicate to other modules if it should be released when creating or updating a Process Designer Application (PDA). If not, the PDA will remain “in process”.
Appendix - JSON structure to configure Step 2
{ "ParentId": "3e9aeb48-0e79-44ce-b2ef-362775dca693", "IsDecomissioned": true, "elements": [ { "type": "system", "related": { "owner": [ { "id": "1503798c-93d9-44f3-b4a0-8a0393ea2024", "type": "authToken", "facetName": "automation" } ] }, "facetName": "it", "attributes": { "id": { "127": "533e40f3-1119-4d3f-881e-2a857ed4f33c" }, "name": { "1031": null, "1033": null }, "description": { "1031": null, "1033": null }, "sysProdFrom": { "127": null }, "sysPilotFrom": { "127": null }, "sysProdUntil": { "127": null }, "sysComplexity": { "127": null }, "sysPilotUntil": { "127": null }, "sysPlannedFrom": { "127": null }, "sysPhaseOutFrom": { "127": null }, "sysPlannedUntil": { "127": null }, "sysPhaseOutUntil": { "127": null }, "sysSwitchedOffFrom": { "127": null } }, "displayNames": { "1031": null, "1033": null } } ]}