Migrating from Vertica to the ETL Engine
Migrating to the ETL Engine replaces the traditional Vertica-based processing layer with a cloud-native execution environment. This transition optimizes resource management and provides a seamless path for translating legacy Vertica SQL transformations into high-performance SparkSQL jobs.
Before migrating your data to the ETL Engine, you need to review and complete the necessary pre-migration steps:
Before initiating the migration, define a complete, end-to-end migration plan. This plan must include all relevant Data Pools (DP).
This should include:
Identify scope: Clearly define which Data Pools need to be migrated.
Decommission review: Just as important, identify any Data Pools that are no longer in use so they can be excluded from the migration scope.
Full migration goal: Remember, the ultimate goal is a full migration of all necessary Data Pools so that we can successfully deactivate Vertica upon completion.
Note
Make sure you are not doing any changes on the original data pool while you migrate it as those changes won’t be reflected in the migrated data pool.
Request migration feature enablement: You must request feature enablement to activate the "Migration button”. Create a Support ticket and provide the following details:
Team URL: The web address of the team being migrated.
Migration team emails: Email addresses of all users who will perform the migration.
This is broken down into the following steps:
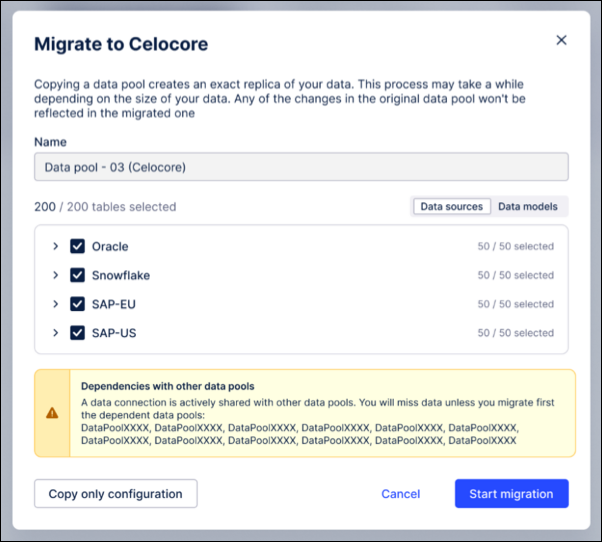
In this step, you'll copy the whole configuration of a data pool to a new ETL Engine data pool. This includes extractions, data jobs, schedules, data models, Replication Cockpit, data pool parameters etc.
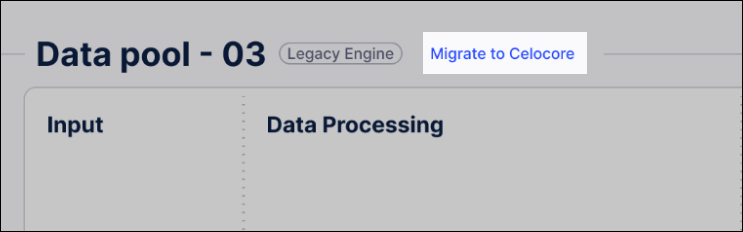
From the data pool, click Migrate to Celocore.
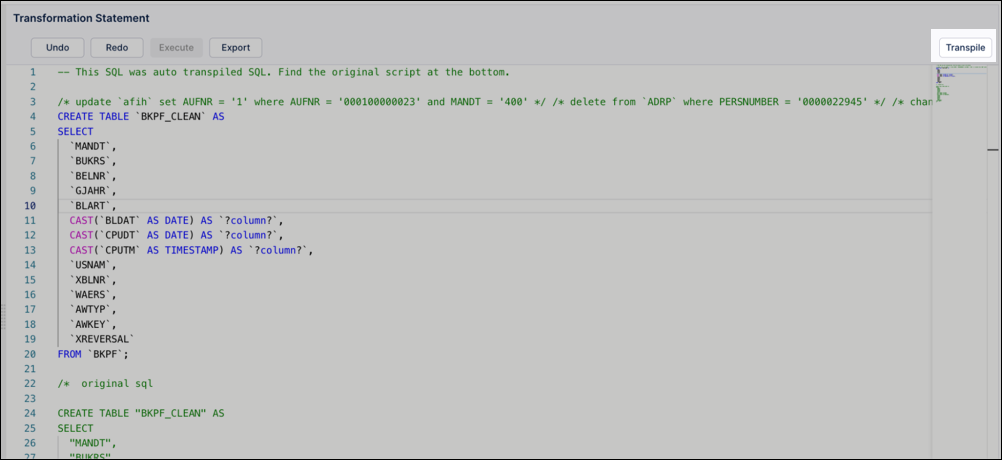
Most Vertica SQL transformations (~90%) translate to SparkSQL automatically. For those note translated:
Manual review: Any transformations that cannot be converted automatically will be flagged for your review.
See: SparkSQL syntax and common translation issues for more details.
Objects & Events: No action is required. These translate automatically upon your first deployment after migration.

Set a new name for the copied data pool, that consists of the “old name + (Celocore)”. You can change this name later if needed. This modal also shows a warning in case the data pool you are copying has imported data connections.
Note
The fact that we highlight imported connections is relevant as data connection sharing between data pools is not supported between a Vertica and an ETL Engine data pool. That means in case you have a use case data pool and an extraction data pool, you have to migrate both.
Disable all schedules in the copied data pool to avoid:
New data being pushed into the data pool.
Continuous data job failures during the migration.
This process creates a point-in-time copy of your Vertica data and moves it into the ETL Engine data pool.
Before completing this step, you should consider:
Point-in-Time Awareness: Understand that any data extracted into Vertica after this snapshot begins will not be included in the copy.
Gap Closure: Note that the first scheduled delta extraction in the new ETL Engine pool will automatically sync any data missed during this window.
To copy a snap of your existing data:
Select tables for migration: By default, all tables are selected and sorted by their data-connection name. Review the list and confirm the selection of tables you wish to copy.
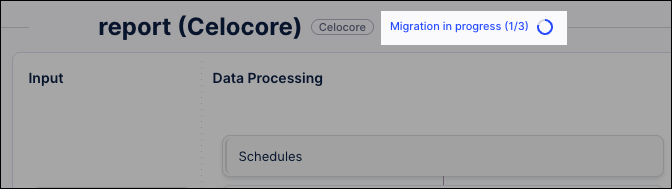
Initiate and monitor copy: Click Start migration.
You don't need to keep the window open. You may safely close the modal and return later while the process runs in the background.
Review completion status: Once the process finishes, review the copy status for each individual table.
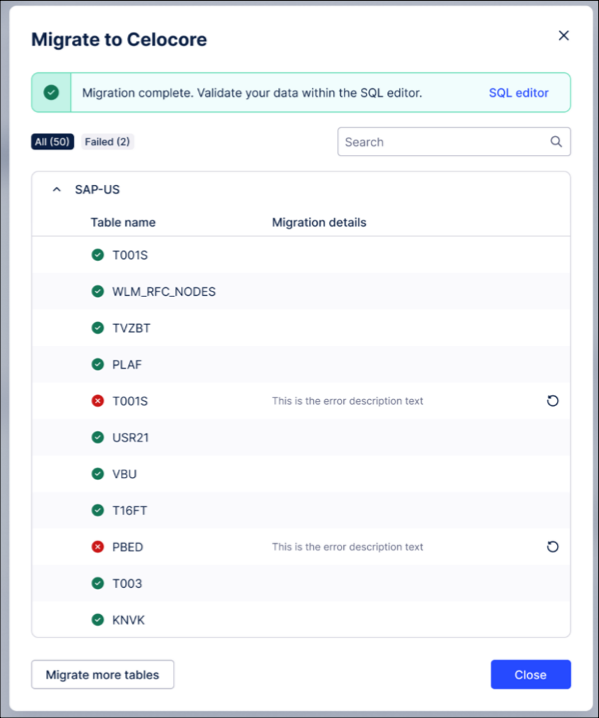
Handle failures or updates (If necessary):
Retry: Use the retry option for any tables that failed to copy.
Repeat: If significant time has passed and you need a fresher snapshot before going live, you can repeat the entire snapshot process.
Note
Do not enable the "Double Ingestion" feature until after you have completed Step 3 (Validating data). Enabling it too early will cause row-count mismatches during validation because the ETL Engine pool will contain more current data than the original Vertica snapshot.
This process ensures data integrity by comparing the new ETL Engine data pool against the snapshot copied from the Vertica data pool.
You can also select to run a validation only on a per data connection / schema and even table basis:
Trigger data validation: From the migration wizard, click Start Validation.
You can choose to run validation for the entire pool or narrow the scope to specific data connections, schemas, or individual tables.

Monitor automated checks: The system will automatically perform the following four checks in sequence:
Existence: Does the table exist in the new pool?
Schema: Is the table structure/schema identical?
Row Count: Do the total number of records match?
Row-by-Row: Does the actual data within the rows match exactly?
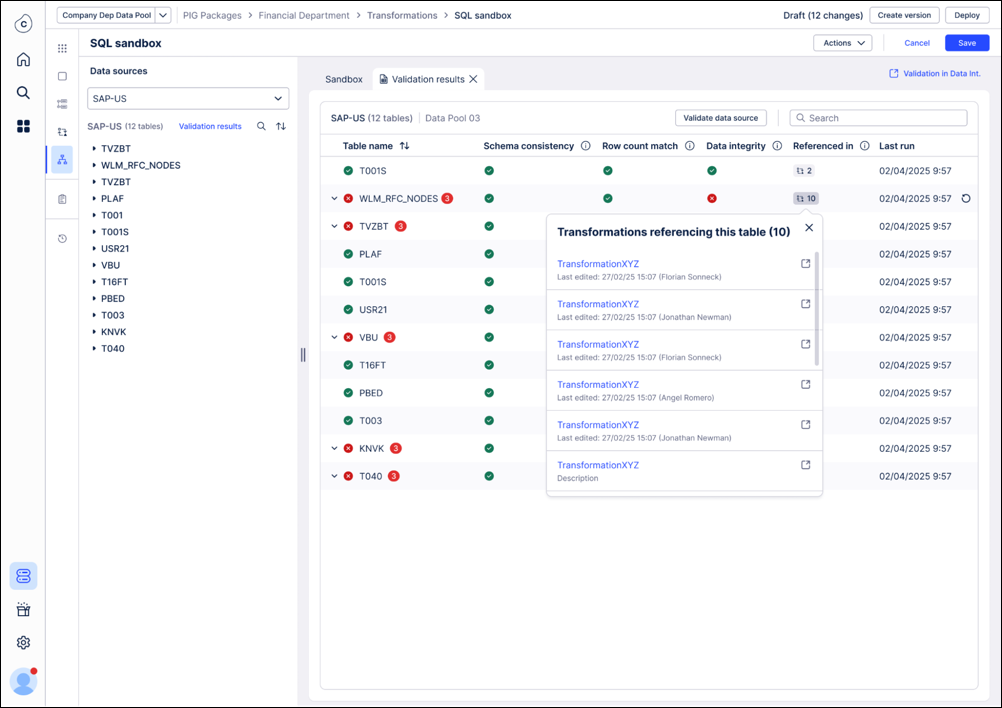
Review results in SQL editor: The results for each of the validation checks are shown in the SQL editor with information which of the checks failed and in which transformations the table is used. In case of a row count mismatch we are exposing the row counts of both tables side by side.
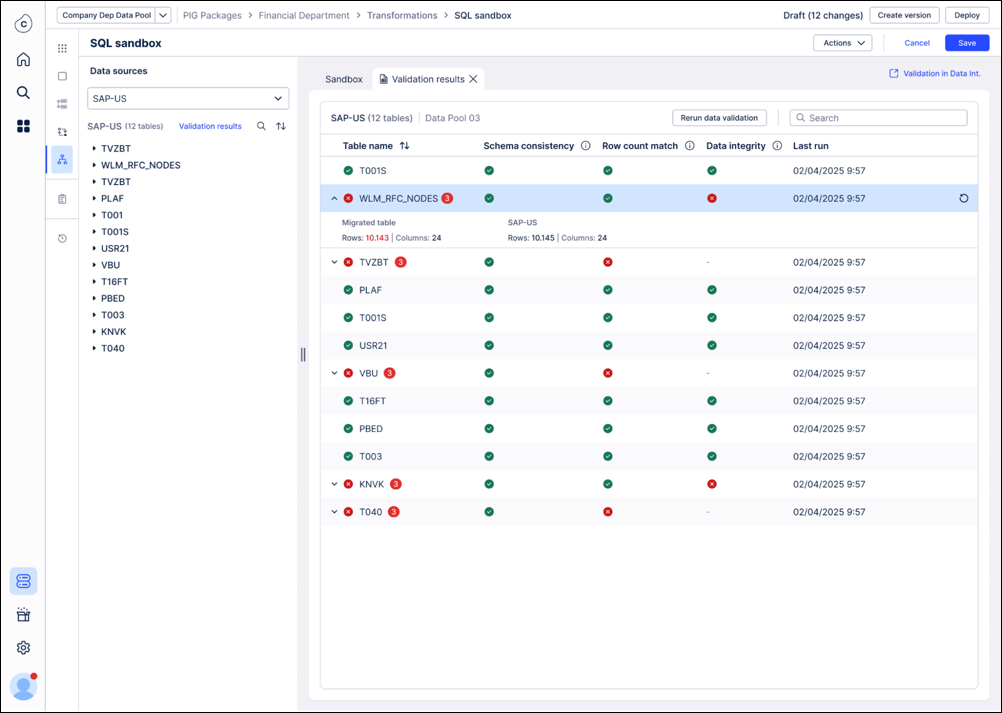
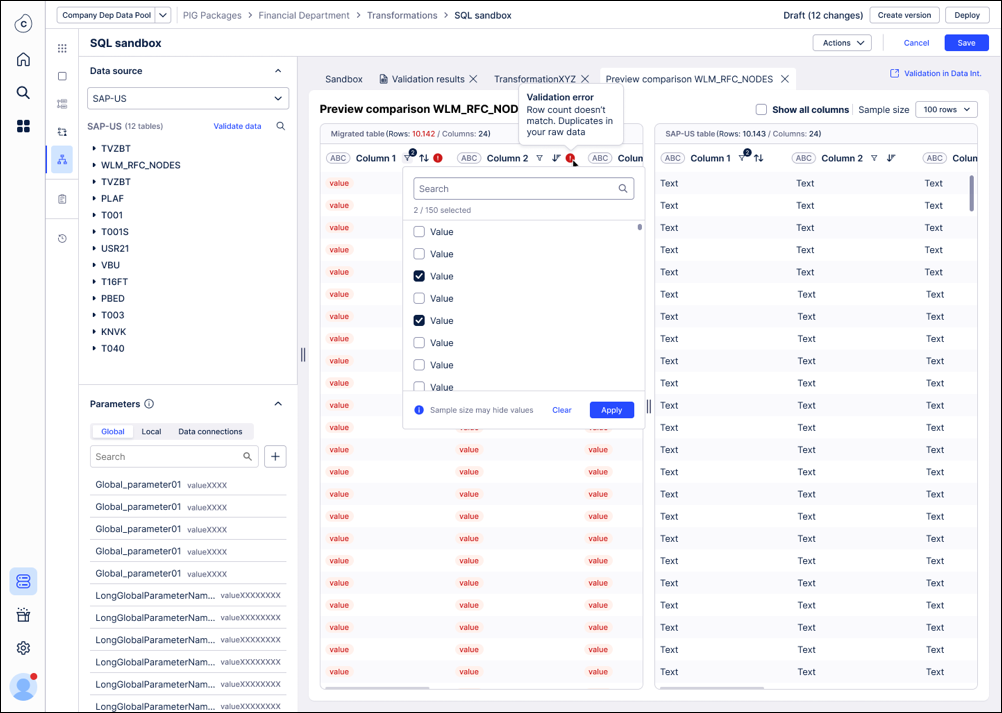
Investigate and resolve mismatches: You can also see a side by side comparison of the tables (original + migrated) when clicking on a failed table. By default, we only show columns with mismatches and mismatching records are highlighted in red. You can drill down by sorting or filtering the side by side view.
The most important rule of validation is the snapshot comparison: It's vital to understand what data is being compared:
The validation snapshot: The validation check only compares the data in your new ETL Engine Data Pool against the initial data snapshot we took from the old Vertica environment.
What is ignored: Any new data that was extracted into the old environment after the initial data copy has no impact on the validation.
CRITICAL WARNING: Wait to enable double ingestion! Don't turn on the "Double Ingestion" feature yet. If you enable it, new data will immediately begin flowing into your new ETL Engine data pool, causing it to have more records than the original snapshot. This will automatically cause the validation check (specifically the row count) to fail. The best practice is to ensure all tables pass validation before activating double ingestion.
The most likely reason for the validation of a table to fail is that the SQL produces a different output. Using the “Referenced in” information in the validation summary allows you to trace back where a specific table gets referenced and fix the SQL. Once you have done that and rerun this transformation, we suggest you to also rerun the validation for that specific table. This might be an iterative process so potentially you need to go through this cycle a few times.
Because security credentials (passwords, API keys, and SSH private keys) are not transferred during the migration for security reasons, you must manually re-authenticate your source systems in the new environment.
To set up your data connections, see: Connecting data sources.
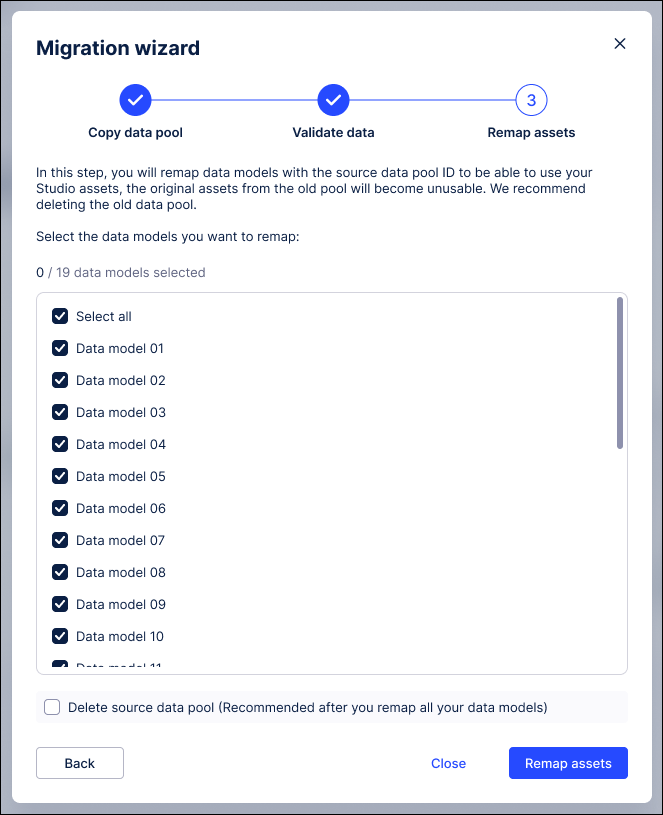
This final step redirects your front-end assets and data models to the new ETL Engine environment. Because the Data Model ID is preserved, this process is largely automated.
Relink the Data Model: Move the data model from the original Vertica data pool to the new ETL Engine data pool.
Verify automatic redirection: Confirm that Studio assets, augmented attributes, and saved formulas now point to the ETL Engine data. No manual editing of individual assets is required.
Validate external integrations: Since the Data Model ID is kept, verify that existing PyCelonis scripts or external applications (e.g., Intelligence API) continue to function without code changes.
If you want to do additional validation you can also do the following:
Create a copy of one Analysis/ View and link it to the new ETL Engine data model and compare the KPIs.
If those look fine, then trigger the step above to use the data pool to populate this production data model.
Note
If you notice discrepancies after the move, you can temporarily move the data model back to the original Vertica data pool to restore the previous state.
The following steps are optional:
Re-establish the imported data connections: If the data pool you migrated contained previously imported data connections, those connections will break during migration and appear as “Dummy Connection” with the type “Not Available.” You can easily repair them within the ETL engine's data pool by opening the three-dot menu on the broken connection, selecting Edit, and choosing the new source data connection to import.
This process preserves the original connection ID, ensuring that all transformations and data jobs referencing that connection continue to function without any changes.
Translate an individual transformation manually: In case the translation for a transformation fails, you can always retrigger it via the transformation workbench using smaller increments by highlighting only a selection of the statements within one transformation.
Double ingestion: For cases where the extraction pool cannot be fully migrated because e.g. it is using Replication Cockpit which is powering a lot of other data pools, we’ve built a mechanism to keep the Vertica and the ETL Engine pool in sync by pushing any incoming new data automatically into both data pools. This mechanism can be enabled on a data connection and even on a table level. Any errors in the double ingestion will be visible in this UI. In case the Vertica and ETL Engine data pool run out of sync due to an error, an initial copy of the data (see step 1) is required.