
ETL Engine

The Celonis ETL Engine transforms your raw source data into Data Models for use in the Celonis Platform. This engine is built state-of-the-art cloud-native technologies and improves the latency for extractions, transformations, and data model loads. The benefits of this engine includes higher data volume processing and increased data freshness. Through horizontal scaling and elasticity improvements, you can get more value out of Celonis by scaling your use cases or adding new ones, without impacting the latency of your existing implementations.

How the ETL Engine works

The ETL Engine is not directly exposed or represented in the Celonis Platform UI. You interact with it by writing SQL transformations and running them in the Extractions Editor or through your data jobs.

For an overview of the SQL syntax used with the ETL Engine, see: ETL Engine SQL Syntax.

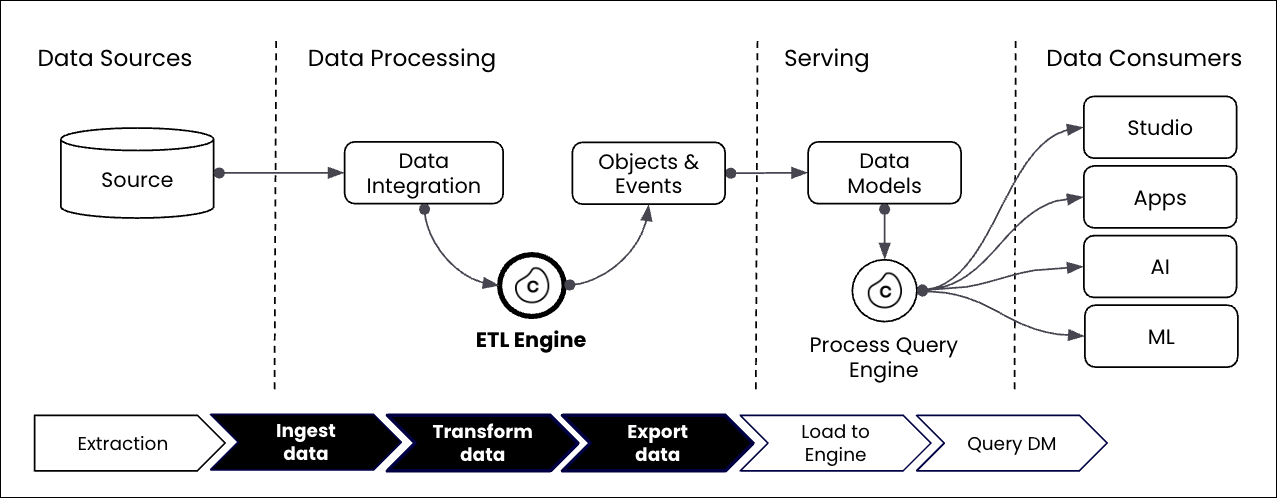
The ETL Engine is involved in all three steps of the Celonis data pipeline:

  • Extractions: Data is ingested into the Celonis Platform and stored there.

  • Transformations: The ETL Engine transforms the data into objects and event data using SQL transformations.

  • Data Model loads: A data model (perspective) is built from the object and events and exported from the data platform before being loaded into the Process Query Engine.

The following illustration visualizes the Celonis data pipeline from a functional architecture and where the ETL engine is located:

A diagram showing how the ETL engine fits into the Celonis Platform architecture.

Benefits of using the ETL Engine

The benefits of using the ETL Engine include:

  • Load responsiveness: Ensure optimal performance and maintain it at peak times.

  • Predictable latencies: Seamlessly accommodate growing data volumes and changing analytical needs. Add new use cases or scale existing ones while keeping predictable and stable data pipeline runtimes for all your Celonis use cases.

  • Large data volumes: Run ETL workloads for large data volumes with billions of records in new record times (confirmed by internal benchmarks).

  • Lowest latencies: Fast data processing, enabling near real-time data refresh rates, and enabling operational Celonis use cases.

Migrating from Vertica to the ETL Engine

Object-centric data models

If you're using an object-centric data model, the migration steps provided below aren't supported. If you would like to migrate from Vertica to the ETL Engine, please create a Support ticket.

See: Contacting Support.

Before migrating your data to the ETL Engine, you need to review and complete the necessary pre-migration steps:

  1. Before initiating the migration, define a complete, end-to-end migration plan. This plan must include all relevant Data Pools (DP).

    This should include:

    • Identify scope: Clearly define which Data Pools need to be migrated.

    • Decommission review: Just as important, identify any Data Pools that are no longer in use so they can be excluded from the migration scope.

    • Full migration goal: Remember, the ultimate goal is a full migration of all necessary Data Pools so that we can successfully deactivate Vertica upon completion.

    Note

    Make sure you are not doing any changes on the original data pool while you migrate it as those changes won’t be reflected in the migrated data pool.

  2. Request migration feature enablement: You must request feature enablement to activate the "Migration button”. Create a Support ticket and provide the following details:

    • Team URL: The web address of the team being migrated.

    • Migration team emails: Email addresses of all users who will perform the migration.

This is broken down into the following steps:

In this step, you'll copy the whole configuration of a data pool to a new ETL Engine data pool. This includes extractions, data jobs, schedules, data models, Replication Cockpit, data pool parameters etc.

  1. From the data pool, click Migrate to Celocore.

    Migrate_to_celocore.png
  2. Automatically translate all transformations from Vertica SQL to SparkSQL. From current tests, the Celonis Platform translates ~90% automatically. Transformations that aren't translated automatically are flagged accordingly.

    Note

    This only applies for case centric transformations/ transformations written in Data Integration. For transformations written in Objects & Events, users don’t have to do anything as they will automatically be translated to SparkSQL with the first publish after the migration.

    automatically_translate.png
  3. Set a new name for the copied data pool, that consists of the “old name + (Celocore)”. You can change this name later if needed. This modal also shows a warning in case the data pool you are copying has imported data connections.

    Note

    The fact that we highlight imported connections is relevant as data connection sharing between data pools is not supported between a Vertica and an ETL Engine data pool. That means in case you have a use case data pool and an extraction data pool, you have to migrate both.

  4. Disable all schedules in the copied data pool to avoid:

    • New data being pushed into the data pool.

    • Continuous data job failures during the migration.

    errors.png

This step is tied to the data pool snapshot. Keep in mind that this is only a point-in-time copy, so any new data extracted into the Vertica data pool after the snapshot will not appear in the ETL Engine data pool. However, the next scheduled delta extraction in the ETL Engine pool after the migration will automatically close this data gap. You can repeat the snapshot process at any time if needed.

After selecting the tables to be copied (all tables are selected by default and sorted by data-connection name, as shown in the screenshot), you can monitor the copy progress. You may close this modal and return later. Depending on the number and size of the tables, the process may take some time to complete.

migrate_step_2_again.png

Once the data copy has completed, you will see the copy status for each table and you can go back to migrate tables again as well as retry tables that failed to be copied.

migrate_step_2.png

After all data has been copied, transformations translated to SparkSQL and the data jobs have been executed , you need to trigger the data validation. The data validation will compare the tables in the ETL Engine data pool with those that have been created as part of the data copy step from Vertica. That means any new data ingested into the Vertica data pool will not impact the data validation.

The validation performs the following checks (which will run one after another):

  • Does the table exist?

  • Is the schema identical?

  • Do the row counts match?

  • Does the actual data match in terms of a row by row comparison?

You can also select to run a validation only on a per data connection / schema and even table basis.

migration_step_3.png

The results for each of the validation checks are shown in the SQL editor with information which of the checks failed and in which transformations the table is used. In case of a row count mismatch we are exposing the row counts of both tables side by side.

SQL_sandbox_1.png
SQL_sandbox_2.png

You can also see a side by side comparison of the tables (original + migrated) when clicking on a failed table. By default, we only show columns with mismatches and mismatching records are highlighted in red. You can drill down by sorting or filtering the side by side view.

preview_comparison.png

The most important rule of validation is the snapshot comparison: It's vital to understand what data is being compared:

  • The validation snapshot: The validation check only compares the data in your new ETL Engine Data Pool against the initial data snapshot we took from the old Vertica environment.

  • What is ignored: Any new data that was extracted into the old environment after the initial data copy has no impact on the validation.

    CRITICAL WARNING: Wait to enable double ingestion! Don't turn on the "Double Ingestion" feature yet. If you enable it, new data will immediately begin flowing into your new ETL Engine data pool, causing it to have more records than the original snapshot. This will automatically cause the validation check (specifically the row count) to fail. The best practice is to ensure all tables pass validation before activating double ingestion.

The most likely reason for the validation of a table to fail is that the SQL produces a different output. Using the “Referenced in” information in the validation summary allows you to trace back where a specific table gets referenced and fix the SQL. Once you have done that and rerun this transformation, we suggest you to also rerun the validation for that specific table. This might be an iterative process so potentially you need to go through this cycle a few times.

The source system credentials of a data connection are not copied as part of the data pool migration so they need to be reconfigured in the ETL Engine data pool.

Once you’ve validated the data between the two data pools is identical, you can start migrating your frontend assets to the new ETL Engine data pool. You can move the data model from the existing Vertica data pool to the new ETL Engine data pool. That means all Studio assets, augmented attributes etc. will automatically point to the data from the ETL Engine data pool from now on and you don’t need to manually edit any individual Studio assets etc. As the data model ID is kept, any PyCelonis scripts or other applications pointing to the data model (e.g. Intelligence API) will continue to work as is.

Note

if you realize anything is off after you’ve moved the data model, you can always temporarily move the data model back to the old Vertica data pool

If you want to do additional validation you can also do the following:

  • Create a copy of one Analysis/ View and link it to the new ETL Engine data model and compare the KPIs.

  • If those look fine, then trigger the step above to use the Rubberband data pool to populate this production data model.

The following steps are optional:

  • Re-establish the imported data connections: If the data pool you migrated contained previously imported data connections, those connections will break during migration and appear as “Dummy Connection” with the type “Not Available.” You can easily repair them within the ETL engine's data pool by opening the three-dot menu on the broken connection, selecting Edit, and choosing the new source data connection to import.

    This process preserves the original connection ID, ensuring that all transformations and data jobs referencing that connection continue to function without any changes.

  • Translate an individual transformation manually: In case the translation for a transformation fails, you can always retrigger it via the transformation workbench using smaller increments by highlighting only a selection of the statements within one transformation.

    optional_steps.png
  • Double ingestion: For cases where the extraction pool cannot be fully migrated because e.g. it is using Replication Cockpit which is powering a lot of other data pools, we’ve built a mechanism to keep the Vertica and the ETL Engine pool in sync by pushing any incoming new data automatically into both data pools. This mechanism can be enabled on a data connection and even on a table level. Any errors in the double ingestion will be visible in this UI. In case the Vertica and ETL Engine data pool run out of sync due to an error, an initial copy of the data (see step 1) is required.

    migrate_optional.png