Configuring the Workforce Productivity app
You can configure the Workforce Productivity app to ensure the Task Mining data and its analysis are as accurate as possible. Configuring the Workforce Productivity app involves:
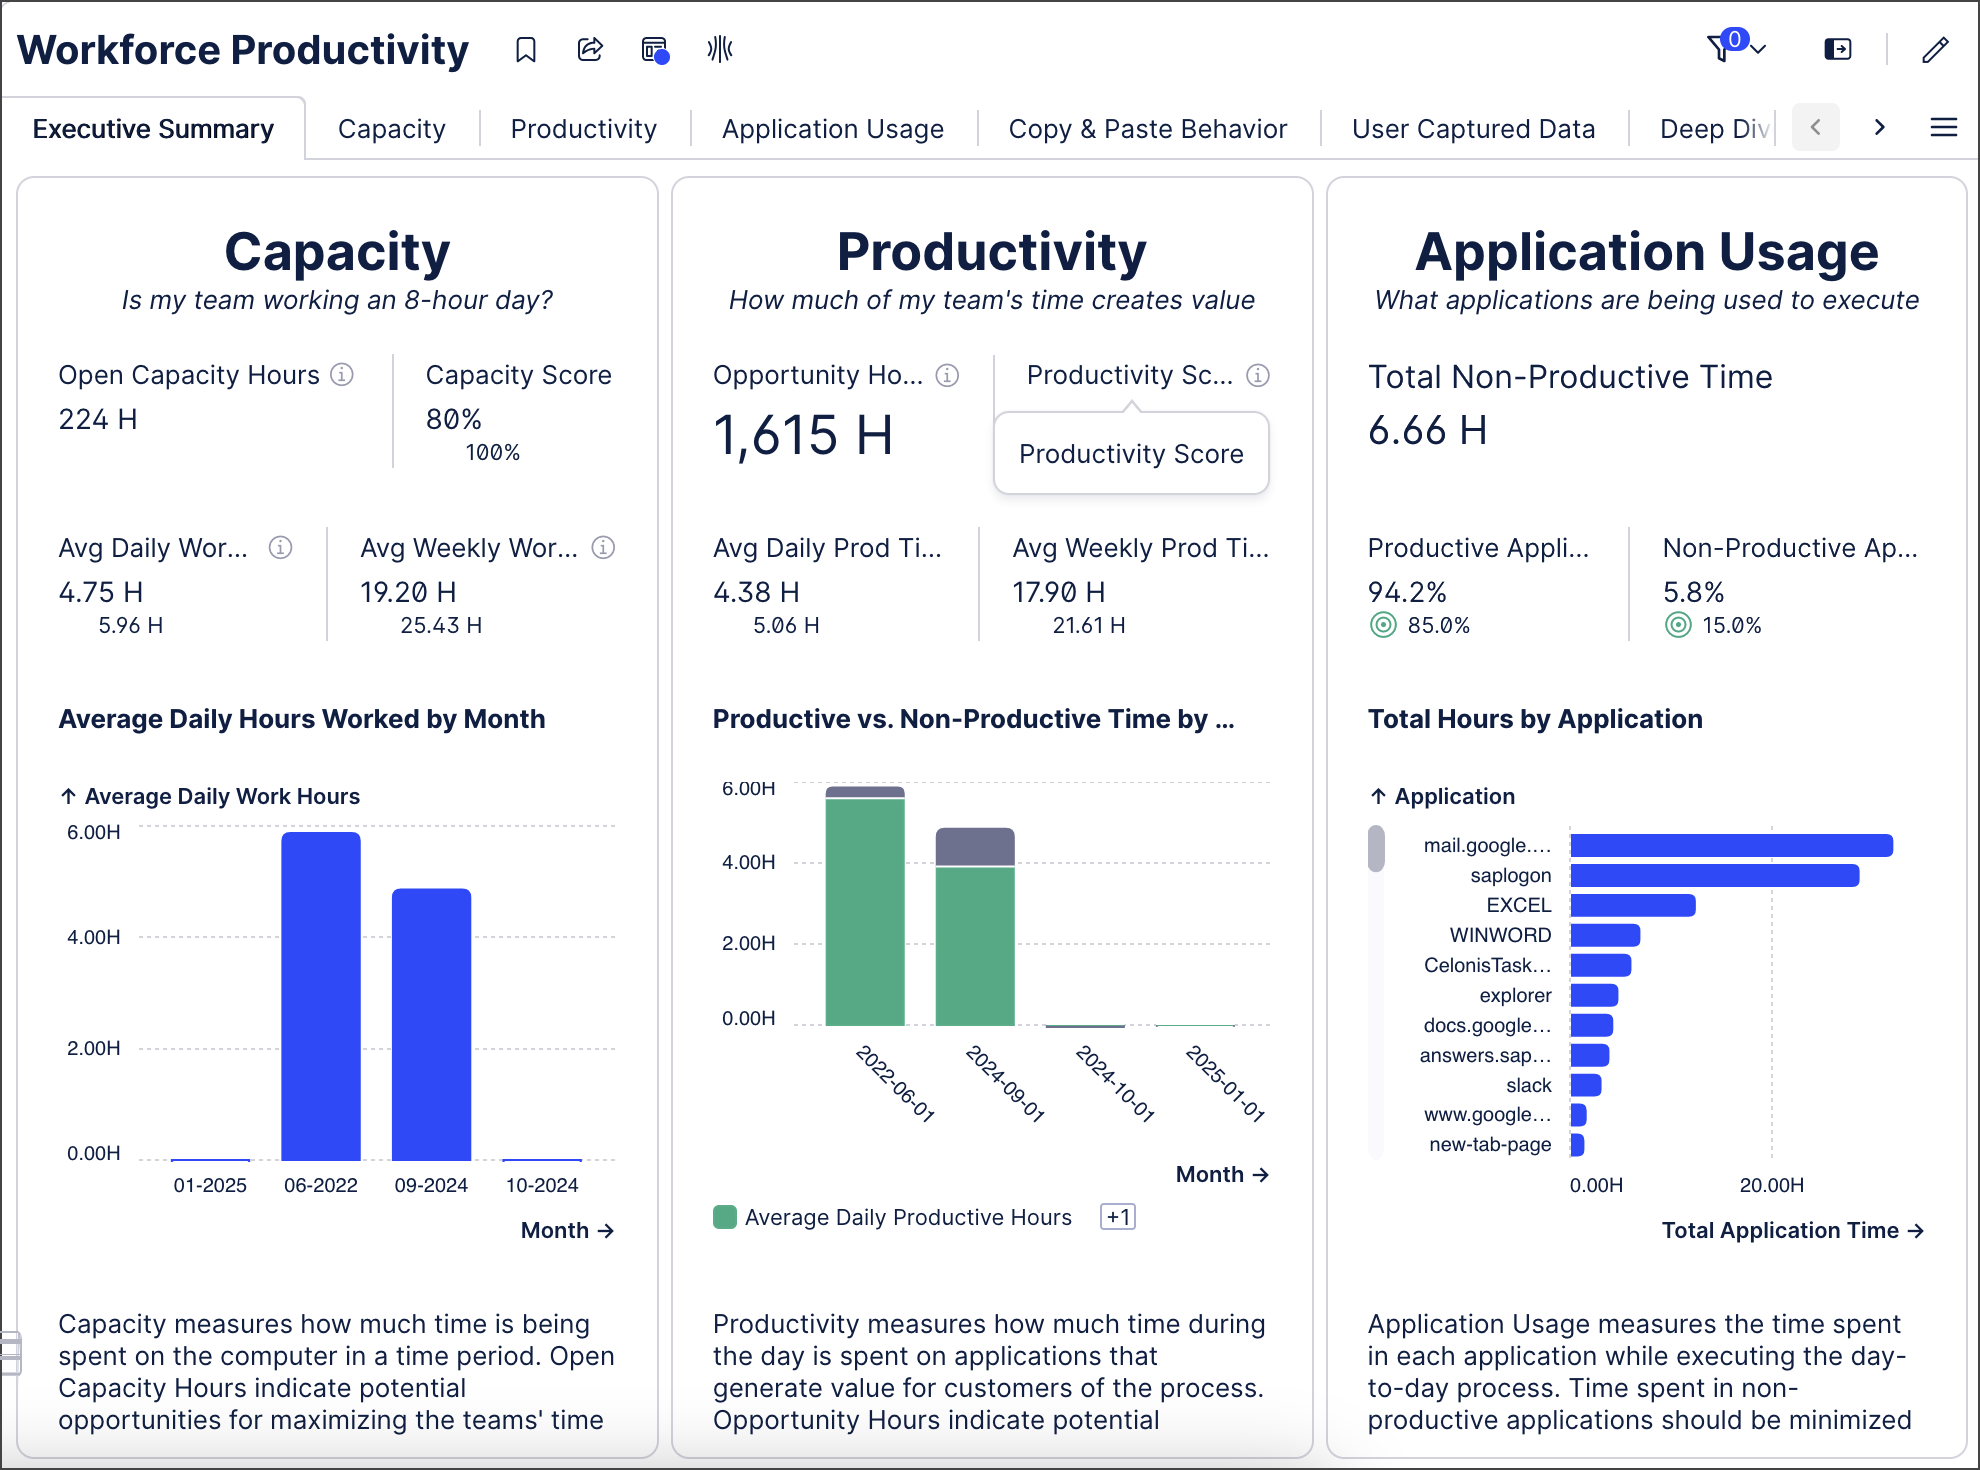
Determining which applications and web pages you want to include when calculating productive and non-productive time for your Task Mining project team.
Adding employee metadata, like team and geographic region, for Task Mining Project team members so you can drill down into the Task Mining data at a more granular level; custom metadata can also be combined with Data Model permissions to limit the scope of data that can be viewed by employees.
Application and web page classification options
Important
Classify applications and web pages as productive if you want to view Application Usage data in the Workforce Productivity app. If you don’t provide this information, Application Usage data will not be displayed. If applications and/or web pages are not classified, they are counted as non-productive. You can further reduce the amount of time spent reviewing and classifying applications and web pages using event processing rules so Task Mining data is collected for allowlisted applications and web pages only.
 |
Option | Description | Use case |
|---|---|---|
Use a transformation script and Workforce Productivity app Settings (Recommended) | Run a transformation script to add any applications and web pages that are in the Classify these applications or web pages as productive or non-productive in the Workforce Productivity app Settings tab. | For regular updates. Can be run manually or scheduled to run at a time/day when use of the Task Mining Client software is low. |
(Expert users) | Create a flat file that contains all applications and web pages you want to collect productivity data for and whether each is productive or non-productive before uploading it to the Celonis Platform. Important The flat file will overwrite everything in the |
|
Before you begin, ensure you have completed the following steps or meet the requirements listed below:
Admin or Analyst role with correct permissions. See Task Mining permissions.
Access the Data Pool for the Task Mining project.
Tip
From the Task Mining project Home page, select Project Connection >Go to Data Pool or select Data >Data Integration in the Celonis Platform navigation bar and open the Data Pool for your Task Mining project. The Data Pool’s name is
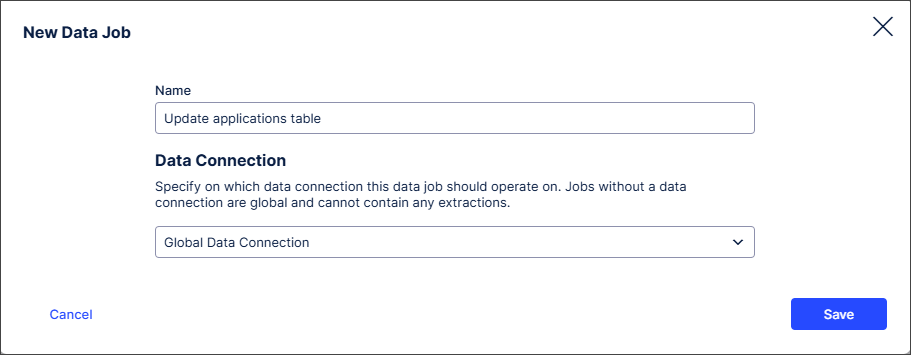
Task Mining Data Pool - <project name>.In the Data Pool graph, select Data Job > Add Data Job.
The New Data Job modal appears.
Add a name for the Data Job, leave Global Data Connection selected and select Save.
Select Add Transformation.
Name the transformation and add a description.
Copy and paste this as the Transformation Statement:
INSERT INTO applications
SELECT DISTINCT A1.Application
FROM TM_Labeled_Data AS A1
LEFT JOIN applications AS A2
ON A1.Application = A2.APPLICATION
WHERE A2.APPLICATION IS NULL;
Select Save.
In the Data Pool, select Execute Data Job.
The Transformation Statement finds all unique application names and URLs in the
TM_Labeled_Datatable that are not already present in theapplicationstable and inserts them into theapplicationstable.Add and run a Data Model for the
applicationstable by selecting Add Data Model Load.Tip
Set up a schedule to run the data job regularly at a time/day when use of the Task Mining Client software is low so Task Mining performance isn’t affected. For more information, see Task Mining processing scheduling options.
In the Workforce Productivity app, select Settings >Applications.
Select each unclassified application in turn and use the Productivity Setting to classify it as productive; if an application is not classified, it counts as unproductive.
Create a flat file (such as a .csv file) containing all applications and web pages and whether each is classified as productive or non-productive.
For information about what to include in your flat file, see applications table fields and values.
Access the Data Pool for the Task Mining project.
Tip
From the Task Mining project Home page, select Project Connection >Go to Data Pool or select Data >Data Integration in the Celonis Platform navigation bar and open the Data Pool for your Task Mining project. The Data Pool’s name is
Task Mining Data Pool - <project name>.Upload the flat file, changing the table name to
applicatisduring upload.For information on uploading flat files to the Celonis Platform, see Uploading data files.
Repeat steps 1 to 3 whenever you add new applications or web pages or want to make changes to existing classifications.
Applications table fields and values
Field name | Description | Example |
|---|---|---|
| A unique alphanumeric identifier for the application or web page. |
|
| The Windows process name of the application or the URL of the web page. This field is case-sensitive. |
|
| Classification of whether an application or URL is productive or non-productive. |
|
Important
Add employee information if you want to use User Filters. If you don’t provide this information, User Filters won’t work. By default, a pseudonymized identifier is used in place of the actual name in the Task Mining project and in the Workforce Productivity app.
 |
Option | Description | Use case |
|---|---|---|
Use a transformation statement (recommended) | Runs a data job to add employee | For regular updates.Can be run manually or scheduled to run at a time/day when use of the Task Mining Client software is low. |
Use a flat file (expert user) | Creates a flat file that contains all employee metadata and upload it to the Celonis Platform. Important The flat file will overwrite everything in the | Add employee information that is not captured by Task Mining like business unit team name and manager. For a full list, see employee table fields and values. |
Configure custom user attributes for the Task Mining project. FROM 2.8. | Adds up to five custom user attributes to the Task Mining project’s configuration. The next time users start the Task Mining Client software, they’ll be prompted to add this information. For more information, see user attributes. | Custom employee attributes add additional employee metadata, allowing the data displayed in the Workforce Productivity app to be refined further. |
Access the Data Pool for the Task Mining project.
Tip
From the Task Mining project Home page, select Project Connection >Go to Data Pool or select Data >Data Integration in the Celonis Platform navigation bar and open the Data Pool for your Task Mining project. The Data Pool’s name is
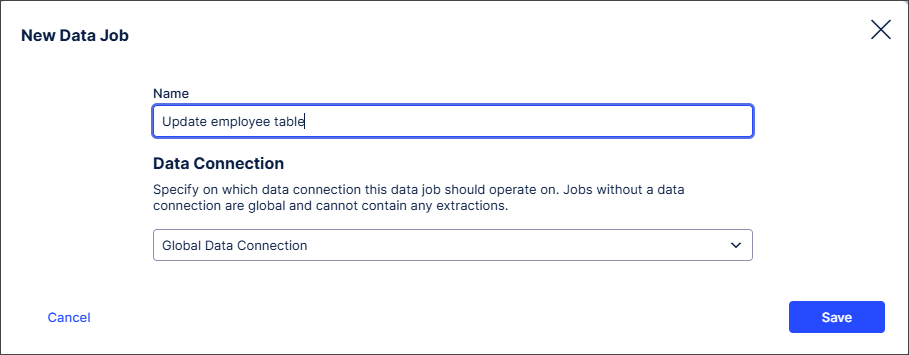
Task Mining Data Pool - <project name>.In the Data Pool graph, select Data Job >Add Data Job.
The New Data Job modal appears.
Add a name for the Data Job, leave Global Data Connection selected and select Save.
Select Add Transformation.
Name the transformation and add a description.
Copy and paste this as the Transformation Statement:
INSERT INTO employees ("USER NAME", "USER ID")
SELECT DISTINCT A1.SystemUser, A1.UserId
FROM TM_Labeled_Data AS A1
LEFT JOIN employees AS A2
ON A1.UserId = A2."USER ID"
WHERE A2."USER ID" IS NULL;
Select Save.
In the Data Pool, select Execute Data Job.
The transformation statement creates a
User IDfor each employee and adds eachUser IDto theemployeestable.Note
To add employee metadata to the
employeestable, you must define custom user attributes in the Task Mining project configuration. Employees will then be prompted to add their information the next time they start the Task Mining Client software. For more information, see user attributes.Add and run a Data Model for the employees table by selecting Add Data Model Load.
Tip
Set up a schedule to run the data job regularly at a time/day when use of the Task Mining Client software is low so Task Mining performance isn’t affected. For more information, see Task Mining processing scheduling options.
Create a flat file (such as a .csv file) containing the employee metadata.
For information about what to include in your flat file, see employees table fields and values .
Access the Data Pool for the Task Mining project.
Tip
From the Task Mining project Home page, select Project Connection >Go to Data Pool or select Data >Data Integration in the Celonis Platform navigation bar and open the Data Pool for your Task Mining project. The Data Pool’s name is
Task Mining Data Pool - <project name>.Upload the flat file, changing the table name to
employeesduring upload.For information on uploading flat files to the Celonis Platform, see Uploading data files.
Repeat steps 1 to 3 whenever you add new employee metadata or want to make changes to existing metadata.
Employees table fields and values
Field | Description |
|---|---|
| Employee’s name. |
| Employee’s user name as displayed in the Task Mining project. This is pseudonymized by default. Tip Get the list of user IDs by querying the
|
| Employee’s job role. |
| Employee’s annual salary. |
| Currency the employee is paid in. |
| Names of managers in the employee’s chain of command where:
|
| Employee’s business unit. |
| Name of the employee’s team. |
| Region where the employee is employed. |