Extractor Builder endpoints
When configuring your data connection you must define the API endpoints for your source system. This includes selecting your API type, configuring your requests, responses, and headers, and optionally managing your error handling.
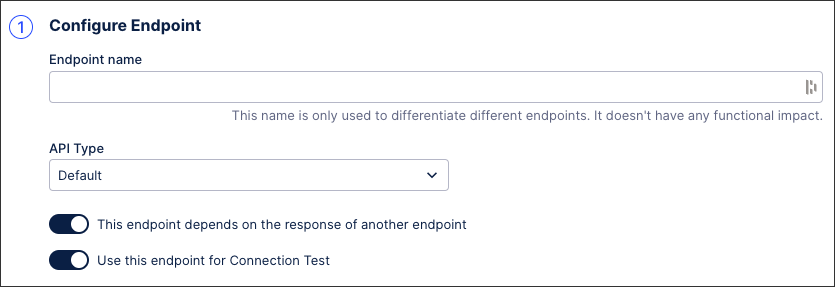
The first stage of configuring your API endpoints is to select the request methods and API types.
With the Celonis Platform, you can use two request types:
GET (default)
POST: This allows POST requests to be sent between your source system and the Celonis Platform. When selected, an additional BODY field is visible, allowing you to select between two HTTP standards:
x-www-form-urlencoded (default): This enables you to select key-value pairs.
Plain text: This provides you with a free text box to add your body in plain / raw format.
With the Celonis Platform, you can use multiple API types:
Default: Configure your own API.
OData V2: This allows you to apply filtering in the extraction configuration without defining request parameters. All applied filters are natively translated into the OData V2 syntax for the request. See: Configuring filtering.
OData V4: This allows you to apply filtering in the Extraction configuration without defining request parameters. All applied filters are natively translated into the OData V4 syntax for the request. Filters on
datetimecolumns must be specified using the UTC timezone. See: Configuring filtering.
You can also select whether this endpoint depends of the response of another endpoint - when selected, the dependencies configuration panel is displayed. For more information, see: Configuring dependencies (optional).
 |
This endpoint will be requested for every unique "Dependency.depends-on-column" value extracted after the extraction of "DEPENDS-ON-ENDPOINT" endpoint. In order to make a request for this endpoint, the placeholder you define in your URL or request parameter will be replaced with the actual value of Dependency.depends-on-column.
You can define dependency in your request in two different ways.
Define dependency in the url: You can use the column you selected with the following syntax
/your/api/{Dependency.depends-on-column}/data.Define dependency in a request parameter: You can define request parameter where the static value of the parameter is
{Dependency.depends-on-column}.
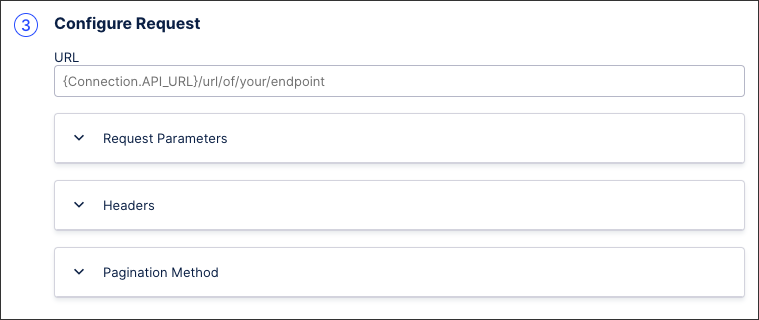
The request URL defines the API endpoint that is called and can be identified in your source system’s API documentation. It always starts with the connection parameter, configured as {Connection.API_URL}.
You then have the following options:
Request parameter: Add request parameters to apply filters to your API requests, such as the last creation or updated date filters.
Request header: This is done via defining a key-value pair. For example: define Accept as key and application/JSON as value for the API response to be returned as JSON.
Pagination method: To fetch data from all pages when extracting, you must select the pagination mechanism used by your source system's API.
For more information about configuring request parameters, see: Configuring request parameters.
 |
After configuring the API request, you can also configure the response. To define the response structure and content, you have two options:
Example JSON response: Copy and paste a JSON response example from the API documentation of your source system.
Sample a response: If you've already established a data connection with your source system, you can copy a sample response directly from that.
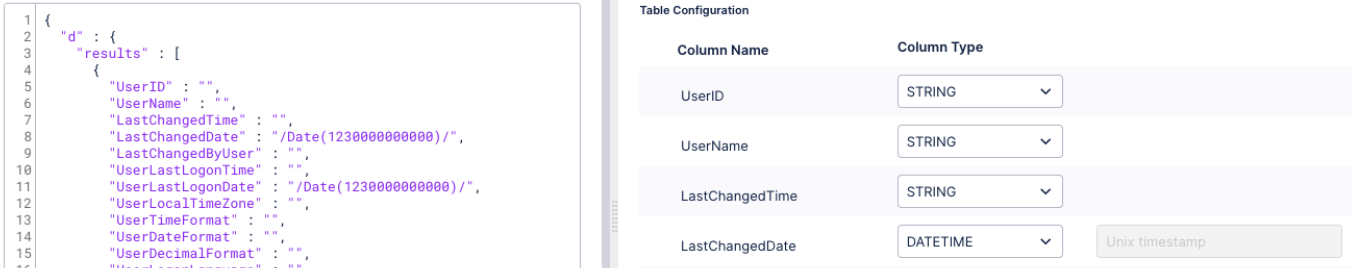
Based on the JSON response copied, the extractor builder automatically creates a table structure including all columns, data types and nested objects. You can configure this table in the following ways:
Multiple response roots: If your JSON response has multiple response roots, you can specify which root you want to extract via the dropdown.
Define primary keys: If you define a primary key for a parent table, the primary key will automatically be created as a foreign key column in its nested tables if they exist. The key will also be used as default primary keys in the extraction configuration.
Adjusting and deleting table elements: You can delete elements from the created table structure by deleting the respective key value pair from the JSON response. Elements you remove here will not be extracted.
Adjust Data Types: You can adjust the data type of each column via a dropdown. For
datetimevalues, a format based on Joda-Time standard needs to be provided. For more information, see: Joda-Time.
If you don't have any error handling rules, your extraction will fail if the response status is not 200. If there are some cases where you would prefer the extraction to continue, you can specify error handling rules. If the response matches any of the rules, that response will be ignored and extraction will continue.
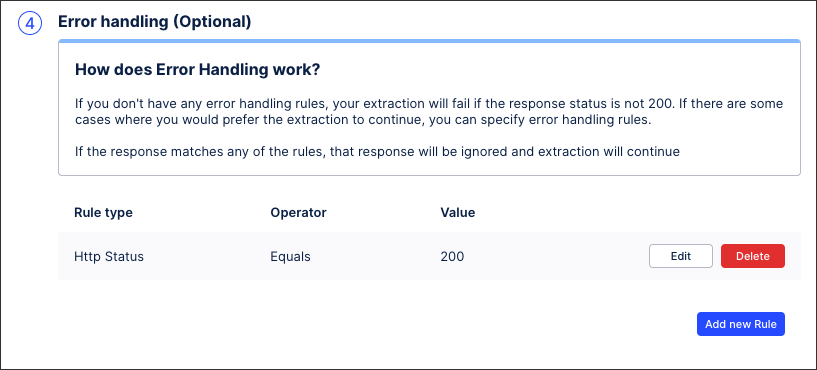 |
When adding an error handling rule, you can select from the following rule types:
Http status
Http response body
Field in the response
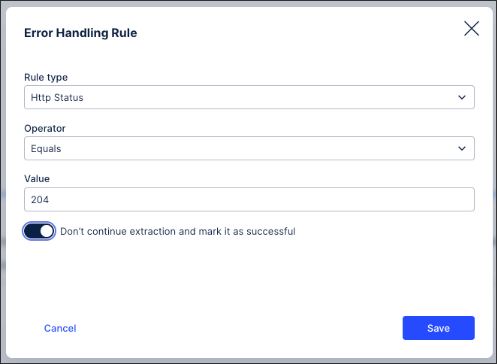
You can also stop the extraction task when an error rule is met, with the task marked as successfully executed. To enable this, toggle on Don't continue extraction and mark it as successful when configuring your rule:
 |
The Extractor Builder supports multiple methods for filtering endpoint data queries. By selecting a specific method based on your source API, you gain granular control over your data extractions.
Use the Filtering via individual query parameters configuration to define specific rules for endpoints where filters are passed as individual query parameters. This provides granular control over your data queries using individual query keys.
To configure this method:
Open your Extractor Builder configuration.
Under the Endpoint section, select the endpoint you want to configure.
Locate the Filtering Method section.
Select the dropdown menu, and choose Filtering via individual query parameters.
(Optional) In the Date time format field, provide the date/time format required by your API. Default is
yyyy-MM-dd HH:mm:ss.(Optional) In the API Documentation URL field, provide a link to your API documentation.
To add parameters, select + Add Dynamic Request Parameters, and provide the following:
In the Name field, provide the name of the dynamic parameter.
For Type, select the data type of the parameter.
If you selected Date or DateTime, provide the format in the Date Format field.
Repeat these steps as required.
Select Save at the bottom right of the configuration window.
This endpoint is now configured so that your configured parameters can be passed to it.
Use the Filtering via request body configuration to pass filter configurations directly within the request body, which is essential for POST endpoints that require key-value pairs rather than URL parameters.
Note
To use Filtering via request body, POST must be configured in Configure Request.
To configure this method:
Open your Extractor Builder configuration.
Under the Endpoint section, select the endpoint you want to configure.
Locate the Filtering Method section.
Select the dropdown menu, and choose Filtering via request body.
(Required) In the Date time format field, provide the date/time format required by your API. Default is
yyyy-MM-dd HH:mm:ss.Note
For Filtering via request body, the Date time format field is required.
(Optional) In the API Documentation URL field, provide a link to your API documentation.
Select Save at the bottom right of the configuration window.
This endpoint is now configured so that key-value pairs can be passed in the request body.
The Extractor Builder supports multiple methods for filtering endpoint data queries. By selecting a specific method based on your source API, you gain granular control over your data extractions.
myAPIURL/?$filter=FiscalYear eq ‘2022’ and InvoiceNumber eq = ‘1234’
Selecting OData V2 or V4 allows you to apply filtering in the extraction configuration without defining request parameters on the endpoint. All applied filters—such as Creation Date, Change Date, or Filter Statements—will be natively translated into the OData syntax.
Filter in extraction configuration | How the request parameter will be generated |
|---|---|
“FiscalYear” = ‘2022’ and “InvoiceNumber” = ‘1234’ | $filter=FiscalYear eq ‘2022’ and InvoiceNumber eq = ‘1234’ |
“FiscalYear” >= ‘2012’ | $filter=FiscalYear ge ‘2012’ |
“FiscalYear” IN (‘2012’, ‘2014’, ‘2016’) | $filter=FiscalYear eq ‘2012’ or FiscalYear eq ‘2014’ or FiscalYear eq ‘2016’ |
CreationDate >= ‘2022-04-03 00:00:00 | For OData V2: $filter=DocumentDate ge datetime'2022-04-03T00:00:00' For OData V4: $filter=DocumentDate ge 2022-04-03T00:00:00Z |
OData APIs return a specific format called Edm.DateTime (e.g., /Date(1646956800000)/). These are automatically detected in the Extractor Builder and converted into user-readable datetime values (e.g., 2022-05-01 10:22:12) during extraction.
In the Configure Response step, this will look as follows:
 |