Alert for Blocked Invoices close to Due Date
This Action Flow mitigates financial loss by identifying blocked invoices nearing their due date. It automatically monitors your Standard AP Data Model, filters for high-value items, and alerts specific stakeholders via email. By providing visibility into these bottlenecks, the workflow helps teams avoid late payment fees and optimize cost avoidance strategies.
This Action Flow automates the monitoring of accounts payable risks by identifying and escalating blocked invoices. It follows a four-stage process to ensure the right stakeholders receive the most critical data:
Data retrieval and segmentation: The flow starts by defining key parameters (like currency and timeframes) and then loops through your organization's Company Codes to ensure comprehensive coverage.
Intelligent filtering: It queries the Data Model for specific invoice details and filters for those currently blocked. To prevent information overload, the system identifies and "slices" only the top 5 highest-value invoices per group.
Logic routing: Using a router, the workflow directs data packets based on the Company Code. For example, invoices from code 1000 and 2000 are separated to ensure they reach the correct regional managers.
Automated notification: Finally, the system formats these high-priority rows into a clean summary and sends an automated email alert to the designated recipients, including a direct link to the AP Operational App for immediate resolution.
Before configuring this Action Flow, you need access to a data model that includes accounts payable information.
See: Modeling your data.
For this Action Flow, only the modules listed below require configuration:
In this module you can define the running schedule by clicking on the clock icon and setting the following variables necessary for the Action Flow:
Min Days to Notification: Number of days before the Invoice Due Date when youstopreceiving the notification (usually meaning that you are no longer able to act on the invoice), e.g. 3
Max Days to Notification: Number of days before the Invoice Due Date when you start receiving the notification, e.g. 10
Currency: enter the currency for the calculations, e.g. EUR or USD
App Link: enter the link to your App that is going to be referred to in the body of the email, e.g. https://ap-operational-app-template.eu-3.celonis.cloud/package-manager/ui/studio/ui/assets/63ee65dc-ecb4-4ed3-8327-4e603197c7a0
In this module you can define the sets that will be used for aggregating your Invoices or KPIs.
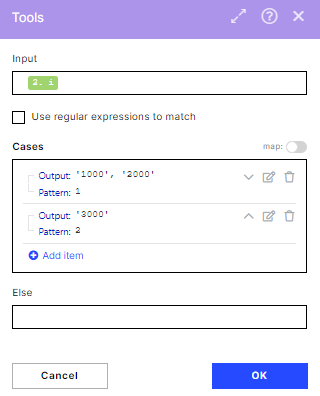
In this module, you can define the sets that will be used for aggregating your Invoices or KPIs.
In the image, you can see two different outputs. In the first iteration, this module will output ‘1000’,’2000’ which means the KPIs will be calculated for invoices belonging to these Company Codes. In the second iteration, they will be calculated for invoices belonging to Company Code ‘3000’.
You can add as many rules as you want, including having Outputs with more than one Company Code (e.g. if your country is composed of Company Codes A and B, you can add a rule like “Pattern = 3, Output = ‘A’,’B’ “). You will also need to increase the maximum number of iterations in module 2.Loop for each new rule you add.
To get the Invoice details, set up the Get Rows module.ś
Note
You don't have to change any fields or filters.
In this module, you can set up the filters that will be applied when displaying the data in the email. In our example, we will be passing information regarding the iteration that contained Company Code 1000 (and ‘2000’ since the list also contained a second Company Code) for the next module of the AF.
You can add as many routing paths as you would like. In the case you want the same recipient to receive the information about two different lists of Company Codes (defined in module 3.Map Loop and Company Codes) you will need to set up 2 routes, one for each list.
You need to set your desired Company Code value in the first condition, e.g.
Condition 1: “13.Output contains 1000”
Condition 2 does not require changes.
In this module, you need to configure the email connection and define the recipient(s) of the email. Change the following settings:
Connection: connect to your mail account and grant Celonis permission to read and write emails.
To: define the recipient you want to send the emails to, e.g. johndoe@domain.com