Connecting to Workday via REST or SOAP
Important
Any references to third-party products or services do not constitute Celonis Product Documentation nor do they create any contractual obligations. This material is for informational purposes only and is subject to change without notice.
Celonis does not warrant the availability, accuracy, reliability, completeness, or usefulness of any information regarding the subject of third-party services or systems.
You can connect your Workday instance to the Celonis Platform, allowing you to extract your reporting data from both commonly-used reporting types and custom reports.
There are two methods of connecting to your Workday instance and extracting your reports - REST (recommended) and SOAP:
The below guide is a step by step guide on how to configure Workday and Celonis Extractor Builder to leverage the easier to use and preferred OAuth using Workday API Client for Integrations. This process involves creating and configuring a custom extractor in the Celonis Platform.
To learn more about creating custom extractors, see: Applications.
Before you begin
Before creating your custom extractor, you need to create or have access to a custom report in Workday. This report must be saved in a JSON format and include the following filters:
Transaction_Entry_Before
Transaction_Entry_After
An example of how the Workday report URL would be structured:
https://InstanceID.myworkday.com/ccx/service/customreport2/InstanceID/UserID/ReportName&Filters&format=json
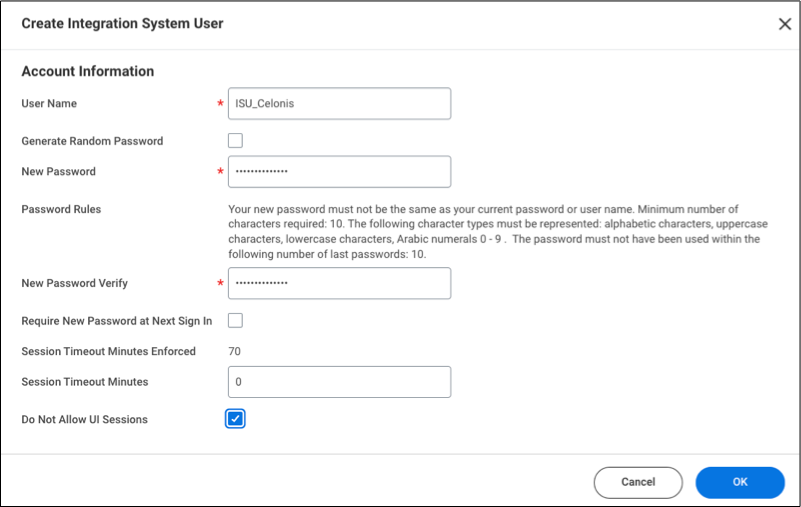
Select Create Integration System User task.
Keep Session Timeout Minutes default (zero).
Select Do Not Allow UI Sessions to not allow the ISU for logging into your Workday system through the UI.
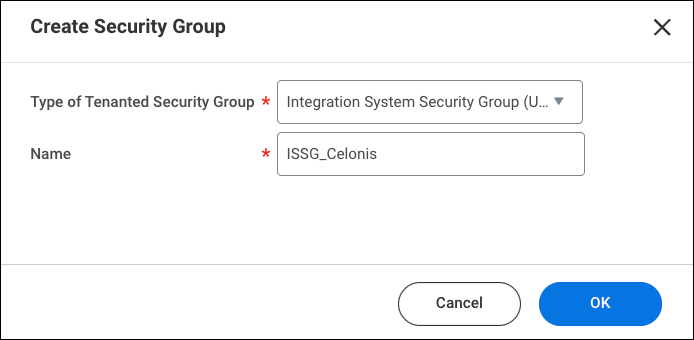
Select Create Security Group task.
As a type, select Integration System Security Group (Unconstrained) or Integration System Security Group (Constrained). The main difference between these is that constrained version results will only be returned for objects that have a connection with a constraint. For example, for workers in the US organizational entity only.
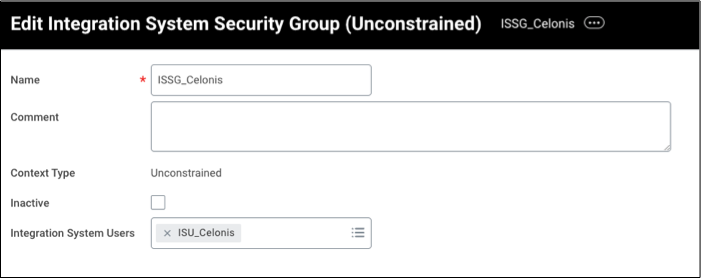
In Group Criteria, select the newly-created ISU for inclusion in the security group.
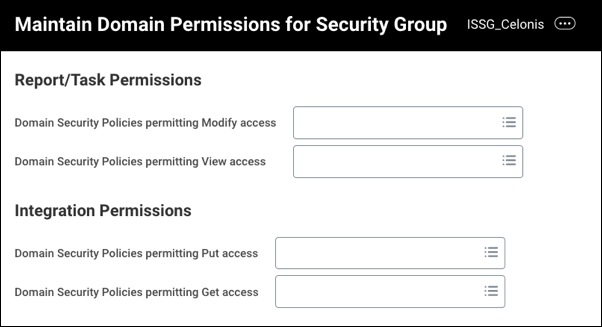
Identify required security needed for specific operations (View Security for Securable Item) and edit domain security policies.
Select the Domain Security Policies for Functional Area report.
Select a security policy.
Select Edit Permissions.
Grant Get access for specific domain to newly created ISSG.
Access Activate Pending Security Policy Changes task.
Select Confirm checkbox to activate your changes.
There are several ways to give the ISSG access to the domains - but the easiest way is to use the related actions on the newly created ISSG and Maintain the domain permissions for security group:

‘View’ Access is needed if using WQL and/or REST API, ‘Get’ Access is needed if using RAAS (Report as a Service) and/or SOAP API.
Note that:
Activate Pending Security Policy Changes is needed after updating Domain Permissions for Security Groups.
If using WQL - View/Modify access to Workday Query Language is also needed.
The security is double layered - the API Client must be given access to the functional areas and the integration user (security group) that was configured in steps 1-5 needs access to the specific domains. If the API Client has access to a functional area but the attached integration user does not have access to that area, then the API Client will not be able to access that data, and going the other direction if the integration user has access to data but the API Client does not have access to the functional area then the API client will not have access to the data.
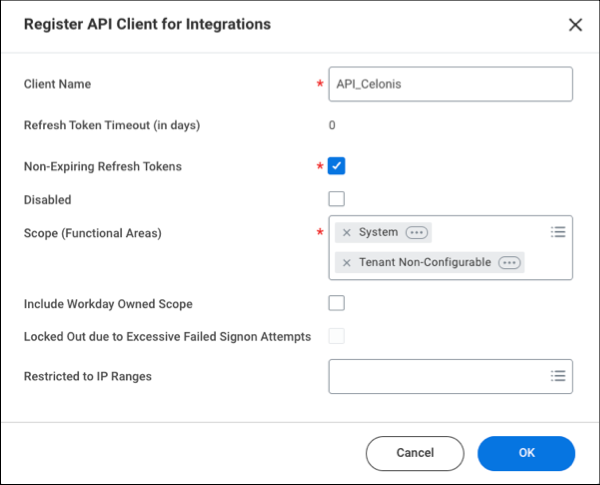
We recommend Non-Expiring Refresh Token, it is misleading but the refresh token is assigned when an integration system user is linked to the API Client, so a non-expiring refresh token just means that the unique refresh token code will not expire. If the refresh token is set to expire it will need to be regenerated and updated in Celonis every time it expires. Note for non-expiring refresh tokens they can still be manually refreshed by the customer - and it has no impact on the ability of the API to refresh it’s authorization code.
We recommend all API Clients for Integration have access to System and Tenant Non-Configurable. System is required for WQL and Tenant Non-Configurable is required for RAAS.
Upon Registration - note down the Client ID and Client Secret - the Secret cannot be viewed again after this point so if it is not noted down a new client secret will need to be generated.
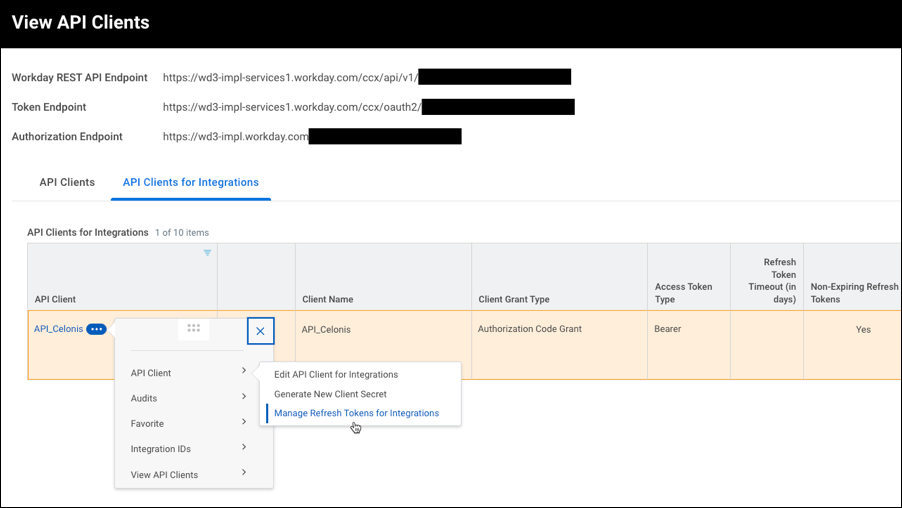
Navigate back to View API Clients - and find the API Client for Integration that was just created. On the related actions, select ‘Manage Refresh Tokens for Integrations’
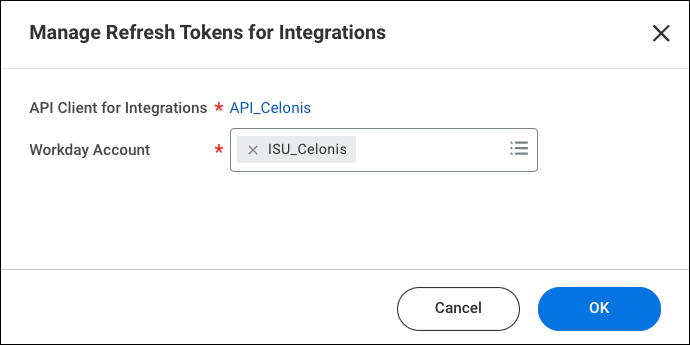
Select/Link the Integration System User that was created in step 1.
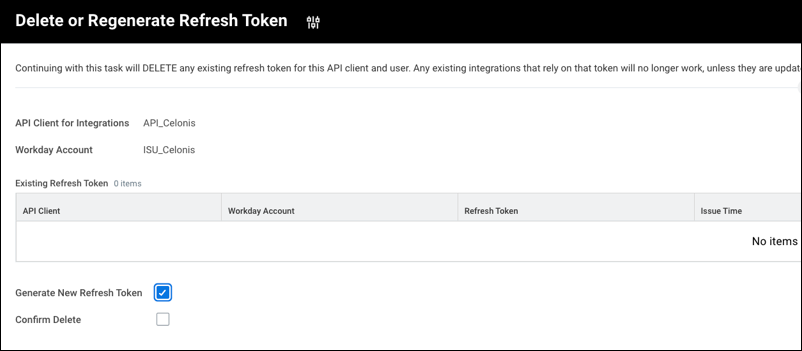
Select the Generate New Refresh Token option. Note if a refresh token already exists for this Integration System User on this API Client, then you will also need to Confirm Delete the existing Refresh Token - multiple Integration Users can be linked to 1 API Client, but each Integration User can only have 1 Refresh Token for each API Client.
With access to the custom report in Workday, you can then create a custom extractor from your data pool:
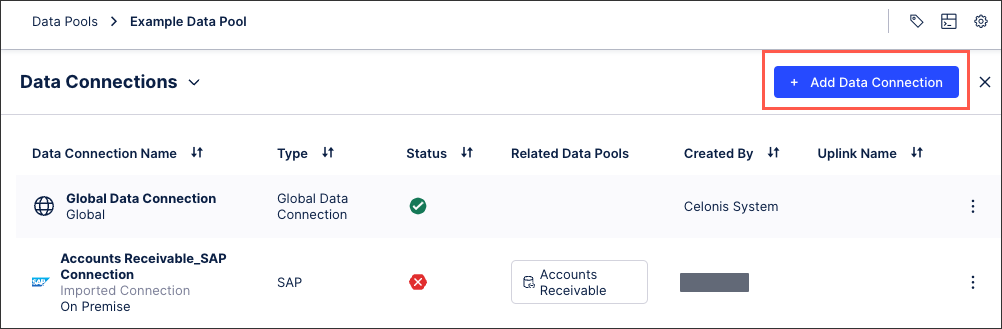
Click Data Connections.
Click Add Data Connection and select Connect to Data Source.
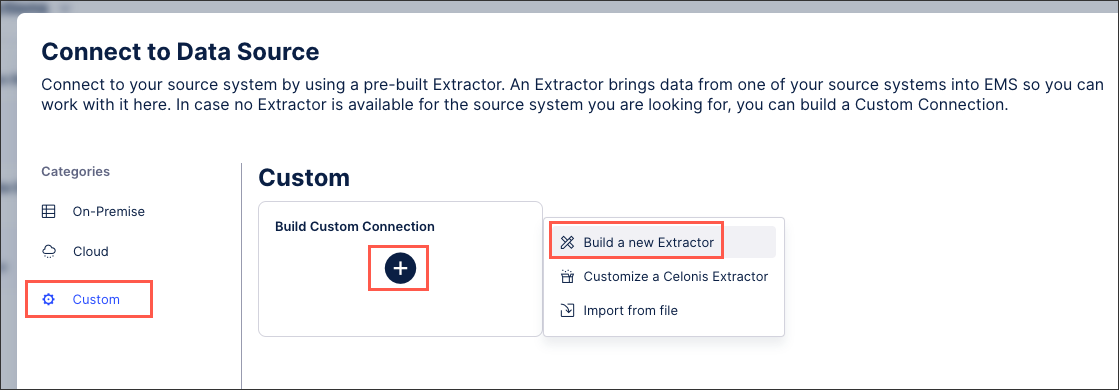
Click Custom - Build Custom Connection - Build a new Extractor.
Configure the following connection details and then click Save and Continue:
Name: An internal reference for this connection.
Description: An optional description.
Connection parameters: The following should all be mandatory:
Client ID
Client Secret - confidential
Refresh token
Token URL
Authentication method: Select the Custom Authentication and configure the fields as follows:
URL = {Connection.Token_URL}
HTTP Method = POST
Request Parameters and Headers = Nothing
Request Body = x-www-form-urlencoded, with the following key pairs:
client_id: {Connection.Client_ID}
client_secret: {Connection.Client_Secret}
grant_type: refresh_token
refresh_token: {Connection.Refresh_Token}
Configure Response = access_token
Configure authentication header for endpoints = authorization bearer
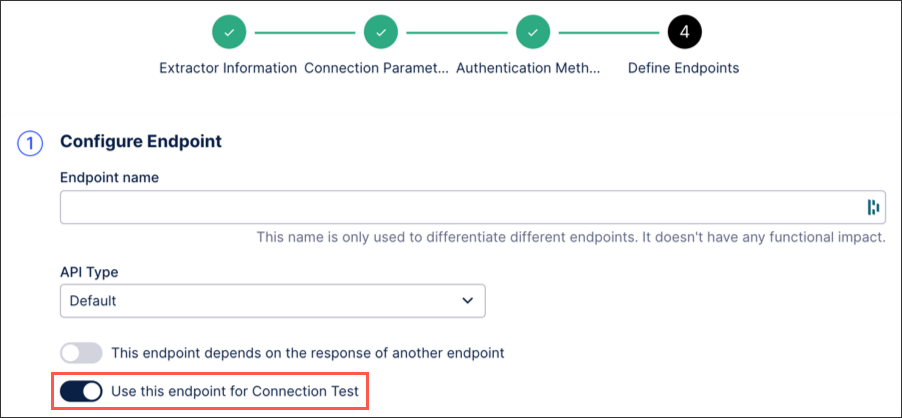
Create a first endpoint which is used for the connection test with the following configurations:
Configure Endpoint: make sure to toggle the "Use this endpoint for Connection Test" option.
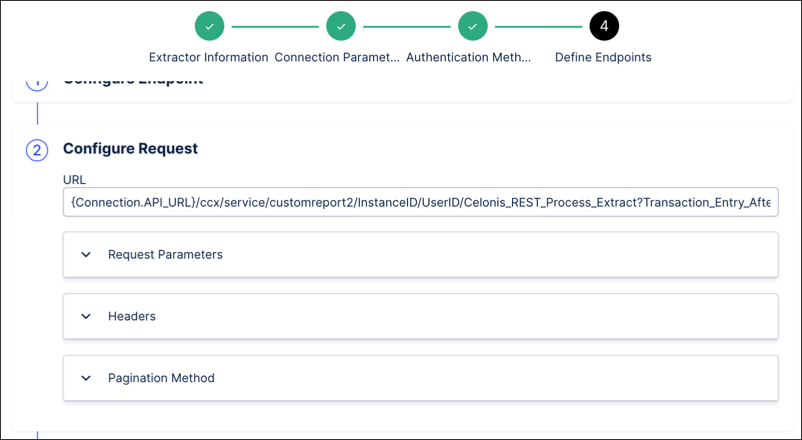
Configure Request: add the {Connection.API_URL} parameter followed by the custom report URL.
For this endpoint, which is purely used for the connection setup, make sure that the Transaction_Entry_Before and Transaction_Entry_After parameters are only covering a one-day difference (as shown in the example). The original report URL can easily be adjusted accordingly. The reason for doing that is that the response can be quite large depending on the time frame and lead to timeouts.
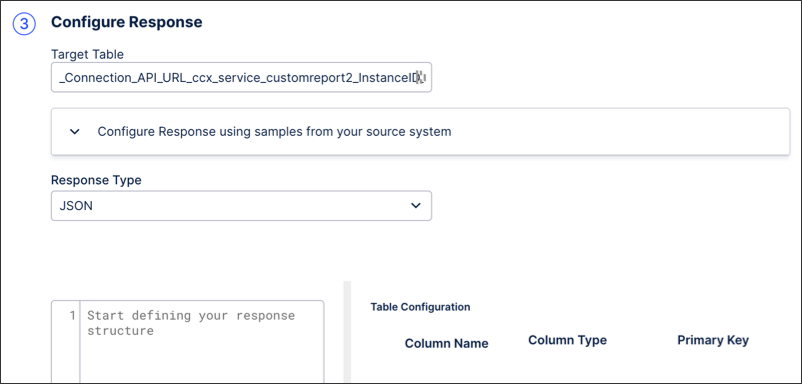
{Connection.API_URL}/ccx/service/customreport2/InstanceID/UserID/Celonis_REST_Process_Extract?Transaction_Entry_After=2021-01-01-00:00&Transaction_Entry_Before=2021-01-02-00:00&Business_Process_Name%21WID=d5ddd2195a6c4f60b63077c26ae2950b!50862dc434f241c3978c87423a859d04!48b49c6d25a74247b7b9d0d6f6593d72! 56cd8fae34ad49ee94acae3d3873ea64!1afb78c169254c73a18e7f5f8d246a22&format=jsonConfigure Response: Define the target table name and add a response sample from the report.
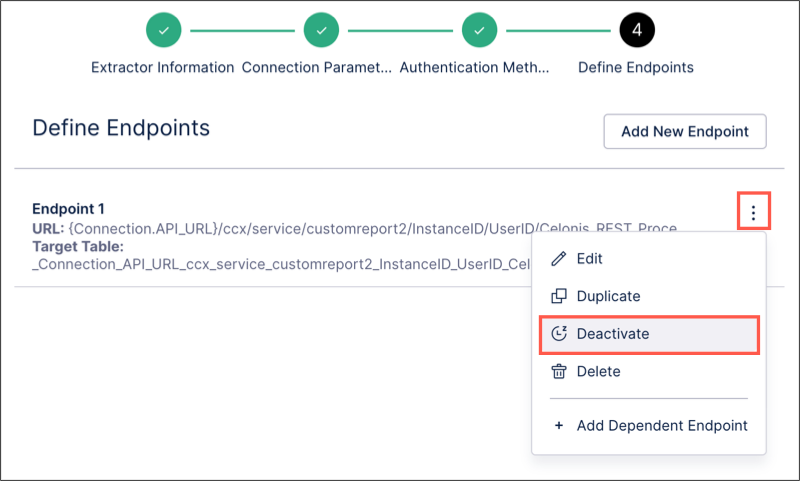
Deactivate this endpoint.
Create a second endpoint that is used for the actual data extraction:
Configure Endpoint: make sure to untoggle the "Use this endpoint for Connection Test" option.
Configure Request: add the {Connection.API_URL} parameter followed by the custom report URL. For this endpoint make sure to remove the Transaction_Entry_Before and Transaction_Entry_After parameters from the URL, these will be added automatically.
{Connection.API_URL}/ccx/service/customreport2/InstanceID/UserID/Celonis_REST_Process_Extract?Business_Process_Name%21WID=d5ddd2195a6c4f60b63077c26ae2950b!50862dc434f241c3978c87423a859d04!48b49c6d25a74247b 7b9d0d6f6593d72!56cd8fae34ad49ee94acae3d3873ea64!1afb78c169254c73a18e7f5f8d246a22&format=jsonRequest parameter: Add a request parameter.
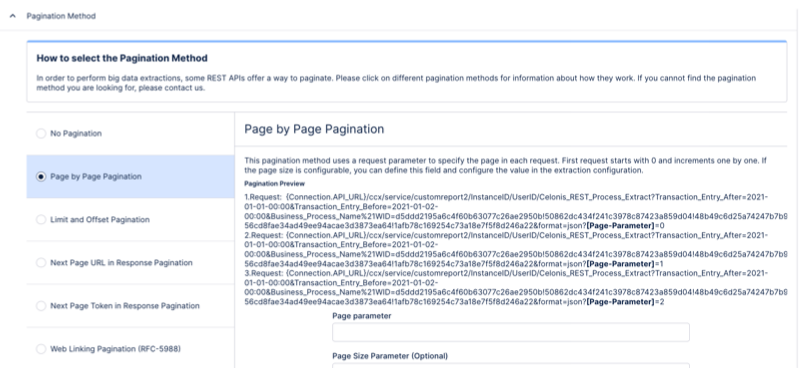
Pagination method: Define the pagination method.
Configure Response: Define the target table name and add a response sample from the report.
Click Finish.
Create a data job targeting that data connection and set up the additional filter in the extraction configuration as follows, where the DATE can be either a specific hard coded date or a parameter as in every other extraction.
For more information, see: Extracting and transforming data.
Limited Availability
This extractor is currently in limited availability mode and can be added to your Celonis Platform environment by request only.
To request access to this extractor, contact Celonis Support.
This method lets you extract your reporting data from five different areas using the Workday API client with JWT.
This method is not recommended for the following reasons:
The data access is limited to the supported APIs, which are not suitable for most use cases.
Performance may degrade with large volumes of data.
Lack of available filtering.
To extract your reporting data, you need to configure a Workday Integration System User (ISU) account with permissions to access Workday's web service operations. For security reasons, Workday restricts each ISU to a single integration system.
While we provide steps for this below, we recommend using the Workday documentation for the latest information: Workday documentation
Select Create Integration System User task.
Keep Session Timeout Minutes default (zero).
Select Do Not Allow UI Sessions to not allow the ISU for logging into your Workday system through the UI.
Select Create Security Group task.
As a type, select Integration System Security Group (Unconstrained) or Integration System Security Group (Constrained). The main difference between these is that constrained version results will only be returned for objects that have a connection with a constraint. For example, for workers in the US organizational entity only.
In Group Criteria, select the newly-created ISU for inclusion in the security group.
Identify required security needed for specific operations (View Security for Securable Item) and edit domain security policies.
Select the Domain Security Policies for Functional Area report.
Select a security policy.
Select Edit Permissions.
Grant Get access for specific domain to newly created ISSG.
Access Activate Pending Security Policy Changes task.
Select Confirm checkbox to activate your changes.
To use OAuth2 two further prerequisites are required:
Generate a key pair
Open a key-pair generator tool like Cygwin then generate a key pair that will be stored in a key store called "JWTkeystore.jks" with a password (example uses "Workday123!").
keytool -genkey -keyalg RSA -alias Workday -keystore JWTkeystore.jks -storepass Workday123! -validity 360 -keysize 2048
Extract the public key and save it as a file called "public.cert".
keytool -export -alias Workday -keystore JWTkeystore.jks -rfc -file publickey.cert
One way to isolate and extract the private key is to convert the key store .jks file to a PKCS#12 (.p12) format.
ƒopen PKCS12 -srcalias Workday -deststorepass Workday123! -destkeypass Workday123!
In PKSC#12 format, you can export the private key unencrypted or encrypted (both versions allegedly work per Workday documentation but this was tested using the unencrypted version).
# Unencrypted Private Key openssl pkcs12 -in keystore.p12 -nodes -nocerts -out privatekey.pem

# Encrypted Private Key openssl pkcs12 -in keystore.p12 -nocerts -out privatekey.pem
Send the public.cert file to the relevant Workday Admin/Power User.
Ensure the private key file is safe and accessible for when the Workday Data Connection is being entered.
Register API Client in the Workday system
In Workday, create a Register API Client instance.
Select JWT Bearer Grant as the Client Grant type.
Under the “X509 Certificate”, select Create x509 Public Key and paste the content of publickey.cert (entire text of file including “---BEGIN Certificate---" and “---END Certificate---").
Ensure the right Scope (Functional Areas) are selected:
Jobs & Positions, Organizations and Roles, Staffing, and Worker Profile and Skills.
These Scopes are needed for the Workday Test Connection as it will wait for a successful response when it hits these Scopes (Web Services).
Create Integration System User (ISU). The ISU User Name needs to match the Client Name in the API Client. There are no requirements for the password. Perform the following steps to finalize creation of the ISU.
Select Create Integration System User task
Keep Session Timeout Minutes default (zero)
Select Do Not Allow UI Sessions to not allow the ISU for logging into your Workday system through the UI.
Create an Integration System Security Group (ISSG). Ensure the Type = Unconstrained. Perform the following tasks to finalize creation of the ISSG.
Select Create Security Group task.
In Group Criteria, select the newly-created ISU for inclusion in the security group.
Identify required security needed for specific operations (View Security for Securable Item).
Select the Domain Security Policies for Functional Area report.
Select a security policy.
Select Edit Permissions.
Grant Get access for specific domain to newly created ISSG (Employee, Employee_Employment_Info, Former_Workers, Job_Categories, Job_Profiles, Locations, Organizations, Supervisory_Organization_Assignment_Restrictions, Worker_Event_History, Worker_Profile, Workers).
Activate pending security policy changes through the following tasks:
Access Activate Pending Security Policy Changes task.
Describe your changes in the Comment.
Select Confirm checkbox to activate your changes.
With access to your Workday authentication credentials, you can create a data connection between your Workday instance and the Celonis Platform from your data pool diagram:
Click Data Connections.
Click Add Data Connection and select Connect to Data Source.
Select Cloud - Workday.
Configure the following connection details:
Name: An internal reference for this data connection.
API version: Select the API you want to use, with the latest being the recommended.
Authentication method: Choose between store credentials (username, password, tenant, and host) and OAuth (client ID, user ID, private key, tenant, and host).
Report configuration: Enter the details for the reports you want to extract from Workday. You can also do this is JSON format.
Click Test Connection and correct any issues highlighted.
Click Save.
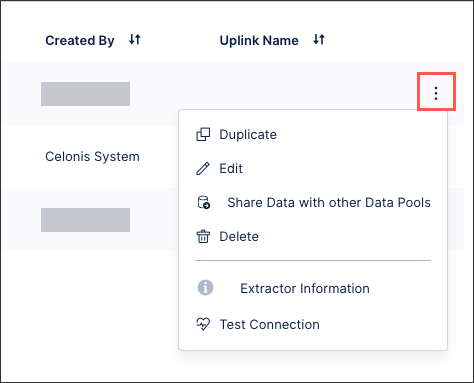
The connection between your Workday instance and the Celonis Platform is established. You can manage this connection at any time by clicking Options:
When connecting your Workday instance to the Celonis Platform, the following API endpoints are supported:
The Workday Hire-to-Retire connector uses Workday's SOAP-based Human_Resources API, which contains operations that expose Workday Human Capital Management Business Services data, including employee, contingent worker, and organization information. The Celonis Extractor uses the following operations to retrieve data from Workday:
API call | Description |
|---|---|
Get_Employee | Retrieves granular information about individual employments (e.g., position, job, status). |
Get_Employee_Employment_Info | Retrieves granular information about individual employments (e.g., position, job, status). |
Get_Former_Workers | Retrieves data for individuals that have previously been employed but were not included as a Workday worker, incl. their personal/job details and contact info as of termination date. |
Get_Job_Categories | Retrieves job categories data for the specified criteria (all if no criteria specified), incl. reference ID, name, description and inactive flag. |
Get_Job_Profiles | Retrieves data related to job profiles for the specified criteria (all if no criteria is specified), organized into different response groups. |
Get_Locations | Retrieves data related to a location for the specified criteria (all if no criteria is specified). |
Get_Organizations | Retrieves data related to an organization, incl. staffing configuration, structure, etc. |
Get_Supervisory_Organization_Assignment_Restrictions | Retrieves the organization assignment default values and allowed values for supervisory organizations. |
Get_Worker_Event_History | Retrieves references to all events created through workflows associated with a worker based on the event type and data parameters. |
Get_Worker_Profile | Retrieves a subset of data related to a worker and their employment/contract, personal info, as well as compensation. |
Get_Workers | Retrieves public and private information for specified workers. |
GET Payments
GET PaymentTypesTable
GET StopItem
GET BusinessUnits
GET CurrencyConversionRates
GET CurrencyRateTypes
GET CompanyOrganizations
GET CostCenters
GET ResourceCategories
GET FinancialRevenueCategories
GET Suppliers
GET PurchaseOrders
GET PurchaseRequisitions
GET PurchaseItems
GET Receipts
GET PurchaseOrderChangeOrders
GET SpendCategoryHierarchies
GET SupplierInvoiceAdjustments
GET SupplierInvoices
GET SupplierContracts
GET Customers
GET CustomerCategories
GET CustomerDeposits
GET CustomerGroups
GET CustomerInvoiceAdjustments
GET CustomerInvoices
GET CustomerPayments
GET CustomerRefunds
GET RevenueCategories
GET SalesItems
GET SalesItemGroups
GET Report
When connecting your Workday instance to the Celonis Platform, the following filters are supported per table:
Table | Supported filters |
|---|---|
customerDeposits | Updated_From_{tableName}_After, Updated_From_{tableName}_Before |
customerPayments | Updated_From_{tableName}_After, Updated_From_{tableName}_Before |
formerWorkers | Updated_From_Moment, Update_To_Moment |
jobProfiles | Updated_From, Updated_Through, Effective_From, Effective_Through |
organizations | Updated_From, Updated_Through, Effective_From, Effective_Through |
payments | Updated_From_{tableName}_After, Updated_From_{tableName}_Before |
purchaseOrders | Updated_From_{tableName}_After, Updated_From_{tableName}_Before |
receipts | Updated_From_{tableName}_After, Updated_From_{tableName}_Before |
requisitions | Updated_From_{tableName}_After, Updated_From_{tableName}_Before |
supplierContracts | Updated_From_{tableName}_After, Updated_From_{tableName}_Before |
supplierInvoiceAdjustments | Updated_From_{tableName}_After, Updated_From_{tableName}_Before |
supplierInvoices | Updated_From_{tableName}_After, Updated_From_{tableName}_Before |
workers | Updated_From, Updated_Through, Effective_From, Effective_Through |
This section explains the limitations and known issues for the Workday extractor:
Data access for the Workday SOAP Extractor is restricted to the supported API endpoints.