Importing object types and relationships from source data
You can create custom object types directly from your source system tables. The table metadata is then used to detect relationships between tables and automatically generate the transformation scripts you need. This is especially helpful if your source data is already organized around distinct business objects.
When importing your object types and relationships, the following applies:
Import one or more tables from a connected data source. Each table becomes an object type. You can run the import multiple times to bring in additional tables or sources.
Table columns become object attributes. You can remove unwanted columns, add new attributes, and choose an ID attribute. Attribute data types must be changed in Data Integration, not during import.
When importing multiple tables, foreign keys are used to suggest one-to-many relationships. You can accept or modify these. Many-to-many relationships must be created after import.
SQL transformations are generated to populate attributes and relationships. Review the scripts, ensure IDs are unique, and add data for attributes or relationships not sourced from the original tables.
You can also use the import flow to add attributes from a table to an existing object type. If needed, a transformation is created automatically, and you can extend the object type as often as required.
Prerequisites
To import your objects and events, the data source must be accessible via a data connection in your data pool.
To share data between your data pools, see: Sharing data between data pools.
Follow these steps to import one or multiple object types from your source data:
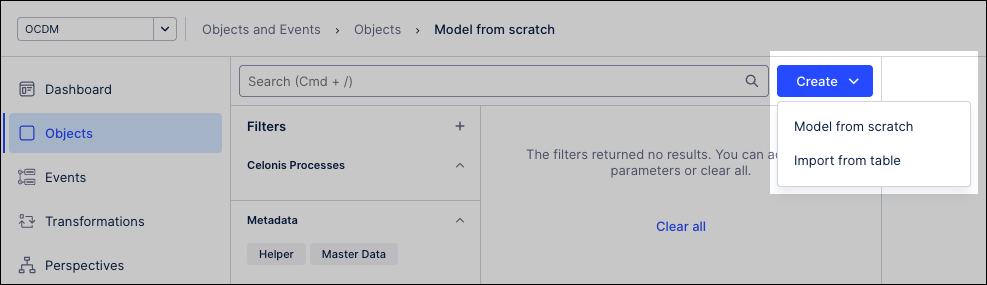
From your Objects and Events dashboard, click Objects.
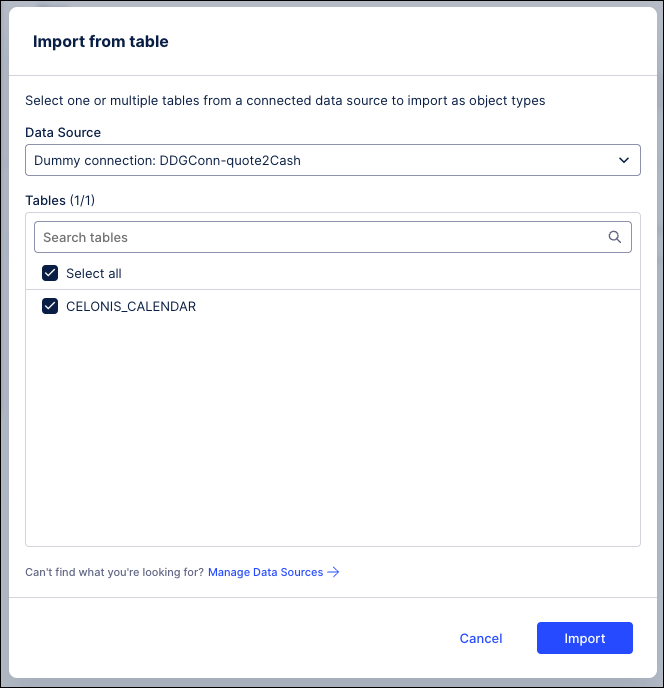
Click Create - Import from table and select your data source.
Select the tables you want to import and then click Import.
Select each table from the list of tables that you've imported and view the object type that have been generated from it.
You have the following optional configurations here:
Select object type ID: Use the dropdown next to the required ID attribute (it can’t be renamed or removed). The selected column can’t be reused as another attribute. If you prefer, set this to None (create later) and generate the ID in your transformation script.
Uncheck / check columns: Choose when columns should and shouldn't be imported.
Add attributes: Click Add attribute to add any further attributes you want in the object type, which you'll be populating with data from outside your selected table.
Rename attributes: Rename existing attributes, with the column name being used by default.
Color: Change the display color that will be used to color-code the object type in the graph view of the object-centric data model. Click Color by the object type name to do this.
Add tags and descriptions: Use existing Celonis process tags or create unique custom tags (up to 41 characters, not case-sensitive) in the Custom processes category. After creation, these tags can be reused for filtering and assigned to other custom object or event types.

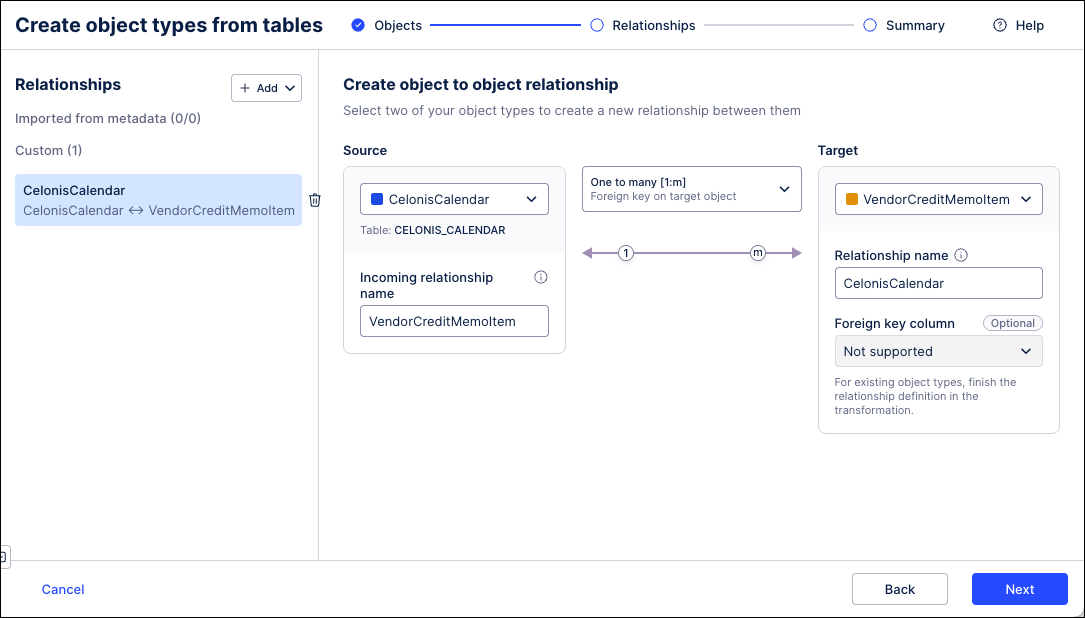
Click Next to move on to the Relationships step.
You have the following options here:
Importing one table: You can't create relationships, so select Back to import more tables, or Skip relationships to move on.
Multiple tables: If you're importing multiple tables but they don't have any existing foreign key relationships, you can create new relationships between them, or select Skip relationships to move on.
Create relationships: Select either Create new or Import.
Click Next, review the object types that you're creating, and then click Create.
In the confirmation dialog, click Check transformations to view and edit the transformation scripts. Select the filter for the Objects column to filter on the object types you just created, and click each transformation script to check it.
Ensure the object IDs are unique. Creating IDs for objects and events explains best practice for creating a unique ID for an object type. You'll probably need to add other items to your selected ID value to guarantee that it's unique. If you didn't select an ID value, assemble your ID now.
Write SQL statements to populate any extra attributes or relationships you added that use data from somewhere other than your original source system table. Creating custom transformations has the instructions to use the transformation editor.
We recommend you check the transformations now, but if you want to do that later, or if you first want to make any edits to your new object types that you couldn't do during the import, click Go to object types to view the list of object types.
To add attributes to an object type:
From your Objects and Events dashboard, click Objects.
Search or browse for the object type. You can add attributes two ways:
Click the object type's context menu (the three vertical dots) and select Add attributes from table.
Click the object type to select it and then select Add from table at the start of the attributes list.
In the Select Table dialog, select the data source containing the table that you want to add attributes from. It must be available through a data connection in the data pool in which you're working with objects and events. If you don't see the data source that you want, click Manage data sources to find your data connection or add a new one.
Select the table that you want to add attributes from and click Import. You'll see the existing attributes of the object type, followed by the attributes that you could add from the table columns.
To map a column from the table to an existing attribute that you have already modeled or imported, go to the Existing attributes list, click the dropdown by the name of the attribute and select the column. The data type for the attribute will be updated to match the data type for the column.
In the New attributes from table list, deselect any columns that you don't want to become attributes of the object type. If you want to see a sample of the data in each column to verify what you're keeping and removing, click Preview source table.
Note
You can't change the data type for an attribute during the import.
Rename any new attributes by entering a name in its Attribute name field. This column name will be used by default, with the naming rules applied.
Click Add attribute to add any further attributes to the object type. Name each attribute and select a data type for each.
Click Save to add the new attributes to the object type.
If you didn't create transformations yet for the object type, a SQL transformation script will be generated automatically that populates the attributes you imported or mapped.
Check the transformation script and add any additional statements needed for the object ID, extra attributes you’ve added, and existing attributes that you didn't map to columns from the table.
You can repeat the process with other source system tables to add more attributes to the object type, though the transformation script will only be generated once.