Notify about new Table Rows
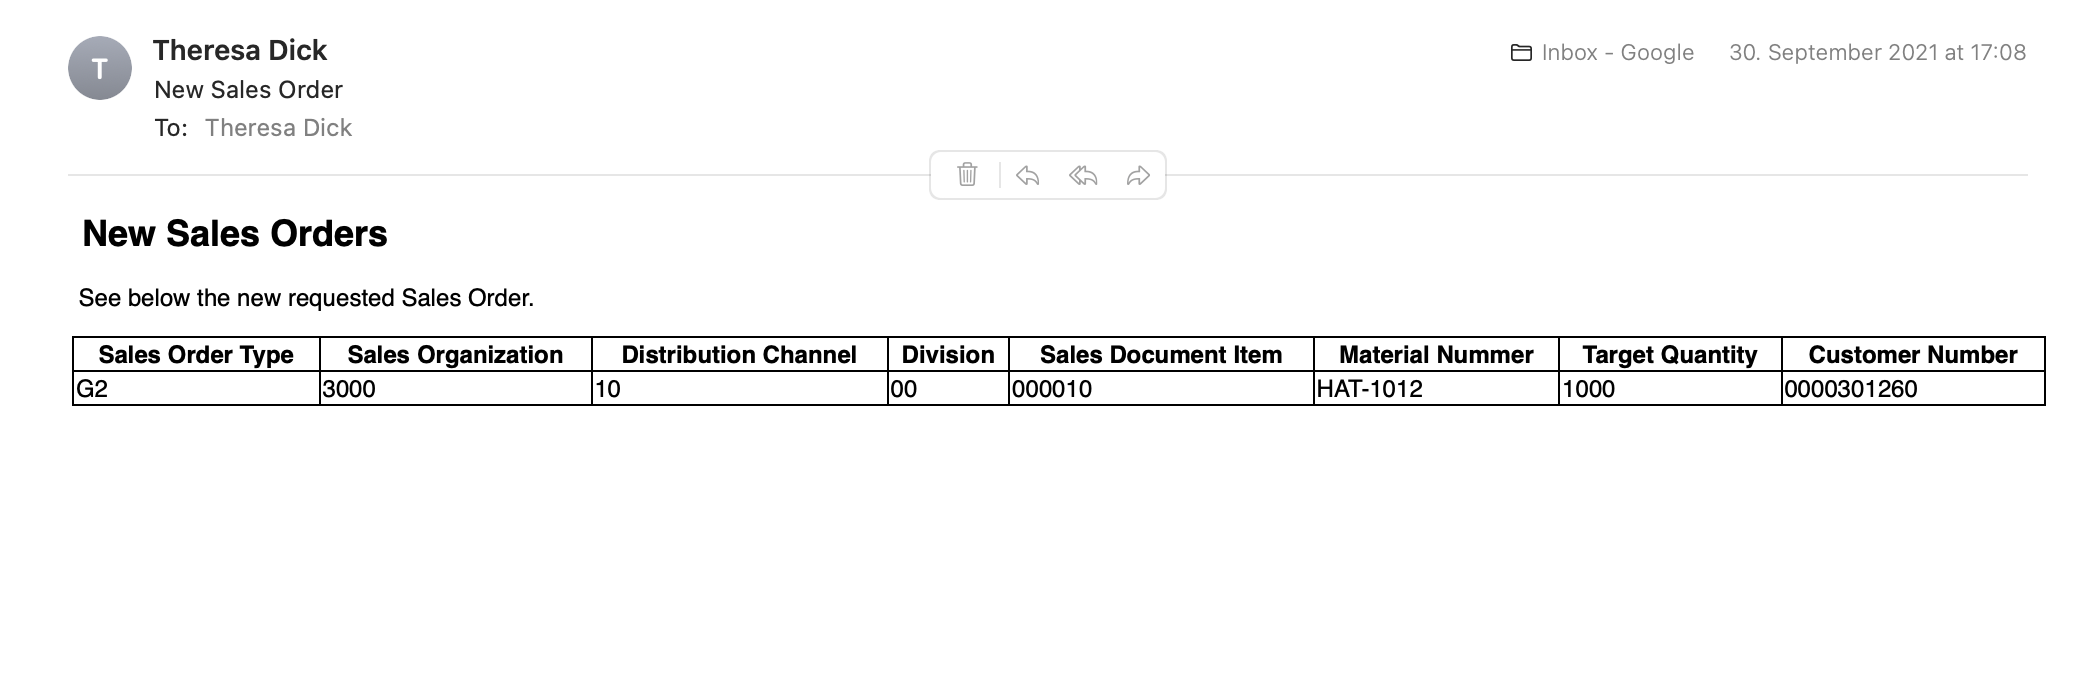
Watching Excel files by hand to inform the right people can be annoying. That's the reason we provide you with that automation solution that watches excel files and notifies the right person automatically. This template makes sure that you don't have to inform people by the hand of new sales orders as we enable you to watch the excel file for new data and inform in case of a new table row which includes a new sales order a person you define via mail. The mail will include all the important data of the new sales order aggregated and visualized as a table to ensure clarity for the recipient. The mail could look like the following:
 |
Follow the step-by-step guide below to implement this solution for your Celonis Action Flows use case.
Sample Action Flow
The image below shows a working Action Flow which:
Watches an excel file for new rows;
Uses the data to build an HTML snippet to be used to build an HTML Table
Sends a mail to a specific recipient including the new data of the excel sheet packed as an HTML table.
 |
Configuring Action Flow
Below you will find the step-by-step guide for configuring each module of the above Action Flow.
1. Watch Sales Orders
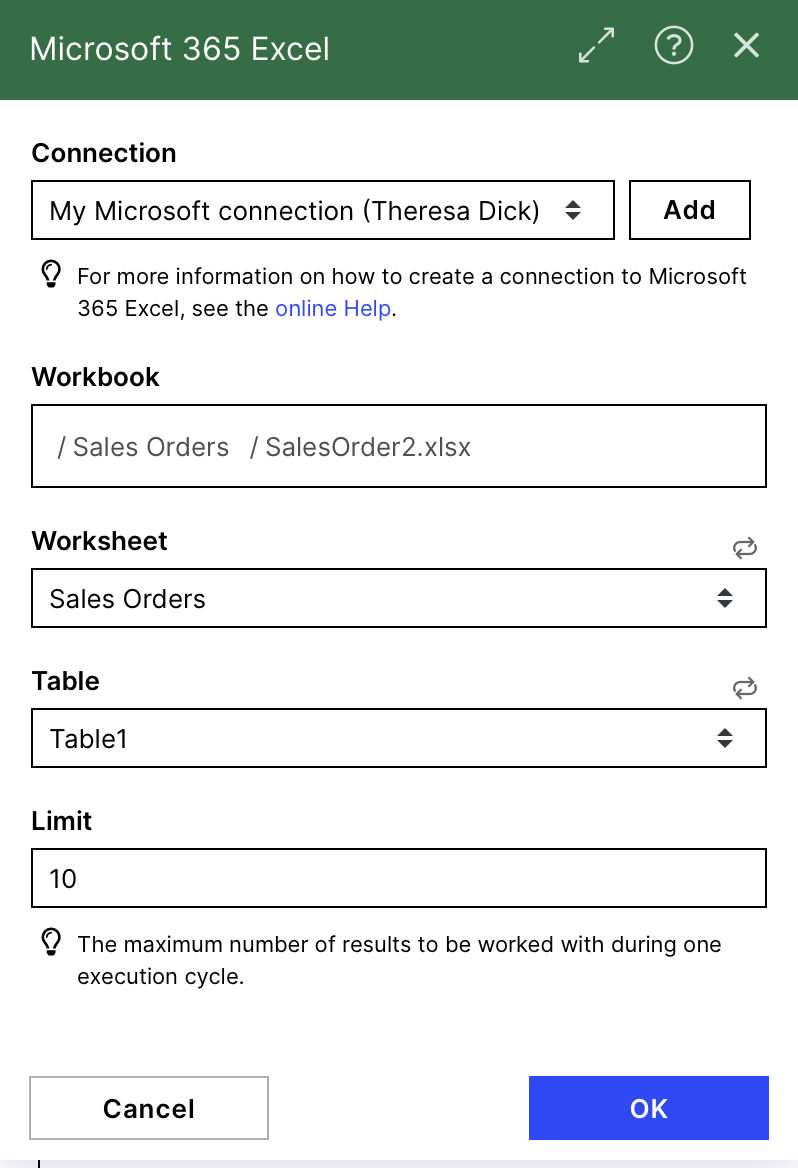
To watch an excel file for new sales orders you have to connect to your Microsoft account. You can choose the desired workbook and worksheet and even the table in that worksheet you want to have a look at. To make sure to always notice all new rows you have to choose a limit that is high enough to get all new rows.
The Table in this example is structured as follows:
 |
Note
To work with the Watch Table Rows module you have to format the table area as a table using the button shown below:
 |
 |
Configuration:
Action Flows Module: Microsoft 365 Excel
Action: Watch Table Rows
 |
2. Build HTML Table
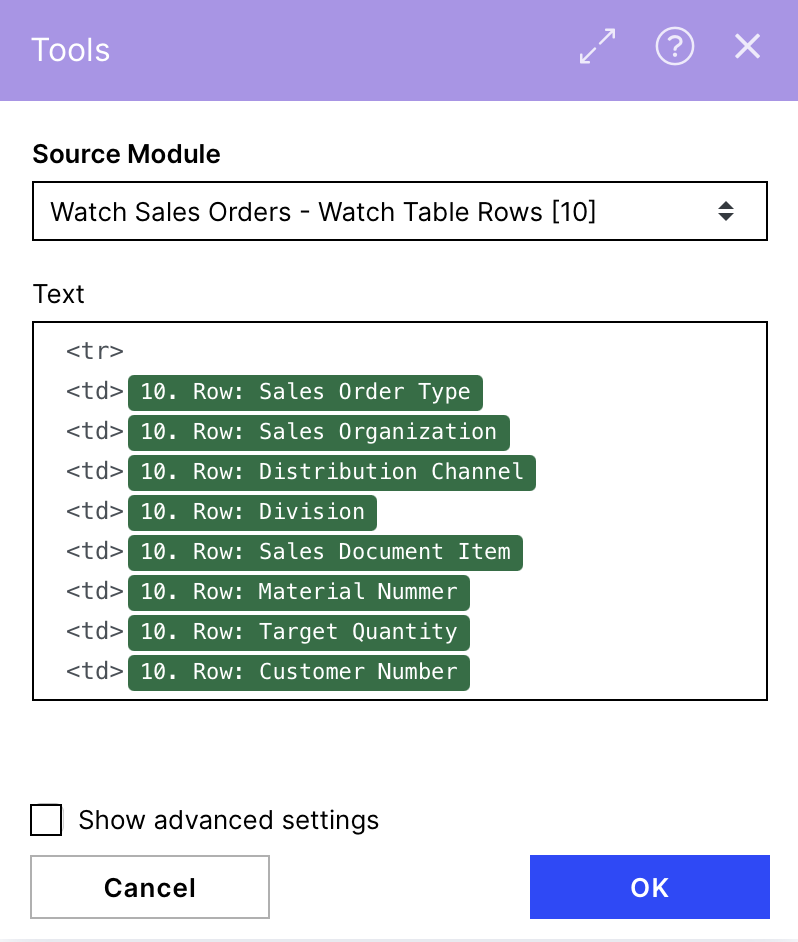
To build up an HTML table you have to define a structure with table rows (<tr>) and table cells (<td>) which will later be included in a table structure to get the right format. Here you would have the chance to format dates.
Add for each column you want to have in your resulting table the structure <td> data of the column</td>
Find the HTML snippet below:
<tr>
<td>{{10.values.`0`}}</td>
<td>{{10.values.`1`}}</td>
<td>{{10.values.`2`}}</td>
<td>{{10.values.`3`}}</td>
<td>{{10.values.`4`}}</td>
<td>{{10.values.`5`}}</td>
<td>{{10.values.`6`}}</td>
<td>{{10.values.`7`}}</td>
</tr> |
Configuration:
Action Flows Module: Tools
Action: Text Aggregator
 |
3. Send Mail with new Sales Order
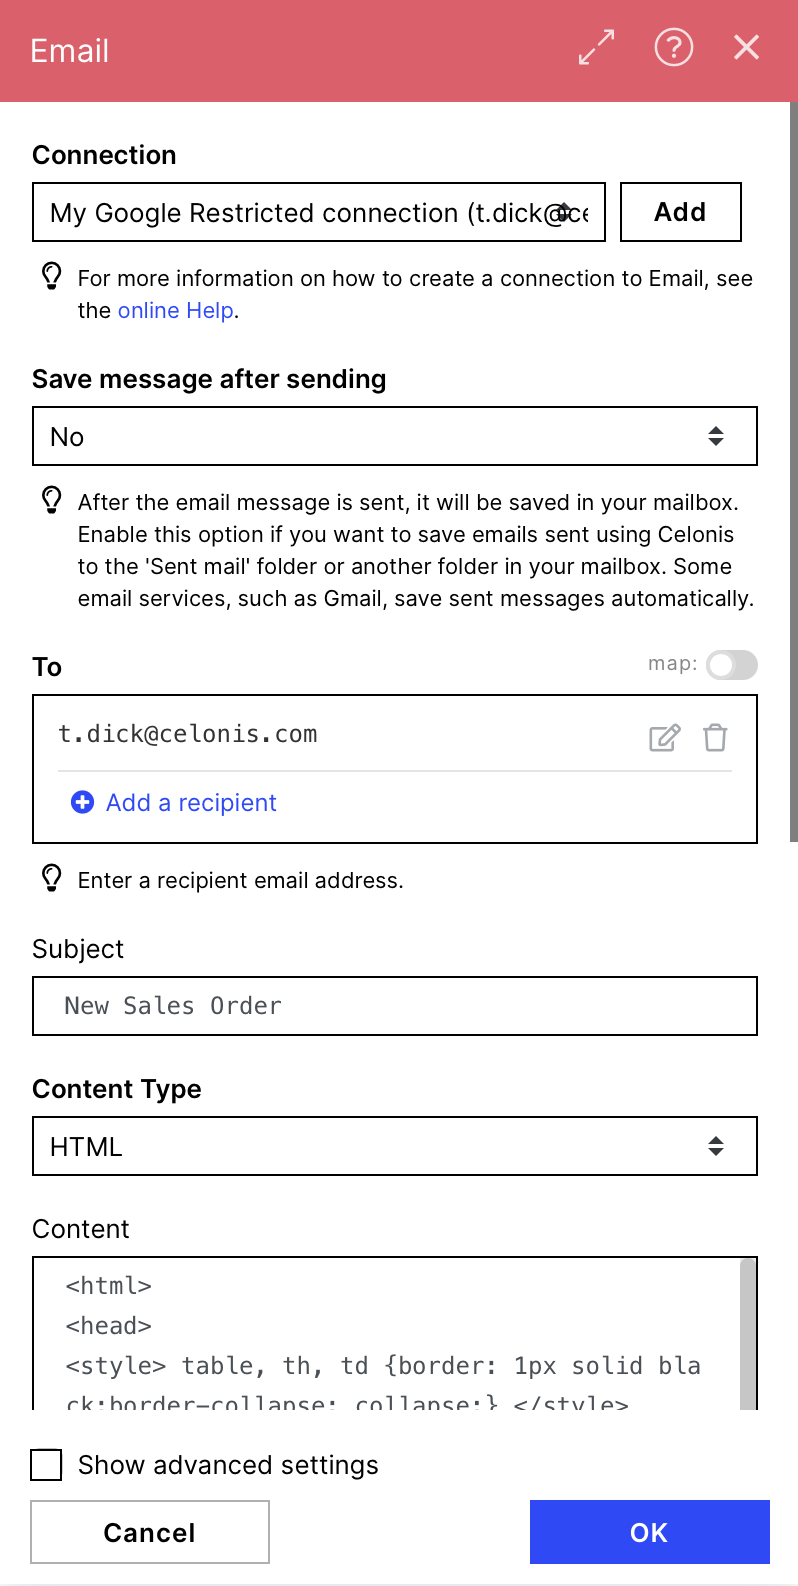
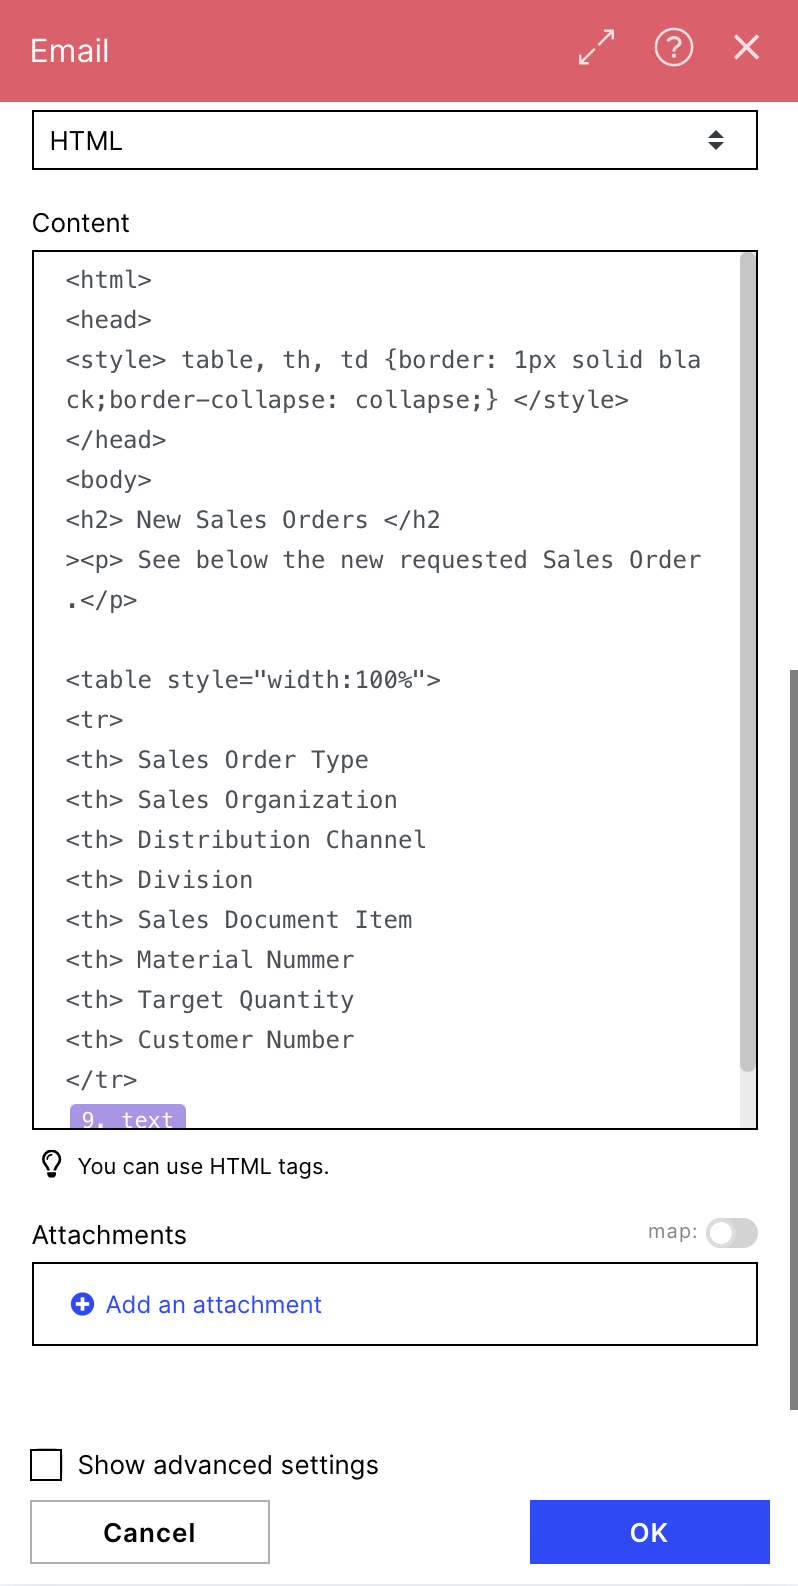
To wrap the constructed html code in a table and send it via mail we use the Send an Email module.
The screenshot on the right show how this module has been configured with our demo data.
To: You can choose a recipient of your choice
Subject: Define the subject of the mail
Content Type: HTML
Content:
<html>

<head>

<style> table, th, td {border: 1px solid black;border-collapse: collapse;} </style>

</head>

<body>

<h2> New Sales Orders </h2>

<p> See below the new requested Sales Order.</p>

<table style="width:100%">

<tr>

<th> Sales Order Type</th>

<th> Sales Organization</th>

<th> Distribution Channel</th>

<th> Division</th>

<th> Sales Document Item</th>

<th> Material Nummer</th>

<th> Target Quantity</th>

<th> Customer Number</th>

</tr>

{{9.text}}

</table>

</body>

</html>
HTML Tables
Find more information on how to send HTML tables in a mail and how to adapt the HTML code to your needs in this template.
 |
Configuration:
Action Flows Module: Email
Action: Send an Email
 |
 |
 |
You can copy the blueprint of the Action Flow defined in this Help Page:
{
"name": "Notify Order Managers about new Sales Order",
"flow": [
{
"id": 10,
"module": "microsoft-excel:watchTableRows",
"version": 2,
"parameters": {
"limit": 10,
"table": "Table1",
"workbook": "/Sales Orders/SalesOrder2.xlsx",
"worksheet": "Sales Orders",
"__IMTCONN__": 2470
},
"mapper": {},
"metadata": {
"designer": {
"x": 0,
"y": 0,
"name": "Watch Sales Orders"
},
"restore": {
"table": {
"label": "Table1"
},
"worksheet": {
"label": "Sales Orders"
},
"__IMTCONN__": {
"label": "My Microsoft connection (Theresa Dick)"
}
},
"parameters": [
{
"name": "__IMTCONN__",
"type": "account",
"label": "Connection",
"required": true
},
{
"name": "workbook",
"type": "file",
"label": "Workbook",
"required": true
},
{
"name": "limit",
"type": "uinteger",
"label": "Limit",
"required": true
},
{
"name": "worksheet",
"type": "select",
"label": "Worksheet",
"required": true
},
{
"name": "table",
"type": "select",
"label": "Table",
"required": true
}
],
"interface": [
{
"name": "@odata.id",
"type": "text",
"label": "@Odata ID"
},
{
"name": "index",
"type": "text",
"label": "Table Row ID"
},
{
"name": "values",
"spec": [
{
"name": "0",
"type": "text",
"label": "Sales Order Type"
},
{
"name": "1",
"type": "text",
"label": "Sales Organization"
},
{
"name": "2",
"type": "text",
"label": "Distribution Channel"
},
{
"name": "3",
"type": "text",
"label": "Division"
},
{
"name": "4",
"type": "text",
"label": "Sales Document Item"
},
{
"name": "5",
"type": "text",
"label": "Material Nummer"
},
{
"name": "6",
"type": "text",
"label": "Target Quantity"
},
{
"name": "7",
"type": "text",
"label": "Customer Number"
}
],
"type": "collection",
"label": "Row"
}
]
}
},
{
"id": 9,
"module": "util:TextAggregator",
"version": 1,
"parameters": {
"feeder": 10,
"rowSeparator": "other",
"otherRowSeparator": ""
},
"mapper": {
"value": "<tr>\n<td>{{10.values.`0`}}\n<td>{{10.values.`1`}}\n<td>{{10.values.`2`}}\n<td>{{10.values.`3`}}\n<td>{{10.values.`4`}}\n<td>{{10.values.`5`}}\n<td>{{10.values.`6`}}\n<td>{{10.values.`7`}}"
},
"metadata": {
"designer": {
"x": 300,
"y": 0,
"name": "Build HTML Table"
},
"restore": {
"feeder": {
"label": "Watch Sales Orders - Watch Table Rows"
},
"rowSeparator": {
"label": "Other"
}
},
"parameters": [
{
"name": "rowSeparator",
"type": "select",
"label": "Row separator",
"validate": {
"enum": [
"\n",
"\t",
"other"
]
}
},
{
"name": "otherRowSeparator",
"type": "text",
"label": "Separator"
}
],
"expect": [
{
"name": "value",
"type": "text",
"label": "Text",
"multiline": true
}
]
}
},
{
"id": 2,
"module": "email:ActionSendEmail",
"version": 7,
"parameters": {
"account": 2421,
"saveAfterSent": false
},
"mapper": {
"to": [],
"subject": "New Sales Order",
"contentType": "html",
"attachments": [],
"cc": [],
"bcc": [],
"from": "",
"sender": "",
"replyTo": "",
"inReplyTo": "",
"references": [],
"priority": "normal",
"headers": [],
"html": "<html>\n<head>\n<style> table, th, td {border: 1px solid black;border-collapse: collapse;} </style>\n</head>\n<body>\n<h2> New Sales Orders </h2\n><p> See below the new requested Sales Order.</p>\n\n<table style=\"width:100%\">\n<tr>\n<th> Sales Order Type\n<th> Sales Organization\n<th> Distribution Channel\n<th> Division\n<th> Sales Document Item\n<th> Material Nummer\n<th> Target Quantity\n<th> Customer Number\n</tr>\n{{9.text}}\n</table>"
},
"metadata": {
"designer": {
"x": 600,
"y": 0,
"name": "Send Mail with new Sales Order"
},
"restore": {
"account": {
"label": "My Google Restricted connection (t.dick@celonis.de)"
},
"saveAfterSent": {
"label": "No"
},
"to": {
"mode": "chose",
"items": []
},
"contentType": {
"label": "HTML"
},
"attachments": {
"mode": "chose",
"items": []
},
"cc": {
"mode": "chose",
"items": []
},
"bcc": {
"mode": "chose",
"items": []
},
"references": {
"mode": "chose",
"items": []
},
"priority": {
"label": "Normal"
},
"headers": {
"items": []
}
},
"parameters": [
{
"name": "account",
"label": "Connection",
"type": "account",
"required": true
},
{
"name": "saveAfterSent",
"label": "Save message after sending",
"type": "select",
"required": true,
"validate": {
"enum": [
true,
false
]
}
}
],
"expect": [
{
"name": "to",
"label": "To",
"type": "array",
"required": true,
"labels": {
"add": "Add a recipient",
"edit": "Edit a recipient"
},
"spec": {
"name": "email",
"type": "email",
"label": "Email address",
"required": true
}
},
{
"name": "subject",
"label": "Subject",
"type": "text"
},
{
"name": "contentType",
"label": "Content Type",
"type": "select",
"required": true,
"validate": {
"enum": [
"html",
"text"
]
}
},
{
"name": "attachments",
"label": "Attachments",
"type": "array",
"spec": [
{
"name": "fileName",
"label": "File name",
"type": "filename",
"required": true,
"semantic": "file:name"
},
{
"name": "data",
"label": "Data",
"type": "buffer",
"required": true,
"semantic": "file:data"
},
{
"name": "cid",
"label": "Content-ID",
"type": "text"
}
],
"labels": {
"add": "Add an attachment",
"edit": "Edit an attachment"
}
},
{
"name": "cc",
"label": "Copy recipient",
"type": "array",
"labels": {
"add": "Add a copy recipient",
"edit": "Edit a copy recipient"
},
"spec": {
"name": "email",
"type": "email",
"label": "Email address"
}
},
{
"name": "bcc",
"label": "Blind copy recipient",
"type": "array",
"labels": {
"add": "Add a blind copy recipient",
"edit": "Edit a blind copy recipient"
},
"spec": {
"name": "email",
"type": "email",
"label": "Email address"
}
},
{
"name": "from",
"label": "From",
"type": "text"
},
{
"name": "sender",
"label": "Sender",
"type": "text"
},
{
"name": "replyTo",
"label": "Reply-To",
"type": "text"
},
{
"name": "inReplyTo",
"label": "In-Reply-To",
"type": "text"
},
{
"name": "references",
"label": "References",
"type": "array",
"spec": {
"type": "text",
"label": "Reference",
"required": true
}
},
{
"name": "priority",
"label": "Priority",
"type": "select",
"validate": {
"enum": [
"high",
"normal",
"low"
]
}
},
{
"name": "headers",
"label": "Headers",
"type": "array",
"spec": [
{
"name": "key",
"label": "Key",
"type": "text",
"required": true
},
{
"name": "value",
"label": "Value",
"type": "text",
"required": true
}
]
},
{
"name": "html",
"label": "Content",
"type": "text"
}
]
}
}
],
"metadata": {
"instant": false,
"version": 1,
"scenario": {
"roundtrips": 1,
"maxErrors": 3,
"autoCommit": true,
"autoCommitTriggerLast": true,
"sequential": false,
"confidential": false,
"dataloss": false,
"dlq": false
},
"designer": {
"orphans": []
},
"zone": "integromat.try.k8s.celonis.cloud"
}
}This blueprint can be imported into your Celonis Platform Team so that you can quickly make the required changes without needing to build the Action Flow from scratch.
Potential Alternatives
You could replace the Email module with a message module of your choice e.g. Microsoft Teams
 |
More information on how to configure the Action Flow with Microsoft Teams instead of Email (connection between Text Aggregator and MS Teams) can be found here.
Downloading Action Flow blueprints
To download blueprints for Action Flows, go to Marketplace. In the Marketplace page for your Action Flow, click the Download button to get the blueprint.
Blueprints can be imported into your Celonis Platform Team so that you can quickly make the required changes without needing to build the Action Flow from scratch.
Possible Use Cases
Notify Order Managers about new Sales Orders
Notify employee about PO/invoice mismatch
Notify clerk about invoice with cash discount approaching
Notify when duplicate invoice detected